This article was co-authored by wikiHow Staff. Our trained team of editors and researchers validate articles for accuracy and comprehensiveness. wikiHow's Content Management Team carefully monitors the work from our editorial staff to ensure that each article is backed by trusted research and meets our high quality standards.
The wikiHow Video Team also followed the article's instructions and verified that they work.
This article has been viewed 68,239 times.
Learn more...
Racerback tank tops are a popular garment to work out in. The armholes are cut wider in the back than in the front, which means that sweat won't accumulate on your shoulders as much. While you can always buy one from the store, making one is much cheaper. Not only will give you an old t-shirt a new lease on life, but you can create a design that you like!
Steps
Cutting the Shirt
-
1Find a t-shirt that is 1 to 2 sizes larger than what you normally wear. The t-shirt can be blank or it can have a design in the front. Do not use a fitted shirt or the racerback will turn out too small.
- The t-shirt needs to be at least the length you want the racerback to be. Remember, you can always cut it shorter, but you can't make it longer!
-
2Cut the sleeves off to make the t-shirt a tank top. Begin cutting 1 to 2 inches (2.5 to 5.1 cm) below the armpit and finish cutting just inside the top shoulder seam. Do the left sleeve first, then fold the shirt in half lengthwise, and use the cut edge as a guide for the right sleeve.[1]
- You can cut the sleeves even lower if you want to. Keep in mind that you'll want to wear a tank top or a bandeau underneath your new racerback to avoid any peek-a-bras!
Advertisement -
3Flip the shirt over and cut the back of the arm holes wider. Turn the shirt over so that the back is facing you. Begin cutting at the back of the shirt at the armpit of your first sleeve. Scoop down 1⁄2 to 1 inch (1.3 to 2.5 cm), then cut in towards the center by about 2 inches (5.1 cm). Finish cutting at the top of the original cut edge.[2]
- Make sure that you are only cutting through the back of the shirt, not the front.
- Trace the piece that you cut out onto the other armhole, then cut along the line that you traced.
- Don't cut the armholes too close together in the back, or you won't have enough fabric to braid with.
-
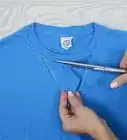
4Cut the collar off at the stitching. Flip the shirt over so that you can see the front again. Cut the entire collar off at the stitching. Start at the left shoulder and work your way around the front of the shirt towards the right. Work your way around the back of the shirt and finish at the left shoulder again.[3]
- For a more feminine touch, cut the front of the collar about 1 to 2 inches (2.5 to 5.1 cm) below the stitching to make it larger.
-
5Cut across the back of the shirt, just below the collar. Flip the shirt over so that you can see the back. Cut straight across the back of the shirt, 1 to 2 inches (2.5 to 5.1 cm) below the collar. Start at the left armhole and finish at the right armhole. This will separate the top of the shirt from the bottom.[4]
- Don't worry, you will reassemble the shirt after you braid it.
- Make sure that you are only cutting through the back of the shirt and not the front.
-
6Cut the corners off of the back collar, if desired. The bottom edges of your collar will have corners from when you cut across the back of the shirt. If you want to, cut these corners off to make back part more rounded and blend in with the rest of the collar.
-
7Cut the bottom hem off of your shirt, if desired. You don't have to do this, but it will complete the raw edged look. Simply cut along the bottom hem of the shirt, right at the stitching. Start at 1 seam and work your way around the bottom of the shirt until you are back to where you started.

Creating the Braid
-
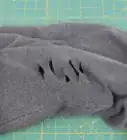
1Cut 2 vertical slits down the back of the shirt to make your strands. By now, you should have a rectangular strip of fabric in the back of your shirt. You need to turn this rectangle into 3 equal-sized strands in order to make your braid. Cut 2 slits into the rectangle, starting at the top, and finishing at about armpit level.[5]
- Make the 2 slits an equal distance from each other and the side edges of the rectangular strip. This way, all 3 strands will be the same thickness.
- If you want to make a 4-strand braid, cut 3 slits. If you want to make a 5-strand braid, then cut 4 slits.
-
2Pull the strands to make them longer and skinnier. Gently pull on each of the 3 strands. This will cause the cut edges of the fabric to curl inward and make them easier to braid. It will also make the strands longer, which is a good thing. Braids end up shorter than the strands used to create them. If you don't stretch the strands out, the braid will end up too short.
- If you want to, pull on the cut edges of your collar and sleeves to complete the look. If you cut the hem off, you should pull on it too.
-
3Braid the strands by crossing the outer ones over the middle one. Cross the left strand over the middle strand, then cross the right strand over the new middle strand. Repeat these steps until you have about 1⁄2 inch (1.3 cm) of fabric left.
- Turn the shirt so that the collar is facing you. If will be easier to braid the strands if they are pointing down rather than up.
- If you made a 4-strand or 5-strand braid, then you'll need to braid them accordingly.
-
4Sew the end of your braid to keep it together. You can do this by hand or on a sewing machine. You don't need any fancy stitching; a simple straight stitch or running stitch will do.
- The color of the thread does not matter here. You'll be covering it up later.
- If you don't know how to sew, glue the strands together with fabric glue. Let the glue dry before moving on, about 10 to 15 minutes.
Finishing the Shirt
-
1Fold the back collar in half to find the center. Set your braid aside, then fold the back collar in half. Make sure that the cut edges align, then mark the middle with a pen or a sewing pin.
-
2Pin the top of the braid to the center of the collar and try the shirt on. Unfold the collar first, place the top of the braid behind the collar so that it touches the inside of the shirt. Make sure that the top of the braid is aligned with the top of the collar, then secure it with a sewing pin. Try the shirt on to ensure you are happy with the fit.
- If the braid is too long, take the pin out, and move the collar further down the braid.
- If the braid is too short, you can't make it longer. Instead, pull on the collar to stretch it.
-
3Sew the braid to the center of the collar. You can do this by hand or on a sewing machine. Again, the stitches don't matter here. A few simple straight or running stitches will do. Remove the pin once you are done sewing. You'll get something like a T shape.
- If you don't know how to sew, use a few drops of fabric glue. Let the glue dry before moving on, another 10 to 15 minutes.
- The color of the thread does not matter since it will be covered up.
-
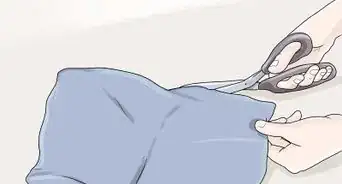
4Cut a strip of fabric from 1 of the sleeves. Take 1 of the sleeves you cut off earlier, then cut along the seam to create a long rectangle. Cut a 1 1⁄2 by 4 in (3.8 by 10.2 cm) rectangle from the sleeve. If you want to, gently tug on the rectangle to make it longer and help the edges curl in.
- If the sleeve is not big enough for this, use 1 of the other scraps of fabric you cut from your t-shirt.
-
5Wrap the rectangle around the top of the braid to conceal the stitching. Place the narrow end of the rectangle against the top of your braid. Wrap it around the top of the braid a few times, making sure to overlap onto the back collar. This will cause the back collar to angle towards the braid and create a Y-shape.
- For a more durable finish, sew or glue the narrow end of the rectangle to the top of the braid before you begin wrapping it.
-
6Cut the excess strip off and sew it down. Finish wrapping the rectangle strip behind the shirt, then cut the rest off. Hand sew the end down making sure that you don't push the needle through the front of the braid, otherwise the stitching will show. A basic running stitch will work the best, but you can use a whipstitch too.
- If you can't sew, you can glue the end down instead with fabric glue.
- Try to use a thread color that matches the shirt fabric for this step.
Things You'll Need
- T-shirt
- Fabric scissors
- Sewing pin
- Needle and thread (or fabric glue)
References
- ↑ https://www.youtube.com/watch?v=mck41lv3jII&feature=youtu.be&t=20s
- ↑ https://www.youtube.com/watch?v=mck41lv3jII&feature=youtu.be&t=50s
- ↑ https://www.youtube.com/watch?v=mck41lv3jII&feature=youtu.be&t=1m20s
- ↑ https://www.youtube.com/watch?v=mck41lv3jII&feature=youtu.be&t=1m50s
- ↑ https://www.youtube.com/watch?v=mck41lv3jII&feature=youtu.be&t=2m25s
About This Article