X
This article was co-authored by wikiHow Staff. Our trained team of editors and researchers validate articles for accuracy and comprehensiveness. wikiHow's Content Management Team carefully monitors the work from our editorial staff to ensure that each article is backed by trusted research and meets our high quality standards.
This article has been viewed 111,682 times.
Learn more...
Whipple cream is a type of clay that you use to make toy and decorative baked goods. Whipple cream is meant to resemble whipped cream and is not edible. All you need to make whipple cream is some art clay, glue, and supplies like a spray bottle and ruler.
Steps
Part 1
Part 1 of 3:
Preparing the Clay
-
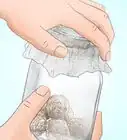
1Break your clay into small pieces and place them in the bag. In order to get your clay to a mixable consistency, you should break it into small pieces. Take out a large chunk of art clay and break it apart. Place the pieces in your plastic bag.[1]
- There is no set amount of art clay to use. Take out as much as you need for your whipple cream. More art clay will make more cream.
- If your clay is very thick or dry, it can help to work your clay with your fingers to soften it before breaking it into pieces.[2]
-
2Add water in small amounts until you reach the right consistency. Put some tap water in your spritzer bottle. Spray in a small amount to start. For example, spritz the water 10 times. Then, seal your bag, leaving a small amount of air in the bag, and work the clay with your fingers through the bag. Keep adding small amounts of water at a time until you reach the right consistency.[3]
- The consistency should be similar to marshmallow fluff. If you've never had marshmallow fluff, this feels like slightly hardened whipped cream.
Advertisement -
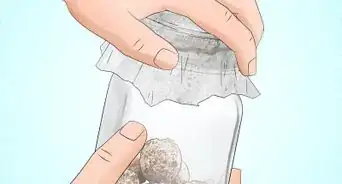
3Push the clay to one side of the bag. Seal the bag and use your fingers to push the clay through the bag. You want all your clay concentrated in one side of the bag. Once the clay is in one side of the bag, cut a hole in the corner where the clay sits.[4]


Advertisement
Part 2
Part 2 of 3:
Mixing in the Other Ingredients
-
1Add glue to soften the whipple cream. Open the bag again and pour in some school glue. As with the water, add a small amount at first and then more as necessary. You do not want the whipple cream to be too runny, but the glue should loosen it slightly. Add enough glue that the whipple cream is easily squeezed out of the bag.[5]
- Pinch the open side of the bag closed while you do this to keep glue from running out of the bag.
-
2Add food coloring if you want a specific color. You can add a small bit of food coloring the the whipple cream. Then, work the cream together using your fingers until the color is dispersed throughout. If you want a darker color after adding your initial coloring, add a bit more food coloring.[6]
- Like the other ingredients, there is no set amount to add. You can add a small amount at first and add more if the color is too light.
-
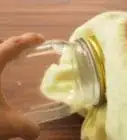
3Place the bag in a pastry bag. Insert the nozzle into the pastry bag by putting it in the bag and pushing it through the opening in the corner. Then, put your plastic bag with the whipple cream in the pastry bag. Push the corner of the plastic bag with the opening into the nozzle in the pastry bag.[7]


Advertisement
Part 3
Part 3 of 3:
Avoiding Common Mistakes
-
1Do not substitute different types of glue. Things like superglue, industrial glue, or rubber cement should not be used to make whipple cream. You should only use school glue, such as Elmer's glue, as this has the right consistency for whipple cream.[8]
-
2Store the whipple cream carefully. Remove the whipple cream from the pastry bag when you're done using it. Twist the end of the plastic bag, removing most of the air, and use a rubber band to secure it in place. You can store your whipple cream in a cabinet until you want to use it again.[9]
- If your whipple cream dries out between uses, add more water. It should last awhile as long as you keep adding water, but will dry out in a few months. How long whipple cream lasts depends on how often you use it and the temperature of your home.
-
3Make sure children know not to eat the cream. If you're using whipple cream for crafts with young children, make sure to make it clear the cream is not to be eaten. Children may mistake whipple cream for food, but it does not contain edible ingredients. Tell children something like, "I know the whipple cream looks like food, but it's bad for you to eat. Just use it for decoration."


Advertisement
Community Q&A
-
QuestionDoes this work using a piping nozzle? Will it hold its shape when piped using a star nozzle?
 Community AnswerIf you add enough of the talcum powder, it should hold its shape. Just test the consistency when you combined both the powder and glue.
 -
QuestionHow long does it take for it to dry?
 Community AnswerIt depends on how much glue you used. Try setting your creations aside for an hour and then checking.
 -
QuestionIf I bake the icing with my polymer clay in the oven will it still have the glossy finished look?
 Community AnswerDo not bake whipple cream. Apply it after baking your clay creations.
Advertisement
Warnings
- Be careful when mixing in the food coloring. Try wearing gloves because it can sometimes stain your hands and it will take quite long to really get the stain off.⧼thumbs_response⧽
Advertisement
Things You'll Need
- Art clay
- Spray bottle
- Plastic bag
- School glue
- Ruler
- Pastry bag
References
- ↑ https://www.youtube.com/watch?v=FJLPoiyQp0o
- ↑ https://www.youtube.com/watch?v=3njcgb8mMR4
- ↑ https://www.youtube.com/watch?v=FJLPoiyQp0o
- ↑ https://www.youtube.com/watch?v=FJLPoiyQp0o
- ↑ https://www.youtube.com/watch?v=T2IggN4Aa9w
- ↑ https://www.youtube.com/watch?v=3njcgb8mMR4
- ↑ https://www.youtube.com/watch?v=FJLPoiyQp0o
- ↑ https://www.youtube.com/watch?v=FJLPoiyQp0o
- ↑ https://www.youtube.com/watch?v=FJLPoiyQp0o
About This Article

wikiHow Staff
wikiHow Staff Writer
This article was co-authored by wikiHow Staff. Our trained team of editors and researchers validate articles for accuracy and comprehensiveness. wikiHow's Content Management Team carefully monitors the work from our editorial staff to ensure that each article is backed by trusted research and meets our high quality standards. This article has been viewed 111,682 times.
Co-authors: 17
Updated: October 23, 2019
Views: 111,682
Categories: Food and Entertaining
Advertisement