This article was co-authored by wikiHow Staff. Our trained team of editors and researchers validate articles for accuracy and comprehensiveness. wikiHow's Content Management Team carefully monitors the work from our editorial staff to ensure that each article is backed by trusted research and meets our high quality standards.
This article has been viewed 26,036 times.
Learn more...
Wine is most commonly made from grapes, but it can also be produced from other fruit, like tomatoes! Tomato wine is described as slightly fruity and zesty with some sweetness. Making this type of wine is a long process, but it can be accomplished with care and effort. To make tomato wine, mix the ingredients, ferment the mixture, and then bottle the wine so that you can enjoy it after approximately 100 days.
Ingredients
- 4 to 5 pounds (1.8 to 2.3 kg) of red tomatoes
- 3 pounds (1.3 kg) of dextrose
- 2 tablespoons (29.5 mL) of acid blend
- 1/2 tablespoon (7.4 g) of diammonium phosphate
- 3 campden tablets
- 1 tablespoon (14.18 g) of yeast nutrient
- Half package of K1-V1116 yeast
Makes 5 standard 25-ounce (750 mL) bottles
Steps
Mixing the Ingredients
-
1Clean and sanitize equipment. It is important for all equipment used during the winemaking process to be clean and free of bacteria. Take out your primary fermenter and spoon (or masher) you will be using. Fill the fermenter will a gallon (3.78 L) of water. Drop a campden tablet into the water to sanitize it. Place the spoon into the water so that it can be sanitized as well. Allow it to sit for a few minutes. Then pour out the water, and allow the equipment to air dry.
- An 8.5-gallon (32 L) fermenter will be large enough for this process.
-
2Wash and mash up the tomatoes. While the equipment is being sanitized, clean and mash up your tomatoes. First, check your tomatoes for signs of bruising or rot. Then, clean them thoroughly. Use a spoon or masher to mash the tomatoes up a little bit but not all the way.
- You can experiment with any type of red tomato you’d like. Sweeter varieties, Sungold and Super 100, are ideal for this recipe.
Advertisement -
3Combine the ingredients except for yeast. Pour all of the ingredients into the primary fermenter (including 2 campden tablets), except for the yeast. Add one gallon (3.87 L) of water on top of the ingredients. Stir it all together with the spoon.
-
4Let it sit for 24 hours. Close the lid on the primary fermenter once you’ve stirred the ingredients. Allow it to sit for 24 hours. Do not touch it during this time.
- This allows the campden tablets to dissolve and kill existing yeast. It also allows the tomatoes to begin to break down.


Fermenting the Wine
-
1Add the yeast. After 24 hours, pour half of a package of yeast into the primary fermenter. You do not have to mix it in. Put the lid back on the fermenter, and make sure it has an airlock.
- You will begin to see bubbles forming after about 12 hours.
-
2Place the fermenter in a cool, dry location. The fermenter should not be exposed to too much heat, light, or humidity. A basement or storage closet would be a good place to store the jugs. Have someone help you move the fermenter if it is too heavy to move on your own.
-
3Use a sanitized spoon to stir the contents after 12 hours. Stir the ingredients 12 hours after you’ve added the yeast. Then, put the lid and airlock back onto the primary fermenter. Do not touch it for another 12 hours. After the 24 hours, you will be ready to push down the fruit that has risen to the top.
-
4Push down the fruit several times each day. Fruit floats to the top during the fermentation process. This is a problem because massive air bubbles could form underneath the fruit if it is not pushed down. Use a sanitized spoon to push down the fruit a few times a day. This is called “punching the cap.” Make the lid is put on tightly when you are done.
-
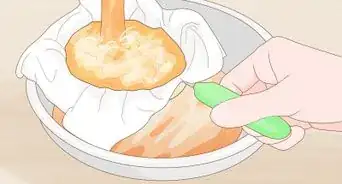
5Strain the solids after 5 to 7 days. There will be less bubbles and less fruit floating to the top after 5 to 7 days. At this point, it’s time to strain the contents. To strain, put a piece of damp muslin or cheesecloth over a funnel. Position the funnel over a glass half gallon (1.9 L) jar. You will need two other gallon jars (3.78 L) as well to funnel all of the liquid from the primary fermenter.
- Make sure the funnel and jars are sanitized before use.
-
6Funnel the wine into a jug. Pour the contents in the fermenter into the muslin cloth. The liquid should drain into the glass jar. Funnel the liquid in until the first jar is filled. Then, move the funnel to the second jar. Fill that jar and move to the third jar until it is full.
-
7Add a campden tablet to each jar. Add water to the jugs if they are not filled with wine. Then, put a campden tablet into each jug of wine. Place the jugs in a cool and dark place.
- Adding some vodka to the airlocks is a good idea because it prevents mold from growing inside of the jugs.
-
8Add an airlock to each jug. Airlocks are important to make sure the fermentation process is healthy and vigorous. Airlocks are fairly inexpensive and can be bought online or at a homebrew store. To use, fill half of the airlock with water. Then, gently press the airlock into a cork. After that, force the cork into the neck of the jug and you’re done.[1]
-
9Wait for 95 days. Your wine should begin to clear up after 4 or 5 days. After 95 days, your wine should be clear and not murky at all. Your wine is ready for bottling once it is clear.


Bottling the Wine
-
1Take out 5 empty wine bottles. This recipe produces enough wine to fill 5 25-ounce (750 mL) wine bottles. Clean and sterilize 5 empty win bottles. Allow them to dry before filling them with wine.[2]
-
2Rack the wine into each bottle. To rack the wine, you will need a siphon and carboy. One end of the siphon tube should be in the carboy, and the other end of the tube should be in the wine bottle. Elevate the carboy so that it is above the wine bottle and can drain properly. Have the next bottle close by so you can attach the siphon tube when the previous bottle fills. Fill all five bottles of wine.[3]
- Make sure your equipment is sterilized before use.
-
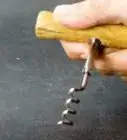
3Prepare the corks. You can use real or synthetic corks. Fill a pot with water and bring it to a boil. Turn the burner off when the water begins to boil. Put the 5 corks into the water, and put a lid on the pot. Allow the corks to sit in the water for 5 minutes. Then, remove the corks and allow them to drain for a few minutes.[4]
-
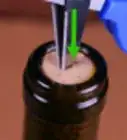
4Cork the bottles. Use a corker to put the corks into the wine bottles. A corker can be bought or rented at most homebrew stores. To use, place the filled wine bottle into the corker. Put the cork into the bottle opening, and pull the lever (or levers if you’re using a double levered corker) to slide the cork into the bottle. Repeat with each bottle.[5]
-
5Age the wine for a few months before drinking. Store the wine in a cool, dark place for two to three months. After that, enjoy your finished wine! It’s an option to drink the wine soon after bottling, but the taste won’t be as flavorful as it could be if you wait for it to age.[6]
- You can also let the wine sit for years after making it if you want.


Warnings
- While fermenting, the wine should not smell like acetone, burning rubber, or any other strange smells.⧼thumbs_response⧽
- All equipment should be sterilized before use.⧼thumbs_response⧽
- Make sure to use fresh, cleaned tomatoes for this recipe.⧼thumbs_response⧽
Things You’ll Need
- Primary fermenter
- Knife
- Soap
- Spoon
- Strainer
- Muslin or cheesecloth
- Funnel
- Cork
- Corker
- Wine bottles


References
- ↑ http://winemakersacademy.com/neglected-piece-winemaking-equipment/
- ↑ http://www.homegrown.org/forum/topics/green-tomato-wine-101
- ↑ http://www.homegrown.org/forum/topics/green-tomato-wine-101
- ↑ http://blog.eckraus.com/preparing-your-corks-when-bottling-homemade-wine
- ↑ http://www.homegrown.org/forum/topics/green-tomato-wine-101
- ↑ http://www.homegrown.org/forum/topics/green-tomato-wine-101
About This Article