This article was co-authored by wikiHow Staff. Our trained team of editors and researchers validate articles for accuracy and comprehensiveness. wikiHow's Content Management Team carefully monitors the work from our editorial staff to ensure that each article is backed by trusted research and meets our high quality standards.
The wikiHow Video Team also followed the article's instructions and verified that they work.
This article has been viewed 161,870 times.
Learn more...
Ripped jeans are great for a rough and trendy look, but they might be expensive or hard to find in the style you love. Instead, transform your old jeans into a pair of cool-looking ripped jeans by applying a few techniques. You can create your own ripped jeans style by choosing where you want your rips to be, fraying and cutting holes with scissors and sandpaper, and patching or bleaching your jeans for an authentic look!
Steps
Gathering Materials and Preparing
-
1Research different ripped jeans styles. Look online and in fashion magazines for distressed jeans. Find out what kind of a ripped jeans style you want to create.
- Pay attention to how many rips jeans have and where those are. Two or three tears are usually sufficient and not overdone, but you should pick what looks most appealing to you.
- See what denim color you like the best on ripped jeans. Check for patches and bleached spots as well.
-
2Pick 100% cotton jeans. For best results, try to use jeans made entirely or mostly from cotton, since polyester or stretch denim is not suitable for fraying. Check the clothing label for this information.[1]Advertisement
-
3Wash your jeans a couple of times for an aged look. Ripped jeans often look better when combined with an aged appearance. If your jeans are new, definitely give them a few washes to rough up the fibers before starting the ripping process.[2]
-
4Get tweezers and a small pair of sharp scissors. Having small but very sharp scissors, like nail scissors or sewing scissors, is crucial for precision. In addition, grab a pair of tweezers for pulling the denim threads easily.[3]
- If you cannot find scissors, a shaving razor or snap-blade knife can work as well.
-
5Buy sandpaper to make distressing easier. You can find sandpaper at many retail stores, such as CVS, Walmart, or Home Depot. Although you can make ripped jeans without this, the coarseness of the sandpaper will make it easier to distress the denim and pull out the threads.[4]
- Go for a 30- or 60-grit sandpaper.
- If you don’t have sandpaper, try to find a cheese grater, steel wool, pumice stone, or foot file for a similar effect.[5]
-
6Wear the jeans and mark where you want the rips to be. This will make it easier to identify how the jeans fit and where exactly your knees correspond to. Stand in front of a mirror, and use a chalk or pen to mark each spot you want distressed. Take off the jeans, and go over your marks if they aren’t clear.[6]
- It might be a few lines on the left knee and on mid-right thigh, or two single lines on both knees. It’s up to you how you want to design your ripped jeans, but it’s ideal to avoid too much symmetry as the rips should look like they happened naturally.[7]
- Make sure you try sitting and squatting while wearing the jeans, so you can see how the fabric rip spots move. If you want a rip exactly on your knee cap, that will be a different spot depending on whether you’re sitting or standing.


Ripping Your Jeans the Right Way
-
1Lay out the jeans flat on a piece of cardboard. Before you start cutting, make sure you have a flat surface. This will ensure further precision.[8]
-
2Scrape down the marked spots with the edge of the scissors. Open the scissors and use the sharp edge to slowly scrape on the surface where you want the rips to form. Keep doing this horizontally until you see white threads.[9]
- Take care not to cut yourself, and do not rush this step.
-
3Fray the white threads with a tweezer. Start pulling out the white threads here and there, making sure it doesn’t seem too regular, since you’re going for a rough look.[10]
-
4Use scissors to cut holes (optional). You can choose to go for a frayed style without cutting, but if you want holes, use the scissors to cut through the lines you marked. Be very careful not to cut the back of the jeans while you’re doing this, and go slowly.[11]
- If you’re making knee rips, don’t cut them too close to the seam as that might change the fit of the jeans and look awkward. Keeping 1/2 inch (1.27 cm) of distance between the end of the cut and the seam is ideal.
-
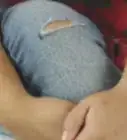
5Rub the sandpaper over the cuts. Once you did some fraying and formed a hole, you can now use a sandpaper to make the rips rougher.
-
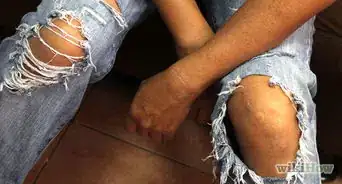
6Fray the edges of the holes with your fingers. For further fraying, use your fingers to pull out the threads around the holes. Make sure you stop when the hole is big enough, depending on your preference.
Adding Style to Your Ripped Jeans
-
1Distress the remainder of your jeans for a rougher look. Tear the corner of a pocket. Rub sandpaper or a grater over random areas, such as over one ankle, pockets, or down the thigh.[12]
-
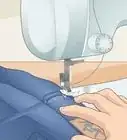
2Add fabric patches to cover your skin or add a personal touch. If you want to wear ripped jeans without showing too much flesh, you can sew denim patches behind the holes. This can also be a way to add something personal, like a fabric with a logo or image peaking through your rips.[13]
-
3Bleach your jeans. If you want to add color variation to your ripped jeans, you can bleach them at home. Tie your jeans with rubber bands on the spots that you want bleached (just like you would do for tie-dying). Put your jeans in a bathtub, and wear rubber gloves. Use a spray bleach bottle directly on the jeans, and rinse after a few minutes.
- You can tie your jeans on one ankle and one thigh, or have the entire jeans balled up, depending on your preference.
- For smaller bleach spots, put bleach an old toothbrush and rub on your jeans to create bleach spots.
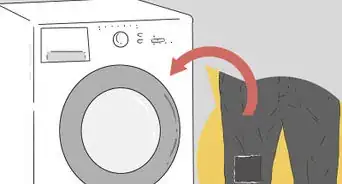
- For an easier but more risky technique, wash your jeans (alone) in the washer, adding a little bit of bleach in addition to detergent.[14]
Community Q&A
-
QuestionWhat can I use instead of bleach?
 Community AnswerYou can try using hydrogen peroxide or a whitening product. Try adding it with detergent next time you wash your jeans (with no other clothes). You can also try laying them in the sun as the sun will naturally impact the color.
 -
QuestionWhat if I make a mistake?
 Community AnswerMake shorts out of the jeans or sew them back together. You could also add some embroidery or a few studs over the mistake.
 -
QuestionHow many holes/scratches/scrapes should I make? (I want a medium to slightly distressed look.)Community Answer2 or 3 rips would be good if you want it to be a medium look, and you could add a couple of scrapes to make it look more detailed and more like what you'd buy in the store.
Warnings
- Use caution with sharp tools and liquid bleach.⧼thumbs_response⧽
Things You'll Need
- Jeans
- Chalk or pen
- Sharp scissors, knife, or razor
- Tweezers
- Sandpaper
- Spray or liquid bleach (optional)
- Old toothbrush (optional)
- Fabric patches (optional)


References
- ↑ http://www.songofstyle.com/2015/06/diy-distressed-jeans.html
- ↑ http://www.marieclaire.co.uk/news/fashion-news/how-to-rip-jeans-821#SAsYY3oM6WJdJ20p.99
- ↑ http://www.marieclaire.co.uk/news/fashion-news/how-to-rip-jeans-821#SAsYY3oM6WJdJ20p.99
- ↑ https://www.theguardian.com/fashion/2015/feb/13/how-to-fray-jeans-like-pro-five-point-plan
- ↑ http://www.marieclaire.co.uk/news/fashion-news/how-to-rip-jeans-821#SAsYY3oM6WJdJ20p.99
- ↑ https://jennblogsat.wordpress.com/2011/08/18/doin-it-yourself-ripped-jeans-the-right-way/
- ↑ https://www.theguardian.com/fashion/2015/feb/13/how-to-fray-jeans-like-pro-five-point-plan
- ↑ http://www.marieclaire.co.uk/news/fashion-news/how-to-rip-jeans-821#SAsYY3oM6WJdJ20p.99
- ↑ https://jennblogsat.wordpress.com/2011/08/18/doin-it-yourself-ripped-jeans-the-right-way/
- ↑ http://www.marieclaire.co.uk/news/fashion-news/how-to-rip-jeans-821
- ↑ https://www.theguardian.com/fashion/2015/feb/13/how-to-fray-jeans-like-pro-five-point-plan
- ↑ http://www.marieclaire.co.uk/news/fashion-news/how-to-rip-jeans-821
- ↑ https://www.theguardian.com/fashion/2015/feb/13/how-to-fray-jeans-like-pro-five-point-plan
- ↑ http://www.marieclaire.co.uk/news/fashion-news/how-to-rip-jeans-821#SAsYY3oM6WJdJ20p.99
About This Article