This article was co-authored by wikiHow Staff. Our trained team of editors and researchers validate articles for accuracy and comprehensiveness. wikiHow's Content Management Team carefully monitors the work from our editorial staff to ensure that each article is backed by trusted research and meets our high quality standards.
The wikiHow Video Team also followed the article's instructions and verified that they work.
This article has been viewed 15,851 times.
Learn more...
Polish dill pickles, also known as Polski ogorki, are a delicious side or topping for your favorite sandwich. If you've been buying them at the grocery store or deli, though, you may want to try making them yourself. Preparing them is as easy as soaking some cucumbers in a brining liquid that's seasoned with spices. The process does require some time and patience, but you'll wind up with tasty homemade pickles that are worth the wait.
Ingredients
- 4¼ cups (1l) hot water
- 1 heaping tablespoon (50 g) non-iodized salt
- 1 tablespoon (15ml) white vinegar
- 2 dill stems
- 2 horseradish leaves
- 2 small cloves garlic
- 8 cucumbers
- 1 teaspoon (2g) yellow mustard seeds
- 4 or 5 peppercorns
- coriander seeds (optional)
- bay leaves (optional)
- crushed red pepper flakes (optional)
Steps
Preparing the Cucumbers and Jars
-
1Wash the cucumbers. For Polish dill pickles, you'll need 8 pickling cucumbers. Before you pickle them, though, it's important to remove any dirt or debris. Rinse the cucumbers in the sink under cold water and ensure that they're clean.
- Kirby cucumbers are an ideal pickling cucumber for Polish dill pickles.
- Rinse the cucumbers thoroughly under cold water, but use your hands to clean them rather than a vegetable brush (which can bruise them).
-
2Cut off the cucumbers' blossom end. There is an enzyme in the blossom end of cucumbers that must be removed because it can make the pickles dangerous to eat. Use a sharp knife to cut off a piece approximately 1/16" (1.6 mm) thick from the blossom end and discard.
- You can identify the blossom end of the cucumbers by looking for a rough dot. The stem end has a smooth, indented dot.
Advertisement -
3Chill the cucumbers in an ice bath. After you've removed the blossom ends from the cucumbers, fill a large bowl with cold water and ice. Place the cucumber in the bowl and allow them to chill until they become firm and crisp.
- It should take 15 to 30 minutes for the cucumbers to crisp up.
-
4Wash and dry the jars. For the pickles, you'll need (2) 1 liter (0.26 US gal) (33.8 ounces) glass jars. Wash them thoroughly by hand with soap and water or in your dishwasher. Next, use a clean towel to dry the jars thoroughly.
- If you wash the jars in the dishwasher, ensure that all of the residue is removed.
-
5Sterilize the jars in the oven. Once the jars are dry, place them inside the oven on clean racks. Turn the heat to 225°F (110°C), and allow the jars to cook for 20 minutes before you fill them.
- After the jars have cooked for 20 minutes, turn off the oven but leave the jars inside the oven until you're ready to fill them.


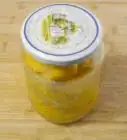
Filling the Jars
-
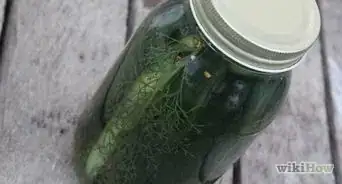
1Divide the cucumbers between the jars. When you've finished sterilizing the jars, remove the cucumbers from the ice water bath. Place four of the cucumbers in each jar so they're evenly divided between the two.
- Traditionally, Polish dill pickles are made from whole cucumbers. However, you can trim the cucumbers to better fit in the jars if necessary. Try to keep each piece of cucumber the same size, though.
-
2Add the dill, horseradish, garlic, mustard seeds, and peppercorns to the jars. For the two jars of dill pickles, you'll need 2 dill stems, 2 horseradish leaves, 2 small cloves garlic, 1 teaspoon yellow mustard seeds, and 4 or 5 peppercorns. Divide the spices evenly between the two jars, making sure to pack them among the cucumbers.
- You can also add some coriander seeds, bay leaves, and/or crushed red pepper flakes to the pickling mixture if you like.
-
3Combine the water, salt, and vinegar. Add 4¼ cups (1l) of hot water, 1 heaping tablespoon (50 g) of non-iodized salt, and 1 tablespoon (15ml) of white vinegar to a medium saucepan. Use a whisk to blend the ingredients together so the salt starts to dissolve.
- The water should be hot but not boiling.
-
4Bring the saltwater to a boil. Place the saucepan on the stove over medium-high to high heat. Allow the mixture to come to a full boil, which should take 7 to 10 minutes.
- Stir the mixture periodically as it boils to help the salt finish dissolving.

Finishing the Pickles
-
1Cool the brining liquid and pour it into the jars. Once the brining liquid has come to a boil, turn off the heat and remove the pan the stove. Allow it to cool for 5 to10 minutes, and then divide the liquid between the two jars, making sure the cucumbers are covered.
-
2Set the jars in a cool, dark spot for several days. Leave the lids slightly ajar, and set them in an area that is cool and doesn't receive much light, perhaps a pantry or basement shelf. Allow the pickles to ferment for 5 to 7 days.
- At the end of the initial pickling period, the pickles should still be crunchy and fresh in the center.
-
3Chill in the refrigerator for 2 weeks. After you've allowed the pickles to ferment for about a week, close the lids. Place the jars in the refrigerator and allow them to chill for at least 2 weeks to complete the pickling process.


Things You'll Need
- Sharp knife
- Large bowl
- (2) 1 liter (0.26 US gal) (33.8 ounces) glass jars with lids
- Towel
- Medium saucepan
- Whisk


About This Article