This article was co-authored by wikiHow Staff. Our trained team of editors and researchers validate articles for accuracy and comprehensiveness. wikiHow's Content Management Team carefully monitors the work from our editorial staff to ensure that each article is backed by trusted research and meets our high quality standards.
There are 7 references cited in this article, which can be found at the bottom of the page.
The wikiHow Culinary Team also followed the article's instructions and verified that they work.
This article has been viewed 29,901 times.
Learn more...
Potato chips are one of the world’s most beloved snack foods. It’s hard to beat their crispy, salty crunch or bite-sized munch-ability, and they make the perfect companion for everything from a picnic lunch to a weekend-long binge of your favorite TV shows. When you get down to the crumbs at the bottom of the bag, you may find yourself instinctively adding potato chips to your grocery list. But if you have potatoes, salt and oil lying around in the pantry, there’s no need to leave the house. Homemade potato chips can be prepared in just a few minutes using an ordinary microwave, and you won’t have to sacrifice crunch or flavor using this quick fix.
Ingredients
- 1 or more large Idaho potatoes, washed and sliced
- 2-3 oz. cooking oil (vegetable, canola, olive, peanut or sunflower)
- Salt, pepper and other seasonings (to taste)
Steps
Washing and Slicing the Potatoes
-
1Cut the potatoes into thin slices. Start by cutting the potatoes in half lengthwise. Then, slice them into sections that are between 1/8th and 1/16th thick using a sharp kitchen knife, hand slicer or mandoline. Place the potato slices into a colander or strainer as you go.[1]
- A single potato will be enough for a snack-sized portion. To have enough to share with others, use at least two large potatoes.
- You can peel the potatoes before slicing them, if you prefer. Peeling is recommended if you’re using potatoes that aren’t as fresh, as you can remove eyes, discoloration and spoiled spots this way.[2]
-
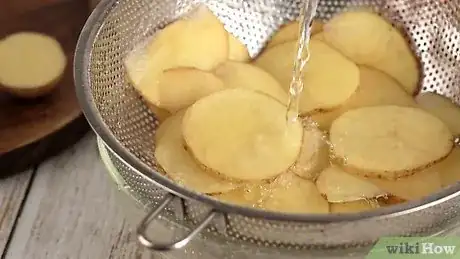
2Rinse the potato slices with cold water. Turn on the tap and run a stream of cool water over the freshly-cut slices. The water may appear cloudy or dirty for the first few moments as dirt, starch and natural juices wash out of the potatoes. Continue rinsing until the water runs clear.[3]
- Toss the potatoes in the colander to keep dirty water and sediment from becoming trapped at the bottom.
Advertisement -
3Soak the slices for 10 minutes. Fill a large bowl with lukewarm water and drop in the rinsed potato slices. Give them 8-10 minutes to soak. This will help clean them more thoroughly while softening them up in preparation for cooking.[4]
- Soaking the potato slices leeches out starch, which will make them cook up extra light and crispy.[5]
- Having a higher water content will also make the potatoes less likely to scorch as they cook.
-
4Dry the slices between layers of paper towels. Press the slices firmly between the layers to squeeze out excess moisture. There should be no visible water remaining on the outer surface of the slices. After drying the slices, lay them out side-by-side in even rows on the paper towels.[6]
- Take care not to break the slices while you’re drying them manually.
- Don’t let the potatoes get too dry. This may make them unpredictable while cooking. A simple pat-and-press will do.
Seasoning the Potatoes
-
1Brush each potato slice with oil. Pour a couple ounces of cooking oil into a small bowl. The exact type of oil you use is up to you—vegetable, canola, peanut or olive oil will all work just fine. Dip the tip of a basting brush into the oil and spread a small amount over the outside of each slice until they glisten.[7]
- The addition of oil will crisp and brown the potatoes similar to frying.
- Use an oil that has a high smoke point. Microwave heating is intense and direct, and can easily cause oils with low smoke points to burn.[8]
-
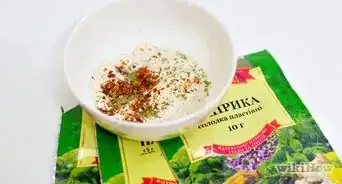
2Season with a dash of salt and other spices. Grab a generous pinch of kosher salt and sprinkle it evenly over the top of the slices. Feel free to add whatever other spices or seasonings you’d like as well, such as cracked black pepper, seasoned salt, garlic salt or onion powder.[9]
- Season to taste, using as much or as little of each spice as you wish.
- Experiment with different combinations of seasonings to create your own flavored chip varieties.
-
3Toss the slices in a mixing bowl. Transfer the slices to a spacious mixing bowl. Toss them lightly a few times using a circular motion. This will help the oil and seasonings coat the potato slices more thoroughly.[10]
- You can also use a large Ziploc bag to shake the chips, oil and seasonings together.
- Shake off excess oil before cooking the potatoes to keep from getting oversaturated.[11]
-
4Arrange the potato slices on a microwave-safe plate. In order to cook the potatoes, you’ll have to microwave them in small batches. Place as many slices as you can fit in a single layer onto a plate or platter lined with paper towels. Make sure that each slice is lying flat and you’ve left a little space between them.[12]
- Separating the slices will ensure that the heat will be distributed properly.
- Microwave the chips on a bacon tray to cook out excess oil and bring the calorie count down a little.[13]
Microwaving the Potato Chips
-
1Heat the potato slices for 3 minutes. Microwave the first round of potatoes at 100% power between 2-4 minutes. Keep an eye on the slices to make sure they aren’t getting done too fast. They should brown slightly around the edges when they start to crisp up.[14]
- You may not notice much of a change of appearance after the initial heating. This will just start to cook the potato.
- Different microwaves heat differently. Depending on the intensity of your unit, your potato chips might not need a full 3 minutes at a time, or they may require a little longer. Watch them closely as they cook and use your best judgment to determine when they’re done.
-
2Turn the slices over and microwave them again. Remove the plate and carefully flip over each potato slice. Put them back in the microwave for another 2-4 minutes, this time at 50% power. Once the chips have begun to turn golden brown in the center, they’ll have a delightful crunchy texture.[15]
- Continue microwaving in 3 minute intervals at 50% power until the chips are fully cooked.
- Look for a consistent golden coloring throughout. Remove the chips from the heat before they burn or blacken.
- When cooked with convection heat such as a microwave, potato chips need to brown in order to be crispy. Don’t be off-put by chips that come out a little darker, as this won’t affect their flavor.[16]
-
3Let the chips cool. The potato slices will be extremely hot after two trips through the microwave. Let them sit for a few minutes before digging in. Once the chips have reached an edible temperature, throw them into a bowl big enough for everyone to grab a handful!
- If you want, you can add another sprinkle of salt as the chips are cooling.
-
4Store the potato chips in an airtight container. Enjoy the potato chips while they’re still warm or have cooled to room temperature. If you have leftovers (which isn’t likely—they’re that addictive!), place them in a large lidded Tupperware container, or a gallon freezer bag with air squeezed out. The chips will stay crunchy for 2-3 days.[17]
- Serve with rich French onion dip or hot, melty pimento cheese for an extra burst of flavor.
-
5Finished.
Community Q&A
-
QuestionWhat to do if it stuck? I'm not able to take the potatoes off.
 Community AnswerMake sure to dry them properly. Using tissues papers could work. Brushing with olive oil should also work.
Warnings
- Anytime you cook something in the microwave, there’s a chance that it will burn. Microwave potato chips contain raw vegetables and oil, and can overcook very quickly if you’re not paying attention.⧼thumbs_response⧽
- Due to their high fat and starchy carbohydrate content, potato chips may not be the best snack for those who are on specialized diets or watching their weight.⧼thumbs_response⧽
Things You'll Need
- Microwave
- Mandoline, hand slicer or sharp knife
- Colander or strainer
- Large mixing bowl or plastic gallon bag
- Microwave-safe plate
- Paper towels
- Airtight container (for storage)
References
- ↑ http://www.epicurious.com/recipes/food/views/my-homemade-potato-chips-234557
- ↑ http://www.food.com/recipe/uncle-bills-microwave-potato-chips-47195
- ↑ https://www.thekitchn.com/how-to-make-crispy-potato-chips-in-the-microwave-166718
- ↑ http://www.food.com/recipe/uncle-bills-microwave-potato-chips-47195
- ↑ http://steamykitchen.com/70-light-as-air-potato-chips.html
- ↑ https://www.thekitchn.com/how-to-make-crispy-potato-chips-in-the-microwave-166718
- ↑ http://www.food.com/recipe/uncle-bills-microwave-potato-chips-47195
- ↑ http://www.seriouseats.com/2014/05/cooking-fats-101-whats-a-smoke-point-and-why-does-it-matter.html
- ↑ http://www.food.com/recipe/uncle-bills-microwave-potato-chips-47195
- ↑ http://www.eatingwell.com/recipe/251600/microwave-potato-chips/
- ↑ http://allrecipes.com/recipe/66646/potato-chips/
- ↑ http://allrecipes.com/recipe/66646/potato-chips/
- ↑ http://www.food.com/recipe/uncle-bills-microwave-potato-chips-47195
- ↑ https://www.thekitchn.com/how-to-make-crispy-potato-chips-in-the-microwave-166718
- ↑ http://www.eatingwell.com/recipe/251600/microwave-potato-chips/
- ↑ http://allrecipes.com/recipe/66646/potato-chips/
- ↑ http://www.eatingwell.com/recipe/251600/microwave-potato-chips/
About This Article
To make potato chips in the microwave, start by cutting potatoes into slices that are between 1/8 and 1/16 inch thick. Next, rinse the potato slices with cold water, then soak them in lukewarm water for 10 minutes. After soaking, dry the slices between layers of paper towels, and brush the outsides with oil. Season them with salt and any other spices you like, then toss them lightly in a mixing bowl to ensure that the slices are coated evenly. Finally, heat the chips in the microwave for 3 minutes, then flip them over and heat for another 2 to 4 minutes. For advice on how to store your potato chips if you’re not eating them right away, keep reading!

