wikiHow is a “wiki,” similar to Wikipedia, which means that many of our articles are co-written by multiple authors. To create this article, 78 people, some anonymous, worked to edit and improve it over time.
The wikiHow Video Team also followed the article's instructions and verified that they work.
This article has been viewed 1,368,977 times.
Learn more...
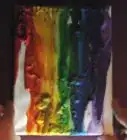
Melted crayon art is an easy and fun thing to do for those artistic adventurers out there. It's so simple, yet the end result can be stunning. No wonder the trend is all the rage! You can make melted crayon art using a blow dryer or hot glue gun; beyond that, you'll also need crayons and a canvas. Both methods can be messy and create slightly different results, but both can be both fun and visually appealing.
Steps
Using a Blow Dryer
-
1Get your supplies. You will need a canvas (your choice of size), crayons (your choice depending on the size of the canvas), a hot glue gun, and a hair/blow dryer. You'll probably want to lay newspaper or an old t-shirt or blanket under the canvas in case the wax splatters, too.[1]
- Whatever area you think will get messy, cover up a bit more on each side. Don't forget to cover up yourself too! Hot colored wax on your skin and nice clothes shouldn't be part of this project.
-
2Sort the crayons out. Sort depending on what you want. A rainbow is a popular design, so if you choose it, place the crayons in the order of the rainbow.[2] Some people order their crayons lightest to darkest, others use different shades of the same color. The arrangement is totally up to you.
- Just make sure you have enough to cover the entire top of the canvas. Repeating colors is just as beautiful.
Advertisement -
3Hot glue each crayon in order on the top of your canvas. Some people keep the wrappers on and some take them off, but either way works.
- You can opt to unwrap the crayons and cut them in half. This makes it look more natural and keeps the top three inches of your canvas from being obviously lined with crayons.
-
4Slant the canvas so that the wax will drip. A common idea is to lean it against a wall. If you do lean it against a wall, tape newspaper onto the wall to avoid any accidents.
-
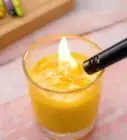
5Use your blow dryer and blow the crayons. It's best to point the blow dryer downwards so that the wax will drip. Take note that this will get messy! However, it doesn't really matter how messy it gets, as long as your newspapers are laid out correctly.[3]
- You can use birthday candles for quicker melting. It's a bit more dangerous and the candle wax drips everywhere, too. If you'd rather be messy than pressed for time, a candle might be a better bet for you.
- A heat gun is also a quicker alternative and can be picked up at most craft supply stores.
-
6Let your work dry.
-
7Clean up your work. Remove the crayons and collect all the dried bits of wax that have seeped onto less than desirable areas. Color in whatever you want to if desired.
- Display your artwork! Hang it up on the wall, post it on Facebook or Tumblr, call over a family member. Show your creativity to the world; they'll love it! The kids will, too!


Using a Hot Glue Gun
-
1Grab your canvas. Prop it up against a wall or a chair lined with a towel. Some area that you're not concerned about getting messy. Choose a size of canvas that you think you can cover with the amount of crayons you have.
-
2Place a crayon into the glue gun. Unwrap the crayons of your choice, shave them down to size (in order to fit), and place one into the glue gun.[4]
- If you want to use multiple colors, once you've placed the first crayon into the glue gun, start pushing in the second, then third and so out - this will force crayon in front of it out .
-
3Color your canvas. With this method, you have the ultimate power of color control; it'll go wherever you want. You could keep to the standard drip look or create shapes and designs. Put the gun tip close to the canvas and create away!
- Once you have nothing to push in, add another crayon. You'll see the color coming out of the tip slowly lighten or darken as the next crayon gets ready to take the spotlight.
-
4Let dry. That was a lot quicker than blow drying, huh? If you think your glue gun is salvageable, insert a regular glue stick and work through until what comes out is clear and glue-y and no longer colored and waxy.[5]
- If you aren't happy with a section of your painting, with this method it's very easy to go back and redo (or add to) an area.


Community Q&A
-
QuestionHow long does it take to melt when using the blow dryer?
 Community AnswerIt takes a very short amount of time. If you hold the dryer near the crayon at full blast it will start dripping in about 20 to 40 seconds depending on the crayon and strength of the blow dryer.
 -
QuestionHow do you block out part of the design to keep it from being dripped on?
 Community AnswerCreate the shape you want to stay blank by using painters' tape to block out the image. For example use the tape to make a heart outline, fill it in with tape then begin the crayon melting fun. Afterwards, take off the tape and you will have a blank area in the shape of your image.
 -
QuestionDo I have to use a canvas?
 Community AnswerNo, you don't have to use a canvas. You can use a paper just as easily, but a canvas stays up better.
Warnings
- Make sure not to get it on furniture or carpet as it will be extremely difficult to remove.⧼thumbs_response⧽
- Be careful not to touch your art right after, as you will most likely burn yourself.⧼thumbs_response⧽
- Be careful with the glue gun! It is very hot and can burn you.⧼thumbs_response⧽
Things You'll Need
With a Blow Dryer
- Canvas
- Crayons
- Hot glue gun
- Hair/blow dryer
- Old clothing and newspapers/tarp
With a Hot Glue Gun
- Canvas
- Crayons
- Hot glue gun
- Old clothing and newspapers/tarp
References
- ↑ http://www.52kitchenadventures.com/2011/09/12/melted-crayon-art-tutorial/
- ↑ https://www.happinessishomemade.net/melted-crayon-art-tutorial/
- ↑ https://www.fourgenerationsoneroof.com/melted-crayon-art/
- ↑ https://www.ohmymag.co.uk/art/what-happens-when-you-put-a-crayon-into-a-hot-glue-gun_art4.html
- ↑ http://www.learnplayimagine.com/2014/03/melted-crayon-art-with-glue-gun.html
- Videos provided by Alicia Dunk
About This Article
To make melted crayon art, first line a pack of crayons up at the top of a canvas. Set them in the order that you want the colors to melt. Then, use a hot glue gun to attach each crayon to the top of the canvas. Stand the canvas up at an angle, and put a plastic bag underneath it to catch any wax that drips off. Next, plug in a hairdryer and set it on high heat. Point the hairdryer at the crayons to start melting them. The closer you place the hairdryer to the crayons, the faster they’ll melt and the more the colors will blend with each other. Find a distance between 2 and 12 inches (5 and 30 cm) away based on how much blending and splattering you want. Continue to heat the crayons and melt them until you’re happy with your new work of art! If you want to learn how to clean your glue gun when you're finished, keep reading the article!