This article was co-authored by Laura M. Johnson. Laura M. Johnson is a Mural Artist and the Owner of Laura Margo Murals & Custom Art in St. Paul, Minnesota. She has over five years of experience in the industry and has worked professionally across venture capital, communications, the arts, and beyond. She helps empower small and growing businesses to find their voices, share their stories, and grow their impact. Laura received her Master of Business Administration from the University of Minnesota - Carlson School of Management, and her Bachelors in Journalism and Communication Studies with a minor in Fine Arts from the University of Oregon.
There are 18 references cited in this article, which can be found at the bottom of the page.
This article has been viewed 36,779 times.
Geometric art is a great way to make an aesthetic art piece, and you can do it no matter how much experience you have! You can make geometric art using Photoshop and Illustrator, or drawing, painting, or sculpting! Use precise measurements to keep your designs uniform and polished. Be sure to add vibrant color to your artwork for an extra flourish.
Steps
Making Low Poly Designs on Photoshop and Illustrator
-
1Choose a base image to work from. Find an image or shape online, or take a photo that you want to create a geometric design from. Opt for an image that has distinct, solid-edged features that contrast softer lines. For instance, use a profile picture of a friend whose glasses, nose, and shirt collar provide solid lines in contrast to the softness of their face.[1]
-
2Upload and edit the image in Photoshop. Create a new document in Photoshop to streamline the image you've selected before using it as a base for your geometric art. Crop the picture as needed and remove any distracting or unnecessary details of the image, such as weeds growing in front of a parked bicycle. Adjust the contrast, brightness, and saturation levels of the colors of your image to make it as dynamic as possible to work with.[2]
- For a simple color fix, use the Auto Contrast, Auto Color, or Auto Levels functions listed in the 'Image' menu.
Advertisement -
3Create a new layer to draw on. Create a new layer by selecting New > Layer in the Layers panel. This layer will allow you to trace over your image while still seeing it underneath.[3]
- You can also press Ctrl+Alt+Shift+N on a PC to instantly create a new layer over your image, or Command+Option+Shift+N on a Mac.
-
4Trace shapes with the Polygonal Lasso Tool. Select the polygonal lasso tool from the menu and begin tracing shapes that match with fragments of your base image. Starting at a sharp point, create and connect dots that form the vertices of your shapes. Connect all of your shapes so that they make a mesh pattern.[4]
- You can use a variety of geometric shapes to trace your image.
- For the best results, use a color for tracing that does not occur in the base image.
-
5Draw small triangles by hand to cover more complex shapes. The best way to cover shapes that have small parts and a lot of detail is to make a number of small triangles. Use the pen tool to draw little, differently shaped triangles that cover the outline of your picture. This process will be time consuming, but it will produce the best possible geometric art.[5]
-
6Hide the original image to fix up your shapes. Click the F7 key to display a panel showing the different design layers you are working with. Select the base image layer and choose the "hide layers" option from the Layers menu. With only the grid of shapes that you have drawn on the screen, reconnect or redo any shapes that are not properly drawn or uniform.
-
7Save the image in JPEG format and open it in Illustrator. In order to be able to open your geometric image in Illustrator, make sure to select JPEG as the file format when you save your work. Close Photoshop and open Illustrator. Place the geometric grid you traced in Photoshop onto the artboard to work on.[6]
-
8Trace your design in a contrasting color. Select the pen tool and choose a color that contrasts the one you drew within Photoshop. Take your time to carefully trace your design in the new color. Move the points of your connecting lines to correct the shapes in your design if necessary.[7]
-
9Hide the Photoshop design and fix any errors. Once you have traced the entire design, hide the original design to make sure your latest tracing is complete. Fix any lines that are not connected and polish the design so it looks perfect. Save your work.[8]
-
10Select all the component shapes of the design and fill them in. Press the Command, Control, and "A" keys at once to select all of the shapes contained within your design. Press the Shift and X key at once to fill in the shapes. If you wish, you can adjust the fill color through the menu on the side of the screen.[9]
-
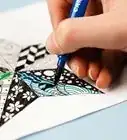
11Choose colors for each shape. Click on each individual shape to fill it with a color. Use the eyedropper tool to fill in the shape. Experiment with different colors to achieve the geometric effect you want.[10]
- If you are making a real art piece, use colors that mirror those found in the real-life image. Using the correct colors will help to identify the object or individual you are representing.
- For instance, skin colors for the face if you are making a geometric art portrait.

Drawing Geometric Art
-
1Sketch a rough draft of your geometric design. Plan out your geometric artwork by drawing a basic outline of what you'd like to accomplish. Sketching out your ideas will allow you to brainstorm and provide you with a guide to work from when you start drawing the final draft. If you are aiming to draw a real object in a geometric style, sketch a rough outline of its shape and use it as a template to expand on.
-
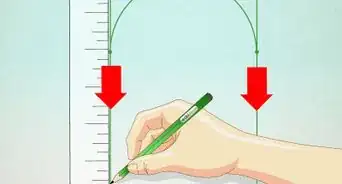
2Draw shapes with a ruler. Using a ruler is the best way to draw crisp, straight-edged shapes to make geometric art. Decide on the dimensions of your squares, triangles, rectangles, hexagons, octagons, or other shapes before drawing them to achieve the results you want. Use the ruler to trace your lines carefully and maintain the proper dimensions for your art.[11]
- You can also use a protractor, a type of ruler that measures the angles of a semicircle, to measure and draw shapes.
-
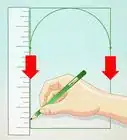
3Draw circles with a compass. A compass is a mathematical instrument with two moveable arms, one with a needle and the other with a pencil to draw. Anchor the needle where you want the center point of your circle to be, then extend the pencil arm to the diameter of your choice. Turn the compass a full 360 degrees to draw a circle.[12]
- For instance, if you want a circle that measures a total of 0.5 inches (1.3 cm) across, extend your compass arm to 0.25 inches (0.64 cm).
- To draw semicircles, turn the compass 180 degrees and use a ruler to mark the bottom.
- You can also use a compass to draw triangles. Mark a point on your page and place your compass needle over it, then draw an arc and mark its two endpoints. Connect the three dots using a ruler.
-
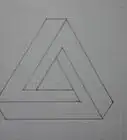
4Repeat shapes to create a pattern. The repetition of shapes and lines is what turns simple geometry into geometric art. Aim to make a pattern by repeating the same sequence of shapes and lines in a predictable way. Experiment with different arrangements until you make a pattern that you find enjoyable.
-
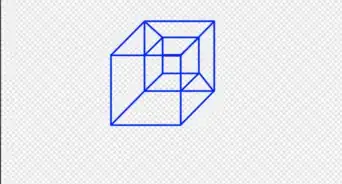
5Overlap and divide shapes in your drawing. Use your compass, ruler, and protractor to overlap shapes over other shapes, or to divide shapes into smaller shapes. You can make circles intersect by placing your compass needlepoint on a part of the outer perimeter of one circle and drawing a new circle from there. You can also use a ruler and protractor to dive a large shape into smaller shapes.[13]
- For instance, you can use a ruler to draw a hexagon, then divide it into six triangles by connecting its opposite points.
-
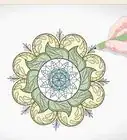
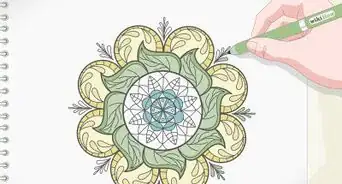
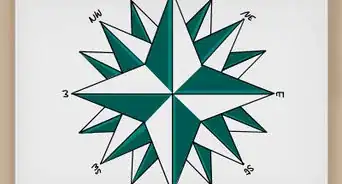
6Play with symmetry in your drawing. To achieve symmetry in your art, choose a central point and draw identical patterns on either side of it. You can do this by using a ruler or compass to mark the exact, mirror points of one shape on the opposite side of your page. Alternatively, aim for radial symmetry, where a consistent pattern of shapes will radiate outwards from your central point.
- To draw something with radial symmetry, draw upwards from your central point and repeat the shape for a full 360 degrees.
- Snowflakes and mandalas are examples of radial symmetry.
Painting Geometric Art
-
1Sketch out your geometric design before painting it. Draw an exact outline of your geometric design on your canvas in pencil, pressing very lightly on the surface. Use a ruler, protractor, compass, or any other tools available to ensure that you make even, clean shapes. Erase and re-draw any lines or circles that look sloppy and unpolished.[14]
-
2Use high-quality acrylic paint. To paint geometric art, forgo watercolors, which are muted and don't lend themselves well to straight lines and distinct shapes. You should also forgo oil paints, which are bold and distinct but also stain permanently, take a long time to dry, and cost more than other types of paint. Your best bet is a good quality acrylic paint, which is thick enough for detailed painting, dries quickly, and can be cleaned from clothing and furniture in the event of a spill.[15]
- Shop for acrylic paints at an art supply store or online.
-
3Use small brushes to draw lines. The best way to paint straight lines in geometric art is to use small paint brushes that allow for better detail and control. Choose round, pointed round, or small, flat brushes to make distinct geometric shapes. Carefully draw the outline of your shapes to get the straightest lines and angles possible.[16]
-
4Use tape to paint shapes on a canvas. Place thin masking tape from one edge of your canvas straight across to its opposite point. Repeat this as many times as you wish at different angles to achieve the shapes you want on your geometric painting. If you want to be precise, draw the design in pencil before laying down the tape.[17]
-
5Paint the shapes in between the tape. Use three of four colors of acrylic paint to color in the shapes formed between the tape lines. To see how the colors will look together beforehand, paint them on a scrap piece of cardboard or thick paper to see the effect. Paint the canvas carefully to make sure only the right color of paint gets inside of each shape.[18] Then let it dry and remove the tape.[19]
- For the best results, use foam brushes to paint your canvas.
- You can purchase a blank canvas, acrylic paint, brushes, and tape at an art supply store or online.
-
6Let the paint dry for an hour or more before removing the tape. Let the canvas sit untouched for at least an hour so that it can dry thoroughly. For the best results, place it in a cool, dry room during this time. Pull away the tape very carefully to avoid damaging your art.[20]


Making a Basic Himmeli Geometric Sculpture
-
1Draw your Himmeli geometric sculpture to scale. Plan out your sculpture thoroughly by drawing it part by part before building it. Use a pencil and ruler to draw a template design for your Himmeli sculpture, making sure that all of the parts connect. Keep the measurements in your drawing proportional to the size you intend for your sculpture to be.
-
2Cut straws into even pieces. Find regular-sized drinking straws. Measure them and cut each one into an equal number of pieces, based on your template design. You should be left with several identical building pieces.[21]
-
3Make a triangle by threading twine through the straws. Thread 3 straw pieces onto a long piece of string. Bend the string at between each straw to make a triangle. Pull one end of the straw through one of the straw pieces a second time to close the triangle. Tie a knot to seal it.[22]
-
4Add 2 more straw pieces to create another triangle. Thread 2 straw pieces onto the thread extending out of the first triangle. Using one of the straw pieces that is already part of the first triangle, shape the 2 straw pieces to make a second, upside triangle next to the first. Again, tie a knot at the end.[23]
- Repeat this step until you have only 1 straw piece left.
-
5Add the last straw piece and attach the two ends of the string. Thread the straw piece onto the long end of the string. Tie the short end of the string remaining from the first knot you made to the long end of the string. Make sure that the string is pulled taut to be the same length as the straw piece.[24]
-
6Make a 3-D diamond shape by tying together two loose triangles. Push together the two loose triangles on one end of the sculpture so that they meet at their top points. Take an extra piece of string and tie them together. This should leave you with a basic Himmeli sculpture that models the principles of the method.[25]
-
7Experiment with different materials, sizes, and colors. Use different materials, such as copper tubing and wire, to make Himmeli sculptures. Play around with tube pieces of different lengths to create more complex designs. Use acrylic craft paint to decorate your sculptures and make them more dynamic.[26]

Things You'll Need
Drawing Geometric Art
- A pencil
- Paper
- A ruler
- A compass
- A protractor
Painting Geometric Art
- A pencil
- High-quality acrylic paint
- Small paint brushes
- A canvas
- Foam paint brushes
- Masking tape
Making Geometric Sculptures
- Drinking straws
- Twine
- Copper tubing (optional)
- Wire (optional)
- Acrylic paint
References
- ↑ https://www.digitalartsonline.co.uk/tutorials/adobe-illustrator/create-low-poly-portrait-photoshop-illustrator/#2
- ↑ https://www.digitalartsonline.co.uk/tutorials/adobe-illustrator/create-low-poly-portrait-photoshop-illustrator/#4
- ↑ http://www.creativebloq.com/tutorial/create-polygon-art-photoshop-812486
- ↑ https://www.digitalartsonline.co.uk/tutorials/adobe-illustrator/create-low-poly-portrait-photoshop-illustrator/#7
- ↑ https://www.digitalartsonline.co.uk/tutorials/adobe-illustrator/create-low-poly-portrait-photoshop-illustrator/#6
- ↑ https://www.digitalartsonline.co.uk/tutorials/adobe-illustrator/create-low-poly-portrait-photoshop-illustrator/#8
- ↑ https://www.digitalartsonline.co.uk/tutorials/adobe-illustrator/create-low-poly-portrait-photoshop-illustrator/#14
- ↑ https://www.digitalartsonline.co.uk/tutorials/adobe-illustrator/create-low-poly-portrait-photoshop-illustrator/#15
- ↑ https://www.digitalartsonline.co.uk/tutorials/adobe-illustrator/create-low-poly-portrait-photoshop-illustrator/#15
- ↑ https://www.digitalartsonline.co.uk/tutorials/adobe-illustrator/create-low-poly-portrait-photoshop-illustrator/#17
- ↑ http://pulitzercenter.org/builder/lesson/interpreting-fractured-lands-through-geometric-art-21065
- ↑ http://sciencing.com/draw-geometric-shapes-2358309.html
- ↑ http://pulitzercenter.org/builder/lesson/interpreting-fractured-lands-through-geometric-art-21065
- ↑ https://sciencing.com/draw-geometric-shapes-2358309.html
- ↑ http://www.jerrysartarama.com/blog/what-kind-of-paint-should-i-use/
- ↑ https://www.art-is-fun.com/how-to-paint-clean-crisp-lines-with-acrylics/
- ↑ https://prettyprovidence.com/diy-geometric-wall-art/
- ↑ https://prettyprovidence.com/diy-geometric-wall-art/
- ↑ https://prettyprovidence.com/diy-geometric-wall-art/
- ↑ https://prettyprovidence.com/diy-geometric-wall-art/
- ↑ https://www.theguardian.com/lifeandstyle/do-something-blog/2014/jun/06/how-to-make-a-himmeli-sculpture
- ↑ https://www.theguardian.com/lifeandstyle/do-something-blog/2014/jun/06/how-to-make-a-himmeli-sculpture
- ↑ https://www.theguardian.com/lifeandstyle/do-something-blog/2014/jun/06/how-to-make-a-himmeli-sculpture
- ↑ https://www.theguardian.com/lifeandstyle/do-something-blog/2014/jun/06/how-to-make-a-himmeli-sculpture
- ↑ https://www.theguardian.com/lifeandstyle/do-something-blog/2014/jun/06/how-to-make-a-himmeli-sculpture
- ↑ http://ashandcrafts.com/himmeli-geometric-sculpture/
About This Article