wikiHow is a “wiki,” similar to Wikipedia, which means that many of our articles are co-written by multiple authors. To create this article, 16 people, some anonymous, worked to edit and improve it over time.
This article has been viewed 48,525 times.
Learn more...
Fabric flowers are an easy craft project and a great way to use up fabric scraps or recycle old fabric to make scrapbook embellishments, gift toppers or hair accessories. The instructions here show how to make fabric flowers with a minimum of sewing. Learn how to make basic fabric flowers, looped flowers, and flowers with singed edges.
Steps
Making Basic Fabric Flowers
-
1Pick out fabric. The sky's the limit when it comes to making fabric flowers. Use fabric scraps you already have or hit the fabric store to pick out new fabric. Remember that the thickness of the fabric you use will affect the final look of the flower.
- To make a flower with floppy petals, use silk, thin cotton, or another thin, floppy material. For stiff petals, choose felt, denim, linen, or another thick, stiff material.
- Fabric flowers have more than one layer, and there's no need for every layer to be made out of the same fabric. Make contrasting petals by choosing two or more types of fabric for your flowers. For example, you could choose a plain blue fabric and one with a white background and blue polka dots.
-
2Make flower stencils. Use a pencil to draw flower shapes on a piece of thin paper. The flower can be any shape you want. Create a daisy, a sunflower, or a dogwood flower. Space the petals evenly or create a wilder look by making the petals less uniform. Cut out the shape with a scissors when you're finished.
- If you don't want to draw your own stencil, check online for stencils you can print out.
- Make more than one stencil if you want contrasting, layered petal shapes. For example, you could make one stencil with large, long petals, and another one with twice as many small, short petals. Layering these two petal types together will create a neat effect.
Advertisement -
3Pin the stencils to the fabric and cut out the shapes. Use straight pins to secure the paper stencil, or stencils, to the fabric you chose for your flowers. Make sure each petal is securely in place. Use a sharp pair of fabric scissors to cut the fabric along the edges of the stencil. When you're finished, unpin the stencil and examine your fabric flower shape.
- Make as many layers as you want by repinning the stencil to a new section of fabric, cutting it out, and repeating until you have enough.
- You can make more than one flower shape at once by folding the fabric and pinning the stencil through both layers of fabric before carefully cutting out the flower shapes.
-
4Stack the layers. Arrange the layers in a stack that shows off the multiple petal sizes and shapes. If you have different sized flower shapes, stack the smaller ones on top of the larger ones.
-
5Sew the flower stack. Thread a needle with thread that matches your flower fabric. Pass the needle through the center of the flower petal stack, then pull it back through to the other side. Repeat a few times until the flowers are sewn together in the very center of the stack.
-
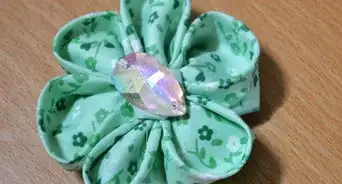
6Make a stamen. You can end your project there or create a stamen, the middle of a flower, using a button, a bead, a gem, or some other small item. Glue the stamen on with fabric glue or hot glue, or sew it on using the same needle and thread.

How to Make Loopy Fabric Flowers
-
1Gather fabric scraps. To make loopy flowers, which have petals that loop backward for a pretty effect, gather several pieces of fabric scraps that are about 4 inches (10.2 cm) long and 3 inches (7.6 cm) wide. This type of flower looks best with stiffer fabric, such as felt.
-
2Fold the fabric scraps in half lengthwise. Place pins along the bottom, where the two edges of the fabric scraps meet. Place the pins about an 1/8 of an inch from the open edge.
-
3Make slits in the folded edge. Use a scissors to make evenly spaced slits along the folded part of the fabric. If you want your flower to have many petals, make the slits every 1⁄4 inch (0.6 cm). For fewer petals, make the slits every 1⁄2 inch (1.3 cm).
-
4Stitch the fabric. Thread a needle with thread that matches the fabric you chose for your flower petals. Tie a thick knot at the end of the thread so it won't pull through the fabric. Starting at one end of the row of petals, insert the needle at the corner of the fabric where the two ends meet, near the first straight pin. Sew a running stitch along the length of the fabric, so that the two layers are now sewn together.
- For a neater final look, make sure your stitches are evenly spaced, and that they are all the same distance from the bottom of the fabric. Run the stitch just above or below the straight pins you used to hold the fabric in place.
- Remove the straight pins once you're finished stitching to the end of the fabric.
-
5Pull the fabric into a flower shape. Slide the fabric toward the knot in the thread so that it becomes cinched. As you slide and push it down, the fabric will begin to form into a circular shape, and the petals will spread apart. Continue cinching the fabric until you have formed a flower shape. Finish sewing the flower by folding it in half and securing the first and last petals together with a few whip stitches. Secure the thread with a knot and cut it.
-
6Add the stamen. Now that you have a circle of flowers, it's time to add a center. Cut out a circle of the same fabric you used to make the petals, or use a contrasting fabric. The circle should be large enough to cover the hole at the center of the flowers, but not so large that it obscures the petals. Dab fabric glue around the edge of the fabric circle and secure it in the center of the petals.
-
7Add a decoration. Use hot glue or fabric glue to add a button, bead, rhinestone, or another decoration to the center of the flower.

How to Make Fabric Flowers With Realistic Edges
-
1Choose a silky fabric. For this method, which requires singing the edges of the fabric to create an organic, realistic effect, you'll need light, silky fabric. Avoid felt and other thick fabrics when you're using this method.
-
2Cut circles from cardstock. You'll need one circle that is about a half an inch larger than the diameter you want the finished flower to be. The other circle should be half an inch smaller in diameter than the first circle, and the third a half an inch smaller than that. Continue cutting smaller circles until you have 5 or 6.
-
3Trace the circles onto the fabric. Use a fabric pen or chalk to trace the circles. Since the edges will be singed, it's ok if the markings show up at the edges of the fabric. Cut out the shapes you traced with fabric scissors.[1]
-
4Make slits in the circles. Use scissors to make slits around the edges of the circles to create petals. The petals don't need to be rounded; all you need for this method are simple slits. Space the slits so that there are about 6 petals when you are done cutting. The slits should end about 1/3 way into the circles.
-
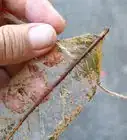
5Light a candle and singe the petals. Working one at a time, hold a fabric flower approximately 2 inches (5.1 cm) over a candle flame. Rotate the flower continuously so that it does not catch on fire. The flame will melt the edges and give the fabric a realistic look. Repeat the process with each layer.[2]
-
6Stack the petals. Place the circles on top of each other so that the largest is on the bottom and the smallest is on top. Place a bead on top as a stamen. With thick thread and a sewing needle, bring the needle through the center of the flower, securing the bead in place and the layers together. Make several stitches so that the layers are securely in place.


References
About This Article
To make fabric flowers, start by cutting out flower shapes from a thin piece of paper to use as stencils. Then, attach the stencils to your fabric with safety pins, and cut out the shapes. Next, stack your fabric layers with the smaller flower shapes on top, and sew them together through the center of the stack. Finally, attach a button or bead to the center of your flower to create a stamen. For tips on how to make fabric flowers with realistic edges, keep reading!