This article was co-authored by wikiHow staff writer, Danielle Blinka, MA, MPA. Danielle Blinka is a Writer, Editor, Podcaster, Improv Performer, and Artist currently living in Houston, TX. She also has experience teaching English and writing to others. Danielle holds a Bachelor of Arts in English, Bachelor of Arts in Political Science, Master of Arts in English with a concentration in writing, and Master of Public Administration from Lamar University.
There are 7 references cited in this article, which can be found at the bottom of the page.
The wikiHow Video Team also followed the article's instructions and verified that they work.
This article has been viewed 14,532 times.
Learn more...
Coffee filter crafts are inexpensive and fun for all ages. The coffee filter butterfly step-by-step process includes coloring the coffee filter with markers or watercolor paint, allowing the filter to dry, creating the wings, and making the body. For a coffee filter butterflies science project, draw a circle around the center point of the coffee filter, create a cone with the filter, and wet the bottom of the cone to see how the color separates.
Steps
Adding Custom Designs with Markers
-
1Use water-soluble markers to color a coffee filter. Flatten the coffee filter on a hard surface so it’s easy to color it. Use your markers to draw large blocks of color or to sketch out a design.[1]
- For instance, you might draw big triangles or circles across the coffee filters. Alternatively, keep it simple by drawing stripes over the surface of the coffee filter.
- It’s okay to leave gaps between the colors because they will spread and blend when you wet the coffee filter.
- Don’t use a permanent marker because the color won’t spread.
Variation: Use a paint brush to apply watercolors to the coffee filters. Brush water across the coffee filter using your paint brush. Then, use your brush to dab watercolors into the water. Watch as the paint spreads across the coffee filter and the colors merge together.[2]
-
2Pinch the edge of the coffee filter and hold it up. It’s best to dangle the coffee filter in the air while you spray it so it doesn’t get too wet. Use the tips of your fingertips or your fingernails to hold the coffee filter. This way you can spritz the filter without the water pooling on the surface.[3]Advertisement
-
3Spray the coffee filter with water to make the colors spread. Position your spray bottle on the side of the coffee filter that you colored. Hold the spray bottle about 6 in (15 cm) away from the coffee filter, then spritz the coffee filter 2-3 times. Watch as the marker colors spread across the coffee filter and merge.[4]
- The colors will create new colors as they combine. For instance, red and blue will merge to make purple.
-
4Lay the coffee filter out to dry completely. Place the wet coffee filter on a flat surface so it dries mostly flat. Leave it to set until it’s totally dry.[5]
- Press the pad of your finger against the coffee filter to see if it’s dry.
- How long it’ll take for the coffee filters to dry depends on how wet it is. For a slightly damp coffee filter, it’ll likely take 30 minutes to an hour to dry. However, it could take a couple of hours for a wet filter to dry.

Trying Color Spectrum Experiments
-
1Use a marker to draw a circle 1 in (2.5 cm) from the center of the filter. Spread out a coffee filter on a flat surface. Then, use a water-soluble marker to draw a thick circle that’s about 1 in (2.5 cm) from the center of the coffee filter on all sides. Stick to 1 color per coffee filter.[6]
- Draw circles on multiple coffee filters using different colored markers. This allows you to experiment with several colors. For instance, you might use purple, green, and orange markers to see what colors separate out of the original shade.
- Make sure you’re using water-soluble markers. Water-soluble colors will separate and spread when they get wet. However, permanent markers will not be affected by water.
Did You Know? When the water separates out the color, it will create a chromatic spectrum. This helps you understand how colors combine to create other colors.
-
2Fold the coffee filter into a cone. Line up the edges of the coffee filter to fold it in half. Then, fold it in half again. Fold it in half 1 more time to make the shape of the cone. Pull the folded coffee filter apart at the 3rd and 4th layer to create a funnel.[7]
- You can create the funnel anyway you like, as long as the center of the coffee filter is the tip.
-
3Stick the tip of the cone into a glass of water and remove it immediately. Fill a cup with water, then dip the end of the coffee filter cone into the water. Quickly remove the cone from the water so that just the tip gets wet.[8]
- Don’t let the colored part of the coffee filter dip below the water. If it does, the filter will get too wet and the color may leach out of the filter.
-
4Watch the colors separate and spread across the coffee filter. Even though just the tip is wet, the water will spread across the coffee filter out to the edge. When the marker color gets wet, the color will separate out into a spectrum of color. Watch as the colors spread from the circle out across the filter.[9]
- For example, purple marker might create a spectrum of purple, pink, red, and blue.
-
5Lay out the coffee filter until it dries completely. Place the wet coffee filter on a flat surface while it dries. Leave it to set until it feels totally dry to the touch. Use the pad of your finger to make sure the coffee filter is dry.[10]
- The coffee filter will likely be dry in 1-2 hours.

Making Butterfly Wings
-
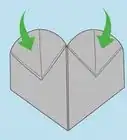
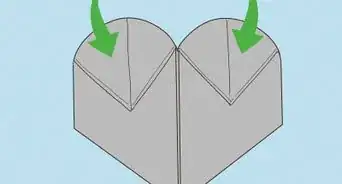
1Scrunch the middle of the dry coffee filter to create 2 wings. Find the center of the coffee filter, then press the edges of the filter toward each other. Use your fingers to squish down on the center to create the wings of the butterfly.[11]
- The center of the coffee filter will become the butterfly’s body, while the sides will be the wings.
-
2Wrap a pipe cleaner around the filter to create a body. Place the center of the pipe cleaner at the base of the center of the coffee filter. Fold the pipe cleaner up around the center of the coffee filter, then twist the ends of the pipe cleaner to secure it in place.[12]
- You can use a whole pipe cleaner or half of a pipe cleaner. If you prefer, use scissors to cut the pipe cleaner into 2 pieces.
-
3Bend the ends of the pipe cleaner to look like antennae. Pull the 2 ends of the pipe cleaner apart. Then, curve each end of the pipe cleaner toward the wing on its side. Use your fingers to adjust the ends of the pipe cleaners until you're happy with the look of the antennae.[15]
- If you like, put beads on the ends of the antennae to add a little pizzazz to your butterfly. Plastic crafting beads work great!
-
4Spread out the wings to make them look like a butterfly. Gently pull the sides apart to fan them out like butterfly wings. Adjust the wings until you’re happy with how they look. Don’t pull too hard on the coffee filter because it may tear.[16]
- If you like, fold the sides of the filter to change the look of the look of the wings.

Things You’ll Need
Adding Custom Designs with Markers
- White coffee filters
- Pipe cleaners
- Water-soluble markers
- Spray bottle
- Water
- Watercolors (optional)
- Paint brushes (optional)
Trying Color Spectrum Experiments
- Water-soluble markers
- White coffee filters
- Cup of water
Making Butterfly Wings
- Pipe cleaner
- Clothes pin (optional)

References
- ↑ https://www.youtube.com/watch?v=oA6ELZNEJVM&feature=youtu.be&t=60
- ↑ https://www.youtube.com/watch?v=oA6ELZNEJVM&feature=youtu.be&t=65
- ↑ https://kinderart.com/art-lessons/crafts/coffee-filter-butterflies/
- ↑ https://www.youtube.com/watch?v=oA6ELZNEJVM&feature=youtu.be&t=60
- ↑ https://kinderart.com/art-lessons/crafts/coffee-filter-butterflies/
- ↑ https://scienceprojectideasforkids.com/tag/craft-butterflies/
- ↑ https://scienceprojectideasforkids.com/tag/craft-butterflies/
- ↑ https://scienceprojectideasforkids.com/tag/craft-butterflies/
- ↑ https://scienceprojectideasforkids.com/tag/craft-butterflies/
- ↑ https://kinderart.com/art-lessons/crafts/coffee-filter-butterflies/
- ↑ https://kinderart.com/art-lessons/crafts/coffee-filter-butterflies/
- ↑ https://kinderart.com/art-lessons/crafts/coffee-filter-butterflies/
- ↑ https://www.youtube.com/watch?v=oA6ELZNEJVM&feature=youtu.be&t=102
- ↑ https://www.youtube.com/watch?v=oA6ELZNEJVM&feature=youtu.be&t=114
- ↑ https://kinderart.com/art-lessons/crafts/coffee-filter-butterflies/
- ↑ https://www.youtube.com/watch?v=oA6ELZNEJVM&feature=youtu.be&t=106
About This Article

To make a coffee filter butterfly, first flatten a coffee filter and decorate it with a water-soluble marker. Spritz the filter with water so the colors bleed and blend, then let it dry completely. Alternatively, roll the filter into a cone and dip the tip into water so the colors bleed and spread. Let the filter dry completely. Either way, scrunch up the middle of the filter once it's dry to make two wings. Wrap a pipe cleaner around the middle to make the body, and bend the two ends to look like antennae. Finally, spread out the wings and admire your new butterfly! For step-by-step instructions with video, keep reading!