This article was co-authored by wikiHow Staff. Our trained team of editors and researchers validate articles for accuracy and comprehensiveness. wikiHow's Content Management Team carefully monitors the work from our editorial staff to ensure that each article is backed by trusted research and meets our high quality standards.
This article has been viewed 44,411 times.
Learn more...
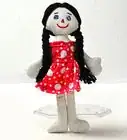
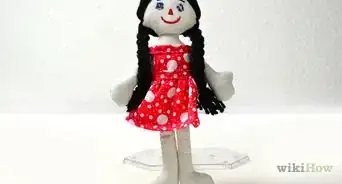
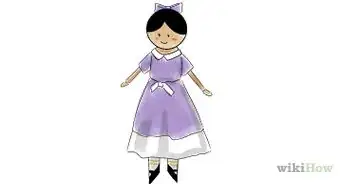
Amigurumi are cute, crocheted dolls. They are typically people-shaped, but some people also make animals, such as cats, dogs, and horses. Adding hair to an amigurumi can help make it look more doll-like. If it is based on an existing character from a book, movie, or series, then it can make the character more recognizable. There are several different ways of attaching amigurumi hair. Once you know the basics, you can vary your technique and create all sorts of unique hairstyles.
Steps
Making Basic Amigurumi Hair
-
1Choose yarn for the hair. You can use any color of yarn you want, including pink or purple. Try to use the same weight of yarn as you did for the rest of the doll. For example, if you made your amigurumi using crochet thread, you should use crochet thread for the hair as well.
-
2Make a wig cap using the same color of yarn as the hair. Use the same pattern as you did for the amigurumi's head. The wig cap will be placed at an angle on the back of the head. How far down the cap goes depends on where you want the hairline to be.[1]
- Leave a long tail of yarn at the end of the wig cap so that you can sew it on.
Advertisement -
3Sew the wig cap onto the amigurumi's head using a simple, running stitch. Thread a yarn needle onto the tail end of the wig cap. Position the wig cap over the back of the head. Once you are happy with the placement, sew the cap onto the head using a running stitch. Sew along the bottom edge of the wig cap, then knot and snip the yarn when you are done.[2]
-
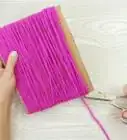
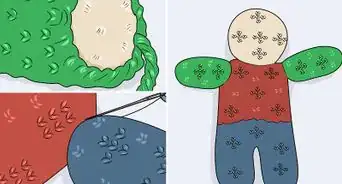
4Wrap the rest of the yarn around a piece of cardboard. Cut a piece of cardboard down the length you want the hair to be first. Next, wrap the yarn lengthwise around the cardboard. Hold the yarn along the top or bottom edge so that it doesn't slip off. Depending on the size of the doll you are making, plan on wrapping the yarn about 50 to 70 times. Start and finish wrapping at the bottom edge of the cardboard.[3]
-
5Cut the yarn along the bottom edge of the cardboard. You will now have 50 to 70 separate strands that are twice the length you need them to be. Don't worry; the hair will be the right length once you attach it. Keep all of the yarn strands together.[4]
-
6Insert a crochet hook through a stitch on the bottom edge of the wig cap. Make sure that you are inserting the hook through the actual cap, and not through the running stitch you used to sew the cap onto the head.[5]
- Use a crochet hook that matches the yarn you are using.
-
7Pull one of the yarn strands partway through the stitch. Pluck out one of your cut strands of yarn. Find the middle and catch it with the hook. Slide the crochet hook back out of the stitch on the wig cap, pulling the yarn strand with it by about 1 inch (2.54 centimeters).[6]
-
8Pull the tail ends of the yarn through the loop and tighten. Use your fingers or the crochet hook to grab the tail ends of the yarn strand. Pull them through the small, 1-inch (2.54-centimeter) loop. Gently tug on them to tighten the knot. You've just attached your first strand![7]
-
9Attach more strands all along the hairline. Use the same method you just did to attach more strands of yarn to the wig cap. Keep going until you filled the entire bottom edge of the wig cap.
- If you did not make a wig cap, consider sketching a guide line with a dressmaker's pen.
-
10Fill in the rest of the wig cap. Work your way row by row until you reach the top of the head. Because of how much space yarn takes up, you do not need to fill every row/stitch. Make sure that you fill the very top of the head, however![8]
-
11Style the amigurumi's hair. Use your fingers to brush the yarn hair how you want it to lay. If you need to, trim the hair with scissors until it is the length you want it to be. Do not brush the yarn hair; otherwise the yarn will come apart. If you must brush it, use your fingers only.
- If you want your amigurumi to have curly hair, you can gently unravel the strands of yarn with a wide-toothed comb. This works best on 4-ply yarn.


Making Pre-Styled Amigurumi Hair
-
1Choose some yarn for the hair. You can make the hair using any color of yarn you want, but it should be the same weight. If you make your amigurumi with crochet thread, you should use crochet thread for the hair as well.
- This method will create hair that is permanently styled into a ponytail or two pigtails.
-
2Make a wig cap using the using the same pattern as you did for the amigurumi's head. Use the same color of yarn as you are going to use for the hair. You will be slipping the wig cap over the back of the head, so size it accordingly. How tall you make the cap depends on where you want the hairline to be.[9]
- Leave a long tail of yarn at the end of the wig cap. This will allow you to sew it on.
-
3Stitch the wig cap onto the amigurumi's head. Thread a yarn needle onto the long tail of the wig cap. Slip the wig cap over the back of the amigurumi's head. Sew the wig cap onto the head using a running stitch. Make sure that the stitches go right along the bottom edge of the wig cap. When you are done, knot and snip the yarn.[10]
-
4Wrap the yarn around a piece of cardboard. Cut the cardboard down to the length you want the hair to be first, then wrap the yarn lengthwise around it, about 50 to 70 times. Begin and finish wrapping at the bottom edge of the cardboard.[11]
- Hold the yarn along one of the edges so that it doesn't slip off of the cardboard.
-
5Snip the yarn apart along the bottom edge of the cardboard. You will now have a ton of little strands of yarn that are twice the length you need them to be. Don't worry; they will be the right length once you attach them to the head.[12]
-
6Insert a crochet hook through a stitch on the bottom edge of the wig cap. Choose a crochet hook that matches the yarn you hare using. Insert it through one of the stitches on the edge of the wig cap—not the running stitch.[13]
-
7Catch and pull one of the yarn strands through the stitch. Pick up one of your cut yarn strands. Find the middle, then slip it over the point of the crochet hook. Use the crochet hook to pull the strand back through the stitch by about 1 inch (2.54 centimeters).[14]
-
8Bring the tail ends of the yarn through the loop and tug to tighten. Use your finger or crochet hook to pull the two tail ends of the yarn through the 1-inch (2.54-centimeter) loop. Tug on them to tighten the knot.[15]
-
9Attach more strands all along the bottom edge of the wig cap. Use the same method you just did to attach more strands of yarn to the wig cap. Keep going until you filled the entire bottom edge of the wig cap.[16]
- If you want a thick ponytail, add another row of yarn strands just above the first one.
-
10Add a double center part if you want pigtails. Imagine a line going from the center-front of the hairline to the center-back of the nape. Attach more yarn strands to this line using the same method as before. You need two lines, right next to each other.[17]
- Make the strands on the left line point to the left, and the strands on the right line point to the right.
- Skip this step if you are making a ponytail.
-
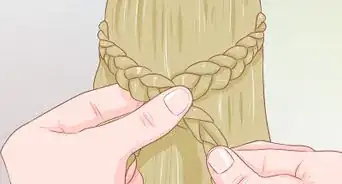
11Style the amigurumi's hair. Pull your amigurumi's hair into a ponytail or two pigtails. Wrap a piece of colorful yarn around it to secure it.[18] For a tighter hold, wrap a clear elastic around the ponytail or pigtails first, then add the yarn.
- The ponytail should be placed high on the amigurumi's head.
- Use the double center part as a guide for the pigtails. For a fancier doll, you can braid the pigtails instead.


Making Curly Amigurumi Hair
-
1Pick yarn for the hair. You can use any color of yarn you want, even blue, but it should be the same weight as the rest of the doll. If you made your amigurumi using crochet thread, then you should use crochet thread for this as well.
-
2Make a wig cap using your chosen hair color. Use the same pattern as you did for the amigurumi's head. How long you make the wig cap depends on how far down you want the hairline to go.[19]
- Cut the tail end of the wig cap long enough so that you can sew it onto the doll.
-
3Sew the wig cap onto the amigurumi's head using a running stitch. Place the wig cap over the back of the doll's head. Thread a yarn needle onto the tail end of the yarn, then use a running stitch the sew it in place. Make sure that you are placing the stitches on the bottom edge of the wig cap only. Knot and cut the yarn when you are done.[20]
-
4Secure the yarn to the wig cap with a slip stitch. Insert the crochet hook through a stitch along the bottom edge of the wig cap. Catch the yarn with it, then pull it back through the stitch to make a small loop. Bring the hook back over the stitch, and catch some more yarn. Pull it through the loop; this will cause the loop to fall off of the hook.[21]
- You can start anywhere along the edge of the wig cap you want, but somewhere along the back might be the best.
- Don't worry about the tail; you'll weave it back into place later on.
-
5Chain stitch until the strand of hair is a little longer than you want the curl to be. The chain will become shorter once it starts to curl. Consider making it about two stitches longer.[22]
-
6Work your way back down with a single crochet. When you are back to where you started with the first chain stitch, stop, and prepare to make your next curl.[23]
-
7Insert the crochet hook in the second stitch to the left or right of the first one. Move your crochet hook over by one stitch on the wig cap. Insert it into the next stitch, and pull up a loop of yarn.[24]
-
8Continue making curls until you fill the bottom edge of the wig cap. Make another chain, just like the first one. Work your way back down using single crochet. Move the hook over by one stitch, and make another curl.[25]
-
9Fill the rest of the wig cap using more curls. Once you finish the bottom row, move the crochet hook up by one stitch, and do the next row. When you finish the last curl, knot the yarn to the wig cap, cut it, then weave the tail into the cap.[26]
- You may notice that the curls take up a lot of room, so it's okay if you skip rows or stitches.[27]
-
10Tack the curls down into position, if desired. Thread some more yarn onto a yarn needle. Knot the end, then use it to stitch the curls down onto the wig cap into a position you like. Start with the bottom layer first, then work your way to the top.[28]
- You can skip this step if you want your amigurumi to have wild, unruly hair.
-
11Weave the tail from the first curl back into the wig cap. Thread the tail onto a yarn needle. Weave the tail back into the wig cap along the edge with a simple running stitch.


Things You'll Need
- Completed amigurumi
- Yarn or crochet thread
- Crochet hook
- Yarn needle
- Scissors

References
- ↑ https://www.youtube.com/watch?v=PfMYJMyqYEI
- ↑ https://www.youtube.com/watch?v=PfMYJMyqYEI
- ↑ http://www.thefriendlyredfox.com/2016/09/how-to-attach-hair-to-crochet-doll.html
- ↑ http://www.thefriendlyredfox.com/2016/09/how-to-attach-hair-to-crochet-doll.html
- ↑ https://freshstitches.com/how-to-add-yarn-hair-to-amigurumi-tutorial/l
- ↑ https://freshstitches.com/how-to-add-yarn-hair-to-amigurumi-tutorial/
- ↑ https://freshstitches.com/how-to-add-yarn-hair-to-amigurumi-tutorial/
- ↑ http://www.thefriendlyredfox.com/2016/09/how-to-attach-hair-to-crochet-doll.html
- ↑ https://www.youtube.com/watch?v=PfMYJMyqYEI
- ↑ https://www.youtube.com/watch?v=PfMYJMyqYEI
- ↑ http://www.thefriendlyredfox.com/2016/09/how-to-attach-hair-to-crochet-doll.html
- ↑ http://www.thefriendlyredfox.com/2016/09/how-to-attach-hair-to-crochet-doll.html
- ↑ https://freshstitches.com/how-to-add-yarn-hair-to-amigurumi-tutorial/l
- ↑ https://freshstitches.com/how-to-add-yarn-hair-to-amigurumi-tutorial/
- ↑ https://freshstitches.com/how-to-add-yarn-hair-to-amigurumi-tutorial/
- ↑ http://www.thefriendlyredfox.com/2016/09/how-to-attach-hair-to-crochet-doll.html
- ↑ http://www.thefriendlyredfox.com/2016/09/how-to-attach-hair-to-crochet-doll.html
- ↑ http://www.thefriendlyredfox.com/2016/09/how-to-attach-hair-to-crochet-doll.html
- ↑ https://www.youtube.com/watch?v=PfMYJMyqYEI
- ↑ https://www.youtube.com/watch?v=PfMYJMyqYEI
- ↑ https://www.youtube.com/watch?v=jtiP_Zf9tH8
- ↑ https://www.youtube.com/watch?v=jtiP_Zf9tH8
- ↑ https://www.youtube.com/watch?v=jtiP_Zf9tH8
- ↑ https://www.youtube.com/watch?v=jtiP_Zf9tH8
- ↑ https://www.youtube.com/watch?v=jtiP_Zf9tH8
- ↑ https://www.youtube.com/watch?v=jtiP_Zf9tH8
- ↑ http://www.thefriendlyredfox.com/2016/09/how-to-attach-hair-to-crochet-doll.html
- ↑ https://www.youtube.com/watch?v=jtiP_Zf9tH8
- ↑ http://www.thefriendlyredfox.com/2016/09/how-to-attach-hair-to-crochet-doll.html
About This Article