This article was co-authored by wikiHow staff writer, Travis Boylls. Travis Boylls is a Technology Writer and Editor for wikiHow. Travis has experience writing technology-related articles, providing software customer service, and in graphic design. He specializes in Windows, macOS, Android, iOS, and Linux platforms. He studied graphic design at Pikes Peak Community College.
The wikiHow Tech Team also followed the article's instructions and verified that they work.
This article has been viewed 96,796 times.
Learn more...
Want to hide files in a secret locked folder in Windows 10 or 11? Encrypting a folder allows you to lock the folder to anyone who doesn't have an encryption key. We'll show you how to encrypt files in Windows 10 or 11 Pro or Enterprise editions in File Manager, and how to use AxCrypt to lock folders if you're using Home edition.
Steps
Locking Folders in Windows Pro & Enterprise Editions
-
1
-
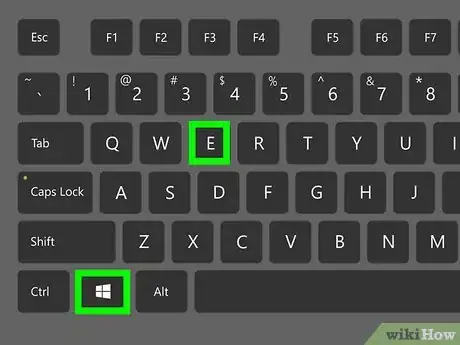
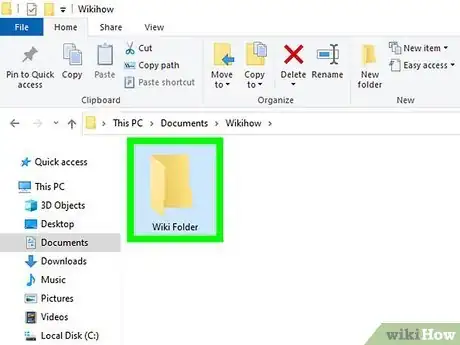
2Navigate to the folder you want to lock. Use File Explorer to navigate to where the folder you want to encrypt is stored on your computer.Advertisement
-
3Right-click the folder and click Properties. Right-clicking a folder displays a context menu. Click Properties at the bottom of that context menu.
-
4Click Advanced. It's the button at the bottom of the Properties menu under the "General" tab. This displays the Advanced Attributes menu.
-
5Click the checkbox next to "Encrypt contents to secure data" and click Ok. This selects the option to encrypt the folder.
- This option is not available in Windows 10 & 11 Home Edition.
-
6Click Apply. It's at the bottom of the Properties menu. This applies the changes you have made. A pop-up menu will appear asking if you want to encrypt just the folder or all the subfolders and contents within the folder.
-
7Select "Apply changes to this folder, subfolders and files" and click Ok. It's the second radio option in the pop-up menu. This applies encryption to all the folders and all the contents within.
- Alternatively, you can click "Apply changes to this folder only" to apply the encryption to the folder only, and not to any of the subfolders or contents within.
-
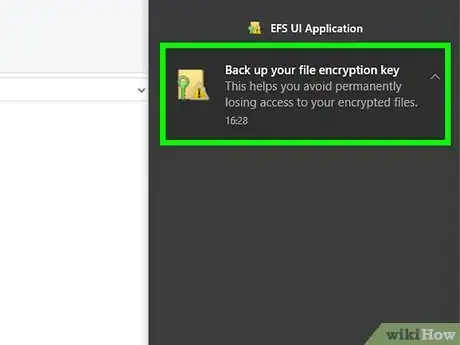
8Click Back up your file encryption key. When you apply the encryption, you will receive a notification in the lower-right corner asking you to back up your file encryption key. Click the notification to display the options for backing up your encryption key.
-
9Click Back up now (recommended). It's the first option that appears in the pop-up when you click the notification.
-
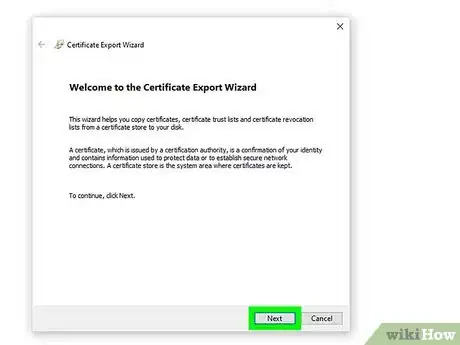
10Click Next. This page explains that the certificate export wizard will help you export the certificate for the encryption key. Click Next in the lower-right corner to continue.
-
11Select the format you want to use and click Next. The default file format is "Personal Information Exchange (.pfx)," but you can select one of the other options if you would rather use them instead.
- If you are not sure which option to select, go with the default Personal Information Exchange. Click Next to continue.
-
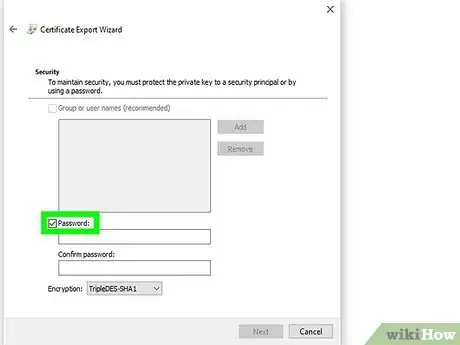
12Click the checkbox next to "Password," create a password and click Next. To create a password, click the checkbox next to "Password" and then enter a password on the line below it. Enter the exact same password again on the line below "Confirm password" and then click Next in the lower-right corner.
-
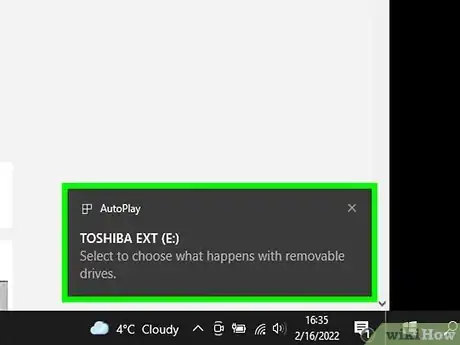
13Insert a USB thumb drive. Since the certificate contains the key needed to open your encrypted folder, the safest place to save this file is on an external hard drive, such as a USB thumb drive. Insert a USB thumb drive into any available USB port on your computer.
-
14Click Browse and select a location of your thumb drive. Click the button that says "Browse" next to the bar that says "Filename." Then select your USB drive.
-
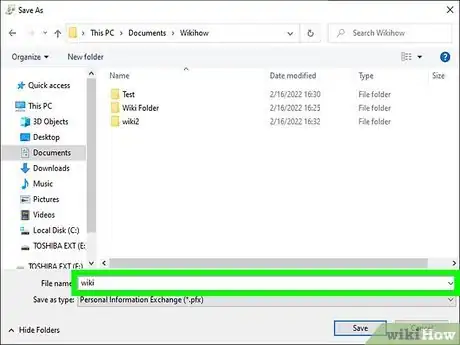
15Enter a filename and click Save. Enter the filename for the encryption key certificate in the line that says "File name." You can enter any filename you want, but you should use a filename that you recognize as the encryption key for your folder. Click Save when you are done.
- Be sure to save the USB drive in a safe location. You will need it if you are not able to access the encrypted folder for any reason.
-
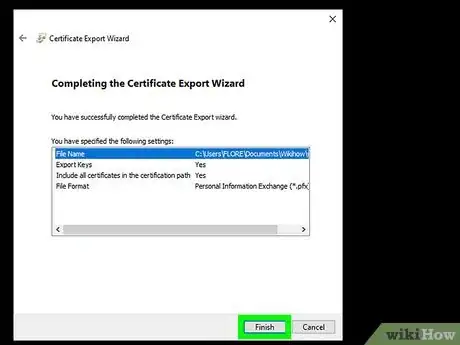
16Click Next and then click Finish. After saving the encryption key certificate, click Next to continue to the last page in the Export wizard. The last page shows a recap of all the steps you have taken. Click Finish to close the export wizard. The folder is now locked to all other users except for you.
- You can access your encrypted folders as long as you are signed into Windows under your user account. No other Windows user (including the admin) will be able to access the folder.
- If your user password is changed by an administrator, or you move the encrypted folder to another computer, you will not be able to access the folder. You will need to import the encryption key certificate to regain access to the folder.[1]
Unlocking Folders in Windows 10 & 11 Pro or Enterprise
-
1Insert the USB drive with your encryption key certificate. Locate the USB thumb drive you used to save your encryption key certificate. Insert it into any USB port on your computer.
-
2Click the Windows Start menu . It's the icon with the Windows logo in the lower-left corner by default.
- If your Windows password has changed or you move your encrypted files to another computer, you will need to import the certificate with the encryption key in order to regain access to your encrypted folder.
-
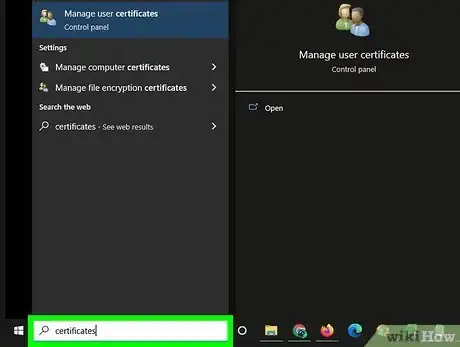
3Type certificates. This displays a list of all apps that manage certificates on your Windows computer.
-
4Click Manage User Certificates. This opens the Manage User Certificates app.
-
5Click Personal. It's the first option in the list on the left in the Manage User Certificates application.
-
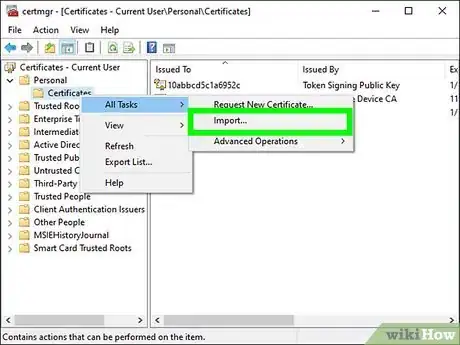
6Right-click Certificates. It's the first option in the panel on the right side under Object Type.
-
7Select All Tasks. It's the first option in the context menu that appears when you right-click "Certificates."
-
8Click Import. It's the second option under the "All Tasks" menu. This opens the Import Certificates wizard.
-
9Click Next. It's in the lower-right corner of the Import wizard. This screen explains that the Wizard will walk you through the process of importing your certificates again.
-
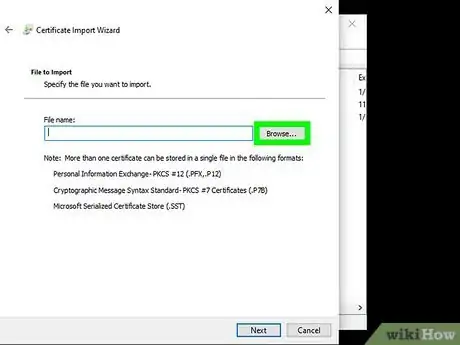
10Click Browse and select your encryption key certificate and click Next. Your encryption key certificate should be stored on your USB drive. Click Browse in the pop-up and navigate to the encryption key certificate on the USB drive, select it, and then click Next.
-
11Enter your password and click Next. This imports the certificates and allows you to access your encrypted folder again.
Locking Folders in Windows Home Edition
-
1Download and install AxCrypt. Windows Home Edition does not have the ability to encrypt and lock folders. However, AxCrypt is a free third-party tool you can use to encrypt and lock folders on all versions of Windows. Use the following steps to download and install Axcrypt:
- Go to https://axcrypt.net/download in a web browser.
- Click Download AxCrypt
- Click the AxCrypt Setup file in your web browser or Downloads folder.
- Click the checkbox next to "I agree to the license terms and agreement."
- Click Install.
- Click Yes.
-
2Click New User? Sign Up. It's at the bottom of the window that appears when you launch AxCrypt. This opens up a web page that allows you to sign up for a new AxCrypt account.
- If you already have an account, enter the email and password associated with your AxCrypt account and click Ok.
-
3Sign up for an account. You can sign up for a basic account for free. A basic account allows you to encrypt and lock folders on Windows. Use the following steps to sign up for an account:
- Click Free below the account options.
- Enter your email address in the bar that say "Email."
- Click the checkbox next to "I am not a robot."
- Click Sign Up.
- Check the email you used to sign up with and open the verification email from AxCrypt.
- Click Verify AxCrypt ID.
- Enter a password you want to use.
- Enter the password again and click Verify.
-
4Launch AxCrypt. AxCrypt has a green icon with an image that resembles a padlock. Click the AxCrypt icon in your Windows Start menu or Desktop.
-
5Sign in to AxCrypt. Enter the email address and password you used when you signed up for an AxCrypt account and click Log In.
- You may be asked if you want to try a free 30 trial of the premium version of AxCrypt. If you don't want to sign up for a premium subscription, click Not Now. You can continue to use the free version of AxCrypt for as long as you want.
-
6
-
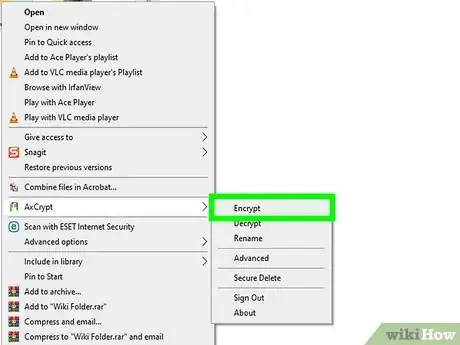
7Right-click the folder you want to lock. Use File Explorer to navigate to the folder you want to encrypt. Right-click the folder to display a context menu next to it. You should see "AxCrypt" as an option in the context menu.
-
8Hover over "AxCrypt" and click Encrypt. It's the first option in the AxCrypt submenu.
-
9Click Ok in the AxCrypt client. This begins encrypting all the files in the folder. They will be converted to ".axx" files. This indicates the files are encrypted. All encrypted files will be inaccessible until they are decrypted using AxCrypt.
- To decrypt a file or folder, make sure you are signed in to the AxCrypt client, right-click the file or folder, hover over AxCrypt and click Decrypt. Then click Ok in the AxCrypt client.
- You do not need to enter your AxCrypt password as long as you are signed in to the AxCrypt client.
Community Q&A
-
QuestionWhat happens if I forget the password?
 Community Answer1. Click Start > Open the "Run" dialog > Type: regedit and hit Enter. 2. Open Registry Editor and go to: HKEY_CURRENT_USER. 3. Click "Software" > "new software" > "folder lock" > "Uninstall". 4. Edit the value to 0; 5. Go to Control Panel and uninstall Folder Lock.
 -
Questionif folder locker.bat got deleted then How the locked folder will be accessed? Will deleting folderlocker.bat will delete the locked file?
 Community AnswerType this into command prompt: cd "" attrib -h -s "Control Panel.{21EC2020-3AEA-1069-A2DD-08002B30309D}" ren "Control Panel.{21EC2020-3AEA-1069-A2DD-08002B30309D}" Locker.
 -
QuestionHave locked folders on a USB but after they are locked can still search with a file extension (eg. docx) and all files with that extension will show up! Not much point locking them.
 Chris GootosCommunity AnswerWhat's the logic to lock the folders? To not allow access to files or to completely hide the folder from search parameters? You can right-click, then properties, then on the bottom you can choose "hide"; however, you're probably best off by restricting the permissions of the folders to access only by you through the System Permissions of the file or folder.
References
About This Article
1. Open the folder.
2. Create a new text file called "lock.txt" inside.
3. Open the file.
4. Copy the lock code from https://www.laptopmag.com/articles/password-protect-folder-windows-10.
5. Paste it into the file.
6. Replace "Your-Password-Here" with a password.
7. Save the file as "FolderLocker.Bat" and close the window.
8. Double-click FolderLocker.Bat in the folder.
9. Drag files to protect to the new fodler called "Locker."
10. Double-click FolderLocker.Bat and press the Y key.
