This article was co-authored by wikiHow staff writer, Kyle Smith. Kyle Smith is a wikiHow Technology Writer, learning and sharing information about the latest technology. He has presented his research at multiple engineering conferences and is the writer and editor of hundreds of online electronics repair guides. Kyle received a BS in Industrial Engineering from Cal Poly, San Luis Obispo.
This article has been viewed 9,022 times.
Learn more...
Let’s face it — mining a significant amount of iron can take a while in Minecraft. Luckily, there is a faster way! Iron golems drop a ton of iron, and they spawn when villagers don’t have a golem around. The iron golem technique keeps villagers contained in a room so they spawn a golem above them. Then, flowing water pushes the golem into lava, dropping iron into hoppers. This wikiHow guide will show you how to make an iron farm in Minecraft Java Edition, survival mode.
Things You Should Know
- Note: This guide covers the Java Edition of Minecraft. Bedrock Edition requires a different method with 10 villagers and 20 beds.
- To build the farm structure, you’ll need around 250 solid, non-flammable blocks and about 130 walls. Take a look at the full materials list below.
- You can optionally trap a zombie to keep near the villagers! This will make them defensive and spawn iron golems more quickly.
- To defeat the iron golems, make a platform above the farm with flowing water. This will push the golems into a room full of lava.
Steps

Build the Farm
-
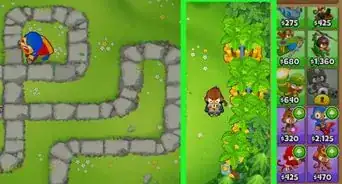
1Use blocks to build a stairway. This stairway will let you get to the spot in the air where you want to make the farm. You’ll also use this stairway to lead the villagers and zombie up to their rooms.
- The floor of your farm should be at least 12 blocks up from the ground. Building it lower may cause iron golems to spawn on the ground.
- Making the stairway 2 blocks wide makes it easier to guide the villagers and zombie up.
-
2Optionally, make the zombie room. This is where you’ll trap a zombie. The zombie causes the villagers to spawn iron golems more quickly to defend themselves.
- Make the floor of the zombie’s room with 1 block.
- Make 4 walls 3 blocks high, 1 block up from the floor.
- Place water on the floor to prevent the zombie from burning during the day.
-
3Make the villager rooms. There will be three rooms total, one for each villager. The villagers spawn iron golems when none are present nearby. Make sure the villagers’ rooms are near the zombie room so they can see the zombie. They need a direct line of sight with the zombie to become defensive.
- The villager rooms should have three blocks of flooring arranged in a 3 by 1 configuration.
- Make the walls for each room 3 blocks high.
- Place a torch in each room to prevent zombies from spawning in the rooms.


Trap a Zombie
-
1Cover the villager rooms with blocks. You’ll be leading the zombie into the zombie room of your farm. Leave only the zombie room uncovered to prevent the zombie from going elsewhere.
-
2Optionally, place a trapdoor over the zombie room. This is helpful if you want to run over the zombie room while luring the zombie.
-
3Find a zombie. You’ll need to wait for night to fall before zombies spawn. Zombies will start following you when you’re close enough.
-
4Lead a zombie up the stairs. Watch your health as you do so. If the zombie defeats you, you’ll have to start over!
-
5Open the trap door. When the zombie is standing over the trap door, open it to drop the zombie into the zombie room.
-
6Place a name tag on the zombie. This prevents the zombie from despawning.[2]
- Make sure the name tag has been renamed using an anvil. Otherwise, it will have no effect on the zombie
- After naming the zombie, you can close the trap door.
-
7Uncover the villager rooms. Break the blocks you used to cover the villager rooms while collecting the zombie.


Gather Villagers
-
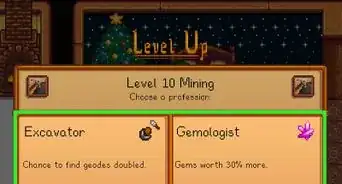
1Use 2 workstations to move the villagers to their rooms. A villager without a job will automatically walk toward the nearest workstation. Any workstation will work for this method:
- Place one workstation near a villager so they walk toward it.
- Place a second workstation closer to your farm.
- Break the first workstation so the villager walks to the second.
- Repeat until the villager is next to their room.
-
2Push the villager into their room. Walk into the villager to push them into their room.
- Repeat the villager leading process until you have 3 villagers.


Iron Golem Platform
-
1Use blocks to make a flat roof. The roof should completely cover the villager and zombie rooms. This roof will also function as the spawning platform for the iron golem.
-
2Replace 3 roof blocks with stairs on one edge of the roof. They should be all in a line (3 by 1) where one stair makes up one corner of the room. The stairs’ lower step should face outward.
- This is where the water will push the iron golem off the platform.
-
3Place stairs on the roof. These should be perpendicular to the 3 exit stairs.
- Place these stairs in a straight line. For example, if your roof is 11 by 7 blocks, make a 7 block long line.
- The stairs should be directly adjacent to the 3 exit stairs.
- The lower steps should face the exit stairs.
-
4Place additional roof blocks. These roof blocks will go behind the roof stairs, creating a raised platform on the roof.
-
5Place walls around the iron golem platform. This will prevent the iron golem from walking off the roof in any direction.
- Don’t put walls in front of the 3 exit stairs.
-
6Place 3 signs at the exit. The signs should be perpendicular to the exit stairs. They should also be in front of the stairs.
- To place the signs perpendicularly, place the first sign as you normally would.
- Then, crouch and place the remaining 2 signs adjacent to the first, creating a “gate” at the exit that will prevent water from flowing out.
-
7Place water on the lower level of the roof. Put the water source on the side opposite to the exit. The water should be flowing directly toward the exit.
-
8Place water on the upper level of the roof. Put the water source on the side opposite to the exit. The water should flow perpendicular to the lower level water. This will push the golem toward the lower level, then toward the exit.


Iron Golem Lava Room
-
1Place a 3 by 3 grid of hoppers on the ground. The center of this 3 by 3 grid should be directly under the middle sign of the exit in the roof.
-
2Place a 2 by 1 chest next to the hoppers. Make sure the hoppers are connected to the chest. This is where the dropped iron will go.
-
3Place walls on the ground around the hoppers. This will be the base of the iron golem lava room. The chest will stick out of one side of the lava room, this is intended!
-
4Place another 2 levels of walls stacked on top of the first walls. The lava room will be 3 walls high at this point. Make sure to place walls on top of the chest as well.
-
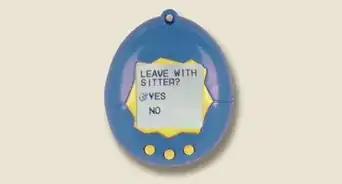
5Place a 3 by 3 grid of signs above the hopper grid. The signs should be 3 blocks above the ground (2 above the hoppers).
- Crouch to place the signs so that they are all parallel with each other.
-
6Place another 3 levels of walls. The lava room is now 6 walls high.
-
7Place lava in the center of the sign grid. The signs prevent the lava from reaching the floor, protecting the iron that drops from the golem.


-Step-13.webp)


References
About This Article