This article was co-authored by wikiHow Staff. Our trained team of editors and researchers validate articles for accuracy and comprehensiveness. wikiHow's Content Management Team carefully monitors the work from our editorial staff to ensure that each article is backed by trusted research and meets our high quality standards.
The wikiHow Video Team also followed the article's instructions and verified that they work.
This article has been viewed 484,050 times.
Learn more...
Holding a pencil correctly is an important step in learning to write and draw well. The tripod holding technique allows you to use your middle and index fingers, along with your thumb, to hold and use the pencil with the most control. Knowing how to hold the pencil correctly and practicing ways to keep good form while writing will ensure that your pencil holding technique is correct and stays that way.
Steps
Learning the Tripod Hold
-
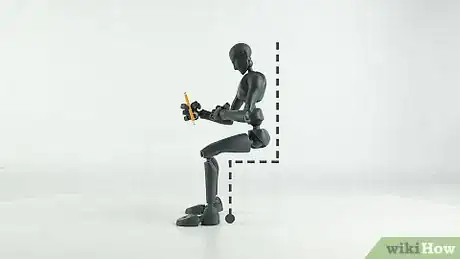
1Sit with your feet flat on the floor and with good posture as your write. Having good posture is important when learning to hold a pencil, as you can injure your back and create bad posture habits over time. Sit in a chair with a straight back and that is short enough for you to place both feet firmly on the floor.[1]
- When teaching children to hold a pencil, focusing on the child’s posture is important in forming good habits.
-
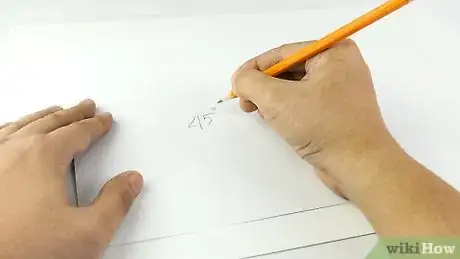
2Use your thumb and index finger to pick up the pencil. The tripod hold calls for your thumb, index finger, and middle finger to create a triangle that supports the pencil. Begin the hold by placing the pencil between your thumb and index finger, keeping the pencil at a 45 degree angle.[2]
- The tripod hold allows for the most accurate writing and drawing, helping you create small, detailed lines.
- The tripod hold is also the best for teaching children how to write, as it is the most common and easiest to learn.
Advertisement -
3Place the index finger on top of the pencil. For the most control, the tip of your index finger finger should be positioned on top of the pencil, working together with your thumb. Avoid squeezing the pencil with your index finger and thumb, holding the pencil gently.[3]
- Hold the pencil as close to the tip as possible.
-
4Rest the pencil on the middle finger. Holding the pencil with your thumb and index finger, rest the pencil on your middle finger for accuracy. Lightly pinch these three digits together with the pencil in between and begin writing. The middle finger is an essential part of the tripod hold.[4]
- Resting the pencil on your middle finger will change the angle of the pencil, making it less straight up and more angled.
- Even with this angle, you should be writing with the tip of the pencil, rather than the side of the pencil.
-
5Rest the pad of your hand on the page. The pad of your pinky and ring fingers should comfortably rest on the page, supporting the rest of your hand and allowing for full mobility. Check to make sure the rest of your hand is not coming off of the page, as this may be a sign of squeezing the pencil too hard.[5]
- You can place a spare piece of paper underneath your hand to avoid smudging, especially if you are left handed.
Other Ways to Hold a Pencil
-
1Use the quadripod grip. Pick the pencil up with your index finger and thumb in the same way you do with the tripod grip. Hold the pencil with your index finger, thumb, and middle finger. Rest the pencil on your fourth finger, ultimately utilizing four fingers instead of three. Utilize this grip if it comes natural to you, as it is just as efficient as other grips.
- Although this grip is less common than the tripod hold, it should be encouraged when teaching children, as they should do what feels natural.
- Do not put any pressure on the pencil with your fourth finger, as this will lower mobility and flexibility in the hand. Simply rest the pencil on this finger and use your other fingers to write.
-
2Utilize the underhand hold for drawing. Pick up the pencil with your index finger and thumb, holding it higher than usual, toward its center. Your fourth and fifth fingers should be supporting the bottom of the pencil. Hold the pencil loosely, with your index finger and thumb on opposite sides of the pencil. Draw larger, steady lines by moving your wrist, arm, and elbow and keeping your hand still.[6]
- This technique will not work well for writing, as it is not meant for detailed lines.
- When teaching children how to draw, this is a good technique for them to use on larger pieces of paper.
-
3Change your grip if you feel pain. There is no correct way to hold a pencil, so change your technique if you feel pain or unusually fatigued when writing or drawing. If a child complains about pain when writing, or you notice that their writing speed is not as efficient as it should be, consider changing their technique from the tripod grip to the quadripod grip, or vice versa.
- Children may start the learning process with immature grips, but it is important to help them grow strength in their hands through practice, allowing them to move on to more mature grips as quickly as possible.
Practicing Good Pencil Holding
-
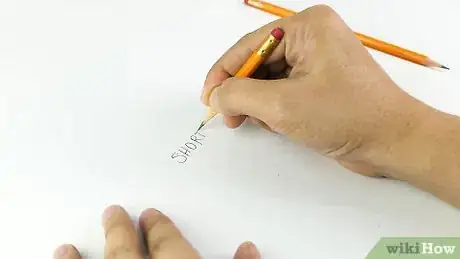
1Start with using a short pencil. Practicing with a short pencil will keep you from picking up the pencil with too many fingers or holding the pencil improperly. Use a short pencil when teaching children how to hold a pencil for the first time, is it will ensure that they pick the pencil up with their index finger and thumb.[7]
- Bad habits are less likely to form when using short pencils because there is less room to add fingers or hold the pencil in odd ways.
- You can break a pencil in half and sharpen one of the short ends, or use a broken crayon.
-
2Practice using "pinch and flip" method. When picking up the pencil, pinch the sharp end with your thumb and index finger. Flip the pencil around so that it rests on the fold of skin between your thumb and index finger. Practice this several times until it feels natural.[8]
- This is a great trick to utilize when teaching children where to hold the pencil.[9]
- This method ensures that the pencil rests in the correct part of your hand.
- The pinch and flip method prepares you for the tripod technique, which is the most common way to hold a pencil.
-
3Place a wad of paper or small ball in the palm of your hand. In order to avoid making a fist or squeezing too tightly, place a small ball in the cupped shape your hand makes. If you can not fit a small ball or wad of paper in this space, your grip may be too tight and restrictive. Make adjustments to your grip until the paper or ball fit into the space in your hand comfortably.[10]
- If a child is squeezing the pencil too tight, or seems to be struggling with technique, this is a great way to help them.[11]
- The ball or piece of paper should be no bigger than the size of a quarter.
-
4Practice writing on a flat surface with the tip of the pencil. Write while holding the pencil slanted or perpendicular to the table, focusing on using the tip of the pencil to write. Whether you use a 45 or 90 degree angle with your pencil is up to you and you should use whatever technique feels most comfortable.[12]
Community Q&A
-
QuestionHow do I get used to holding a pencil a different way? I keep going back to the old way when I'm not thinking.
 Community AnswerPractice makes perfect.You may find it feels uncomfortable and unnatural at first but keep trying. Every time you notice the reversion, restore it to the new way of holding it. It will take weeks and even months for this to change but with a will and constant practice, it will change.
 -
QuestionIs it okay if my thumb is bent?
 Community AnswerHowever is most comfortable to write, go ahead. Bent fingers while writing is perfectly normal.
 -
QuestionAfter writing a letter, I find myself moving my hand over slightly to form the next letter. Is this correct or should I be gliding and not resting my hand on the desk?
 Community AnswerIt depends on the size of your letters. For very small writing, you will move your hand less frequently than for larger lettering. Whatever works best and is most comfortable for you is fine.
Warnings
- Incorrect pencil grip can contribute to reduced speed, legibility and even arthritic conditions later in life.⧼thumbs_response⧽
References
- ↑ http://www.educationandbehavior.com/teaching-proper-pencil-grip-to-develop-or-improve-handwriting/
- ↑ http://www.educationandbehavior.com/teaching-proper-pencil-grip-to-develop-or-improve-handwriting/
- ↑ http://www.teachhandwriting.co.uk/pencil-grip-tripod-guide-forming-handwriting.html
- ↑ http://www.educationandbehavior.com/teaching-proper-pencil-grip-to-develop-or-improve-handwriting/
- ↑ http://www.teachhandwriting.co.uk/pencil-grip-tripod-guide-forming-handwriting.html
- ↑ http://www.jerrysartarama.com/blog/how-to-hold-your-pencil-when-you-draw/
- ↑ http://www.educationandbehavior.com/teaching-proper-pencil-grip-to-develop-or-improve-handwriting/
- ↑ http://mamaot.com/2012/07/19/3-tricks-to-help-kids-learn-to-hold-their-pencil-correctly/
- ↑ http://mamaot.com/3-tricks-to-help-kids-learn-to-hold-their-pencil-correctly/
About This Article
To hold a pencil correctly, start by sitting up straight and placing both feet flat on the floor. Pick up the pencil using the thumb and index finger of your dominant hand, keeping the pencil at a 45 degree angle. Next, position the tip of your index finger on top of the pencil and use your thumb to grip the side loosely. Let the pencil rest on your middle finger, then lightly pinch your thumb, index, and middle fingers together. Rest the pad of your hand comfortably on the page to support your hand as you write! If you want to learn how to adjust your grip for drawing with a pencil, keep reading the article!


