This article was co-authored by Ollie George Cigliano and by wikiHow staff writer, Hunter Rising. Ollie George Cigliano is a Private Chef, Food Educator, and Owner of Ollie George Cooks, based in Long Beach, California. With over 20 years of experience, she specializes in utilizing fresh, fun ingredients and mixing traditional and innovative cooking techniques. Ollie George holds a BA in Comparative Literature from The University of California, Berkeley, and a Nutrition and Healthy Living Certificate from eCornell University.
There are 15 references cited in this article, which can be found at the bottom of the page.
This article has been viewed 100,371 times.
If you want to improve your knife skills and stay safer in the kitchen, it all starts with holding your blade properly. Adjusting your grip on a knife will let you make more controlled and quicker cuts so you’re more efficient. It also prevents the blade from slipping so you’re less likely to have an accident in the kitchen. With a bit of practice and care, you’ll stay safe while handling your knives.
Steps
Gripping a Standard Chef’s Knife
-
1Loop your middle, ring, and pinky finger around the handle so they’re directly behind the blade.[1] Keep your fingers close together so you don’t see the knife’s handle between them.[2]
- The knife should fit comfortably in your palm while you’re holding it. If you have to twist or position your fingers awkwardly, then readjust your grip or try using a different knife.
-
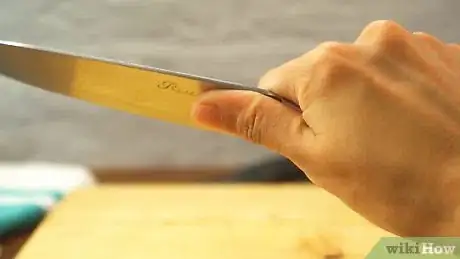
2Pinch the base of the blade with your thumb and index finger. Grip the knife with your dominant hand so you have the most control.[3] Press your thumb against the side of the blade right where it meets the handle. Then put your index finger on the other side of the blade so your fingertip is just above the sharp cutting edge. Squeeze the blade between your fingers so you have a firm grip.[4]
- This hand position keeps your wrist in line with the blade so it’s more comfortable to use.[5]
- Avoid holding the knife by the end of the handle since you won’t be able to get a firm grip.
- You can wrap your index finger and thumb around the handle just behind the blade if it’s comfortable for you, but you won’t have as much control when you make precise cuts.[6]
Warning: Avoid resting your index finger along the blunt edge on top of the blade since you won’t have as much control when you’re chopping. However, you can keep your finger on top of the blade if you’re using a deboning or paring knife.[7]
Advertisement -
3Squeeze the handle firmly so the knife doesn’t move around. Tighten your grip on the knife so it doesn’t slip or rattle around in your hands. Keep the blade so it’s in line with your wrist and arm. Don’t shift any of your fingers when you use your knife, or else you could risk cutting yourself.[8]
-
4Keep the blade pointed down while you’re carrying it. If you ever need to walk through the kitchen with your knife, firmly grip it by the handle. Hold the blade on the side of your body so the tip points toward the ground. That way, you’re less likely to injure yourself or someone else.[9]
- If you drop your knife, move out of the way and let it fall to the ground. Do not try to catch it since you could accidentally grab the blade.
Guiding the Knife while Cutting
-
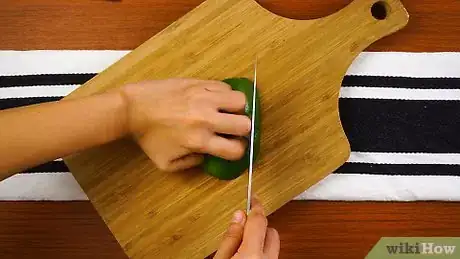
1Curl the fingers on your non-dominant hand into a claw. Lay your non-dominant hand flat on your countertop or table with your palm face-down. Push your fingertips into the surface to lift up your palm. Curl your fingertips back so they’re behind the first knuckles on your finger. When your hand is in the right position, it should look like the letter C.[10]
- Pretend you’re holding an imaginary baseball to get your hand in the correct position.
- Never extend your fingertips past your knuckles since you’re more likely to cut yourself.
-
2Rest your fingertips on the food you’re cutting. Keep your hand locked in the claw shape and position your arm so your wrist is parallel to the edge of your cutting board. Press your fingertips into the ingredient just behind where you want to make your cut. Make sure the first knuckles on your fingers are in front of your fingertips so you don’t injure yourself.[11]
- Position the ingredient so the flattest side is on the bottom. That way, it’s less likely to rock or move around when you try to cut it. If you’re working with a round or irregularly shaped ingredient, cut it in half before you continue chopping it.
Tip: Always check that you have a stable cutting surface. If your cutting board rocks or shifts, try putting a towel underneath it to help keep it steady.[12]
-
3Press the side of the blade against your knuckles. Hold the knife with your dominant hand so you have the most control. Move the blade next to your guide hand so it pushes against the first knuckle on your index or middle finger. Keep your fingertips curled back so they’re away from the sharp edge of the blade.[13]
- Your knuckles will help keep the blade straight and protect your fingertips.
-
4Rock the knife blade forward to cut through the ingredient. Press down on the ingredient with your guide hand so it doesn’t slip or move. Hold the knife at a 30- or 45-degree angle so the tip touches your cutting board. Push the knife forward as you bring the base of the blade down. Use a single, fluid motion while you slice through the ingredient to make the cleanest cuts.[14]
- Be careful not to lift the knife up so much that the cutting edge lifts up over your knuckle, or else you may cut yourself.
- Avoid lifting the knife straight up and down since you won’t get clean cuts and could cause the blade to slip.
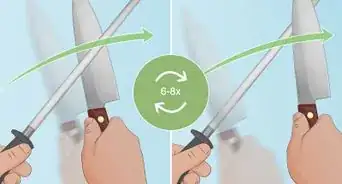
Warning: Sharpen your knife before using it since the blade is more likely to slip when it’s dull.[15]
-
5Move your guide hand backward as you’re cutting. After each cut, slide your non-dominant hand further back along the ingredient. Check the width of the first piece you sliced, and shift your guide hand back enough to cut another piece that’s the same size. Once you reposition your non-dominant hand, press the side of the blade back against your knuckles and continue cutting.[16]
- It’s okay if you cut slowly when you’re first starting off. As you practice and feel more comfortable using your knife, you’ll be able to increase your speed.
- Always keep your fingertips behind your knuckles when you reposition your hand.
-
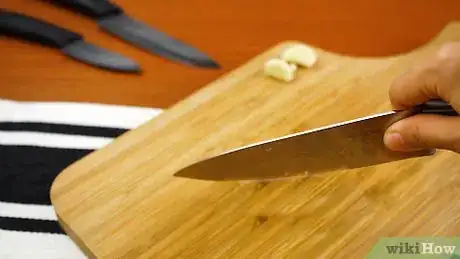
6Place your guide hand on top of the blade’s tip if you’re mincing. Hold the knife by the handle with your dominant hand and keep the blade parallel with the long edge of the cutting board. Press the tip of the blade against the cutting board. Rest the fingers of your non-dominant hand on the blade’s blunt edge right above the tip. Keep the blade tip against your cutting board as you rock the handle up and down to make your cuts.[17]
- This works great for breaking down herbs, onions, garlic, and other ingredients into small, fine pieces.
Community Q&A
-
QuestionWhy is it important to store and carry chef's knives in a carrying case?
 Tally_ 2Community AnswerIt helps them last longer, and they’re less likely to be lost or damaged or to do damage.
Warnings
- Pay attention to where you position your hands and fingers while using your knife so you don’t accidentally cut yourself.⧼thumbs_response⧽
- Avoid holding the blade loosely since you won’t have as much control and could hurt yourself.⧼thumbs_response⧽
References
- ↑ Ollie George Cigliano. Private Chef & Food Educator. Expert Interview. 30 August 2021.
- ↑ https://www.foodrepublic.com/2011/05/02/how-to-hold-a-knife/
- ↑ Ollie George Cigliano. Private Chef & Food Educator. Expert Interview. 30 August 2021.
- ↑ https://www.epicurious.com/expert-advice/how-to-hold-a-knife-the-right-way-and-become-a-better-cook-because-of-it-article
- ↑ Ollie George Cigliano. Private Chef & Food Educator. Expert Interview. 30 August 2021.
- ↑ https://www.seriouseats.com/2010/05/knife-skills-how-to-hold-a-knife.html
- ↑ https://www.foodnetwork.com/fn-dish/recipes/2019/12/rachael-ray-teaches-knife-skills-for-cutting-vegetables
- ↑ https://www.thekitchn.com/how-to-learn-basic-knife-skills-the-video-cooking-lessons-from-the-kitchn-108959
- ↑ https://youtu.be/eY6AyiwY1wE?t=46
- ↑ https://youtu.be/MI0YuyLZa10?t=44
- ↑ https://www.thekitchn.com/cooking-school-day-1-knife-skills-the-kitchns-cooking-school-208639
- ↑ https://food.unl.edu/how-use-chefs-knife
- ↑ https://youtu.be/MI0YuyLZa10?t=66
- ↑ https://youtu.be/G-Fg7l7G1zw?t=88
- ↑ https://www.urmc.rochester.edu/encyclopedia/content.aspx?contenttypeid=1&contentid=263
- ↑ https://youtu.be/MI0YuyLZa10?t=100
- ↑ https://www.seriouseats.com/2010/05/knife-skills-how-to-hold-a-knife.html
About This Article
To hold a chef’s knife, grip the handle in your dominant hand. Wrap your middle, ring, and pinky fingers around the top third of the handle so that your fingers are pointing up on the other side of your wrist. Raise your thumb and rest it on the side of the blade, safely near the top of the blunt side of the knife. Point your forefinger out and bend it slightly. Rest it against the blade on the opposite side of your thumb. This will help you balance and position the blade to make precise cuts. To hold a thin knife, like a carving or boning knife, grip the handle near the top with your middle, ring, and pinky fingers. Raise your thumb up to the junction where the handle meets the blade, near the top of the blunt side of the knife. Then, raise your wrist 1-2 inches (2.5-5 cm) and extend your forefinger along the top of the blunt side of the blade. If you're cutting something tough, rest your forefinger against the side of the blade near the top or tuck it around the handle next to your middle finger. This will help you guide the thinner blade as you make your cuts. For tips on how to guide your knife with your other hand while chopping, read on!


