This article was co-authored by wikiHow staff writer, Jessica Gibson. Jessica Gibson is a Writer and Editor who's been with wikiHow since 2014. After completing a year of art studies at the Emily Carr University in Vancouver, she graduated from Columbia College with a BA in History. Jessica also completed an MA in History from The University of Oregon in 2013.
There are 7 references cited in this article, which can be found at the bottom of the page.
This article has been viewed 21,159 times.
Learn more...
If you love to garden or just want to save a few bucks, start growing your own celery! To jumpstart the process, buy a bunch of celery from the store and cut off the base. You can place the base in water so the plant regenerates and begins growing new leaves. You could also grow an entirely new celery plant from seeds. Once your celery start has put on enough growth, plant it in an indoor container or transfer it outside.
Steps
Growing Celery from Stalks
-
1Buy a bunch of celery with the base still attached. Since you won't be starting your celery from seeds, purchase already grown celery from the grocery store or farmer's market. Choose a healthy-looking bunch of celery that has vibrant green leaves.[1]
- Unfortunately, you can't regrow a celery plant from an individual celery stalk. This is why it's important to buy celery with the base attached.
-
2Cut off a 2 in (5.1 cm) base from the bottom of the celery. Rinse your celery well to remove dirt and place it on a cutting board. Take a sharp knife and carefully cut across the celery to remove the base. Trim off the bottom so you have a 2 in (5.1 cm) base to grow the celery from. You won't use the individual stalks to grow new celery.[2]
- Eat the celery stalks or use them in other recipes.
Advertisement -
3Pat the base dry and set it in a bowl or jar. Dry the base with a kitchen cloth or paper towel and set the celery base in a bowl or jar. Position the celery base so the side you cut is facing up.[3]
- Choose a bowl or jar that's twice as wide as the celery base. This gives the plant room to grow.
-
4Pour in warm water to cover 2/3 of the celery base. Use tap water and fill the container until water comes up the side of the celery base. The warm water is more effective than cold water at stimulating plant growth.[4]
- Don't use hot water because you'll stress the plant which could make it soften.
-
5Put the container with celery in a bright location. Set the bowl with the celery base in a sunny windowsill or somewhere that it will get natural light throughout the day. In order to grow, your celery needs 6 to 7 hours of sunlight every day.[5]
- If your space doesn't get enough light, place an LED or fluorescent light near the plant. Then, turn on the light to ensure the celery gets a total of 6 or 7 hours of light a day.
-
6Replace the water every other day and wait for new shoots to grow. The water will become stagnant as it sits, so pour it out about every 2 days and replace it with fresh water. Pour in more water whenever the celery base begins to dry out.[6]
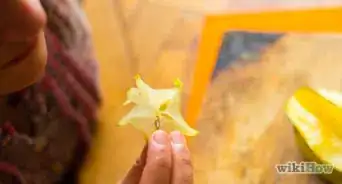
- You'll slowly begin to see tiny green and yellow leaves emerging from the top of the celery base. This should take about 5 or 6 days.
Tip: Check the water after the first few days. The celery base might suck up a lot of the water, so you may need to pour in extra water to prevent it from drying out.
-
7Plant the celery base in a pot filled with soil after 1 week. Once your celery base has been growing in the water for about 1 week, you'll see several small leaves and shoots in the middle. Since the celery plant needs nutrients from soil, fill a pot about 2/3 full of garden soil and put the celery base in it. Cover the base with soil so that only the tiny shoots are visible and then water the new plant.[7]
- If you prefer, plant the celery base in your garden.


Starting Celery from Seeds
-
1Read seed packets to find celery seeds that will thrive in your area. The back of the packet will tell you how long it takes the celery to grow, what zones you can grow it in, and other characteristics of the plant. For example, if you live in zone 6, you could grow most types of traditional celery or leaf celery.[8]
- You could choose celery that has heavy, dark green stalks or heat-resistant varieties, for instance.
-
2Start the seeds 10 to 12 weeks before the last spring frost. It will take a long time for your celery to grow, but soaking and starting the seeds indoors gives you a jumpstart. Celery is sensitive to frost so if you plan on transplanting your celery starts outdoors, grow it indoors first.[9]
- If you're planning on growing the celery in a large pot, you can begin the seeds whenever you like. Just pay attention to your area's cold weather conditions if you decide to put the pot outside.
-
3Soak the seeds in a bowl of water overnight before you plant them. Celery seeds have a tough outer shell that can make it difficult for water to penetrate them in the soil. To get your seeds ready for planting, dump the seeds into a bowl and pour in enough cold water to cover the seeds. Set them aside at room temperature and leave them to soak overnight.[10]
- You can also try soaking the seeds in cool chamomile tea. The tea contains tannins that are thought to soften the hard shells of the seeds.
-
4Drain the seeds and plant them in a pot filled with soil. Set a fine-mesh strainer over the sink and pour the bowl of celery seeds into it. Then, fill a pot that's at least 8 inches (20 cm) deep with standard potting soil. Scatter the seeds over the top of the soil and cover them with 1⁄4 inch (0.64 cm) of soil. Don't push the seeds down into the soil.[11]
- Choose a pot that has drainage holes. This prevents the soil from becoming water-logged.
Tip: If you prefer, buy a large gardening flat. This contains dividers that keep the celery starts separate as they grow.
-
5Water the seeds every other day. Never let the soil dry out or your celery seeds won't grow. Pour in enough water to moisten the soil, but don't flood it so water drains out of the container.[12]
- If you prefer, fill a clean spray bottle with water and mist the soil every day. This ensures that you don't overwater the seeds.
-
6Put the container in a warm, sunny space. Keep the room temperature between 60 and 70 °F (16 and 21 °C) to give the seeds the best growing conditions. You could place the pot or flat in a sunny windowsill, for instance.[13]
- If you're concerned that the seeds aren't getting enough sunlight, place a lamp with an LED or fluorescent light over the container.
-
7Transplant the individual celery starts when they're 2 inches (5.1 cm) tall. If you let all of the celery starts grow in the same pot, they'll crowd each other and won't reach their full size. Once the celery starts are 2 inches (5.1 cm) tall, plant each start in its own pot or container.[14]
- You can plant the celery starts outside instead of keeping them in pots. Plant the celery starts 8 to 10 inches (20 to 25 cm) apart in a row. If you have more than 1 row, leave 10 inches (25 cm) of space between the next row.


Transplanting a Celery Start in a Container
-
1Choose a well-draining 8 in (20 cm) deep pot for your plant. The pot needs to have holes in the bottom for excess water to drain from. Although you could use any material, plastic can prevent the soil and celery plant from drying out.[15]
- If you want to plant more than 1 celery start, use several pots. Crowding too many plants in 1 pot will prevent them from reaching their full size.
-
2Fill the pot with garden soil and organic compost. Buy a bag of garden soil and fill your pot 3/4 full with the soil. Most garden soils have a pH between 6 and 7, which is good for celery. Mix in about 1 inch (2.5 cm) of organic compost, which will help the soil hold onto moisture.[16]
- You can purchase compost from most gardening centers or use homemade compost.
-
3Plant 1 celery start 3 inches (7.6 cm) deep in the pot and press soil around its base. Take a celery start that you bought or grew from seed and lower it 3 inches (7.6 cm) deep into the soil in the middle of your pot. Add more garden soil and press around the base of the plant so the roots are anchored.[17]
- Put in enough soil so it's level with the top of the pot.
-
4Water the plant every other day so the soil stays moist. Don't let the soil around your celery dry out or the plant won't thrive. Touch the soil and water around the base of the plant whenever the soil begins to feel a little dry.[18]
- You may need to water the celery every few days or more often if the soil absorbs most of the water.
-
5Place the celery container in a sunny location. Expose your celery plant to sunlight throughout the day so its leaves can create food for the plant. Try placing the pot in a sunny windowsill. Your celery needs 6 to 7 hours of sunlight.[19]
- If you don't have an indoor space that gets enough sunlight, place a lamp with an LED or fluorescent near the plant and turn it on for a few hours.
-
6Harvest the celery once it reaches 8 inches (20 cm) tall. Continue to water your plant frequently and ensure that it gets sunlight. Let the plant keep growing until its leafy stalks are 8 inches (20 cm) tall. Then, you can use a knife to cut off the outer stalks. Continue to let the center stalks grow or slice across all of them if you want to harvest the entire plant.[20]
Did You Know? It takes around 100 to 140 days for most celery varieties to mature.


Community Q&A
-
Questionis there a way to grow celery completely in water?
 James PorterCommunity AnswerSee aqua/hydroponics. In theory, with constant refreshing of water and feeding it the right plant foods, then yes. But it is easier to grow celery in soil; originally celery was mounded up with soil to blanch the stems too.
Things You'll Need
Growing Celery from Stalks
- Knife and cutting board
- Shallow bowl or dish
- LED or fluorescent light, optional
Starting Celery from Seeds
- Bowl
- Pot with drainage holes
- Garden soil
- Fine-mesh strainer
- Pots or gardening flats
Transplanting a Celery Start in a Container
- Deep pot
- Garden soil
- Organic compost


References
- ↑ https://www.allrecipes.com/article/regrow-celery-from-scraps/
- ↑ https://www.allrecipes.com/article/regrow-celery-from-scraps/
- ↑ https://www.allrecipes.com/article/regrow-celery-from-scraps/
- ↑ https://www.allrecipes.com/article/regrow-celery-from-scraps/
- ↑ https://www.allrecipes.com/article/regrow-celery-from-scraps/
- ↑ https://www.allrecipes.com/article/regrow-celery-from-scraps/
- ↑ https://www.allrecipes.com/article/regrow-celery-from-scraps/
- ↑ https://garden.org/plants/group/celery/
- ↑ https://www.garden.eco/growing-celery-indoors
- ↑ https://www.garden.eco/growing-celery-seed
- ↑ https://www.garden.eco/growing-celery-indoors
- ↑ https://www.garden.eco/growing-celery-indoors
- ↑ https://www.garden.eco/growing-celery-indoors
- ↑ https://www.gardeningknowhow.com/edible/vegetables/celery/container-grown-celery.htm
- ↑ https://www.gardeningknowhow.com/edible/vegetables/celery/container-grown-celery.htm
- ↑ https://www.gardeningknowhow.com/edible/vegetables/celery/container-grown-celery.htm
- ↑ https://youtu.be/SrYPkVjQGVA?t=253
- ↑ https://pioneerthinking.com/practical-steps-to-grow-celery-indoors
- ↑ https://www.gardeningknowhow.com/edible/vegetables/celery/container-grown-celery.htm
- ↑ https://www.gardeningknowhow.com/edible/vegetables/celery/container-grown-celery.htm
About This Article