This article was co-authored by wikiHow staff writer, Amy Bobinger. Amy Bobinger has been a writer and editor at wikiHow since 2017. She especially enjoys writing articles that help people overcome interpersonal hurdles but frequently covers a variety of subjects, including health and wellness, spirituality, gardening, and more. Amy graduated with a B.A. in English Lit from Mississippi College in 2011 and now lives in her hometown with her husband and two young sons.
There are 8 references cited in this article, which can be found at the bottom of the page.
This article has been viewed 35,502 times.
Learn more...
Although oysters are best eaten when they’re fresh, they don’t have to go to waste just because you have too many to enjoy all at once. You can freeze oysters in their shells, on the half-shell, or shucked, but be sure the oysters are still alive if you freeze them in their shells. When stored properly, oysters should stay fresh in the freezer for up to 3 months, but they should be cooked before they are eaten.
Steps
Freezing Whole Oysters
-
1Tap the shells to check if the oysters are still alive. Oysters should be frozen, eaten, or cooked alive to prevent the spread of foodborne illness. When you tap on a live oyster, it will hold its shell tightly shut, or it will close it if it’s opened. Sort through the oysters individually, carefully checking each one.[1]
- If you come across an open oyster that doesn’t react when tapped, discard it.
-
2Wash the shells thoroughly under cool running water. Before you freeze the oysters, you should wash the shells to rinse away any sand or pieces of shell that might be present. If you like, you can gently scrub the outside of the shell with a stiff-bristled brush to remove any dirt.
- By washing the oysters before you freeze them, they’ll be ready to shuck and cook as soon as you thaw them out. This will also help preserve their texture better than washing them after they are thawed.
Advertisement -
3Place whole oysters in moisture-resistant bags in the freezer. The shells will protect the oysters from being damaged, so you can just toss them into a resealable plastic bag, then place the bag into the freezer.[2]
- This is a great method for freezing oysters if you don’t have very many of them; however, it’s not the most efficient if you are storing a large quantity.
-
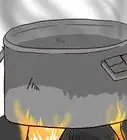
4Store the oysters in the freezer for up to 3 months. After 3 months, you run the risk of your oysters becoming freezer-burned. When you're ready to thaw them out, place the bag of oyster shells into your refrigerator for about 24 hours.[3]
- Use a permanent marker to write the date that you froze the oysters on the bag before you put it into the freezer so you don't forget how long it's been.


Storing Half-Shell Oysters in the Freezer
-
1Tap each oyster to make sure it's still alive. A live oyster has a muscle that it uses to hold its shell tightly closed. If a live oyster is open, tapping on its shell should cause it to slam shut. If it stays open, the oyster has already died and you should throw it away.[4]
- Oysters should always be shucked, eaten, or frozen while they are still alive to prevent exposure to a natural bacteria that can cause serious illness or even death.
-
2Scrub the shells with a stiff-bristled brush. Hold the shell under running water and use a brush to scrub away any sand, shell particles, or mud that might be on the outside of the oyster.[5]
- If the oyster isn't clean, you can push dirt onto the oyster meat with the knife when you open it.
-
3Hold the oyster with a dish towel or a glove. Oyster shells are sharp, and it's easy to cut yourself when you're opening them. You'll get a better grip on the oyster and be less likely to get a cut if you protect your hand.[6]
-
4Pry off the top shell of the oyster. Carefully slide an oyster knife into the hinge, or the pointed edge, of the oyster shell, and twist until you hear a pop. Run the knife along the top edge of the oyster to free it from the shell, then break the top shell away.[7]
- Keep the oyster upright to save as much of the oyster’s juice as possible.
-
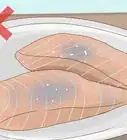
5Place half-shell oysters in a shallow container. Leave about 1⁄2 in (1.3 cm) of headspace in the container, then seal the container and place it into the freezer.[8]
- Carefully lay the oysters flat so the juices don’t spill out, as this liquid contains a lot of flavor. It will also help keep the oysters plump and hydrated while they’re frozen.
-
6Store your oysters in the freezer for up to 3 months. After 3 months, your oysters will run the risk of becoming freezer burned and they will no longer be suitable for eating. Label the container so you don't forget how long they've been in the freezer.[9]
- When you're ready to thaw out your oysters, place them in the refrigerator for at least 24 hours.


Shucking Oysters for Freezing
-
1Rinse the shells under cold water before you shuck them. By cleaning the oysters before you shuck them, you remove any sand and debris from the shells, as well as any bacteria that might be living on the oyster.[10]
- If you like, you can use a stiff-bristled brush to clean the shells.
-
2Put on a pair of heavy gloves. Rubber or canvas gloves will work best to protect your hands from the sharp oyster shells, and they will also help you have a better grip on the oysters as you’re shucking them.[11]
- If you don’t have a pair of heavy gloves, fold a tea towel into quarters and drape it over the hand you’re using to hold the oyster.[12]
-
3Tap each oyster to make sure it's alive. Oysters keep their shells tightly closed when they’re alive. If they do open their shells, they will close them again when you tap on the outside of the oyster. If the oyster isn't alive, throw it away.[13]
- Oysters should be alive when they are shucked, as bacteria grows quickly on shellfish once it is no longer alive.
-
4Hold the oysters over a bowl to keep the liquor. The juice that is naturally in an oyster, called the liquor, is very flavorful. When you’re eating oysters raw, you usually slurp this liquid up with the oyster. By saving the juice, you can add it to whatever recipe you make with your oysters when you thaw them out, and you’ll get even more oyster flavor in your dish.[14]
- The liquor inside the oyster should be clear or just slightly opaque. If it’s cloudy or yellowish, discard the whole oyster.[15]
-
5Hold the oyster in your hand with the curved side down. When you’re looking at the oyster, you should see one side that looks more rounded, and one side that looks more flat. The curved side should be against your palm, and the pointed end of the oyster should be pointing towards you.[16]
-
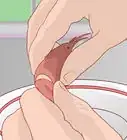
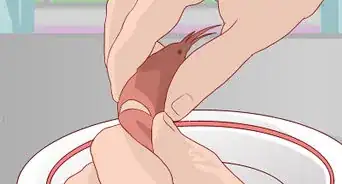
6Place the knife in the hinge that connects the top and bottom shells. The hinge is located at the pointy end of the oyster, and you should be able to find a small opening where you can insert the tip of your oyster knife.[17]
- If you need to, you can wiggle the tip of the knife around to help it slide into the hinge.
-
7Twist the oyster knife until you feel the shell pop. You might have to work the knife back and forth a little before you can twist it, but by twisting and prying, you should feel the oyster pop as the shell releases.[18]
- Although an oyster knife works best for shucking oysters, you can use a butter knife if you need to.
- The more you practice this, the easier it will be.
-
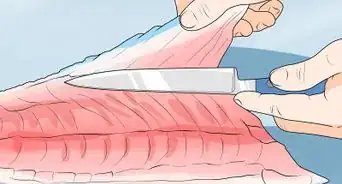
8Run the blade along the top of the shell to separate the top and bottom shells. This will cut through the muscle that attaches the oyster to the top shell. Break the top shell off and discard it. As you’re doing this, tilt the oyster to allow the liquor to pour into the bowl.[19]
- Try not to break the shell into pieces, since this will make it harder to get the meat out in one piece.
-
9Separate the oyster meat from the bottom shell with the knife. Run the blade beneath the oyster in a smooth motion to sever the oyster’s muscle from the bottom shell. This will free the oyster, and you can discard the bottom shell as well.[20]
-
10Place the oysters in a freezer-safe container and pour the liquor over them. Once your oysters are shucked, you can place them into a shallow container or a resealable plastic bag, then pour any of the liquid that you reserved over the oysters.[21]
- If the liquor doesn’t cover the oysters, add a little water to the container.
-
11Store the oysters for up to 3 months. When you’re ready to thaw out the oysters, place the container in the refrigerator for at least 24 hours or until they are completely defrosted. Due to food safety issues, you should not eat these oysters raw, but they will be excellent when they're cooked.[22]
- The texture of the oysters will be different after freezing.
- Label the container before you put it into the freezer so you don't forget how long they've been in there.


Warnings
- Because of texture changes and food safety issues, frozen oysters should not be eaten raw.⧼thumbs_response⧽
References
- ↑ https://nchfp.uga.edu/how/freeze/oysters.html
- ↑ https://nchfp.uga.edu/how/freeze/oysters.html
- ↑ https://www.doh.wa.gov/Portals/1/Documents/4400/332-072-RecHarvest.pdf
- ↑ https://nchfp.uga.edu/how/freeze/oysters.html
- ↑ https://www.seriouseats.com/2010/07/knife-skills-how-to-shuck-an-oyster.html
- ↑ https://www.seriouseats.com/2010/07/knife-skills-how-to-shuck-an-oyster.html
- ↑ https://www.seriouseats.com/2010/07/knife-skills-how-to-shuck-an-oyster.html
- ↑ https://nchfp.uga.edu/how/freeze/oysters.html
- ↑ https://www.doh.wa.gov/Portals/1/Documents/4400/332-072-RecHarvest.pdf
- ↑ https://www.seriouseats.com/2010/07/knife-skills-how-to-shuck-an-oyster.html
- ↑ http://www.foodandwine.com/how/shucking-oysters-home-according-professional-shucker
- ↑ https://www.bbcgoodfood.com/videos/techniques/how-shuck-oyster
- ↑ https://nchfp.uga.edu/how/freeze/oysters.html
- ↑ https://www.bonappetit.com/test-kitchen/common-mistakes/article/oyster-common-mistakes
- ↑ http://science.unctv.org/content/oyster-eating-safety-tips
- ↑ https://www.seriouseats.com/2010/07/knife-skills-how-to-shuck-an-oyster.html
- ↑ https://www.seriouseats.com/2010/07/knife-skills-how-to-shuck-an-oyster.html
- ↑ https://www.seriouseats.com/2010/07/knife-skills-how-to-shuck-an-oyster.html
- ↑ https://www.seriouseats.com/2010/07/knife-skills-how-to-shuck-an-oyster.html
- ↑ https://www.seriouseats.com/2010/07/knife-skills-how-to-shuck-an-oyster.html
- ↑ https://nchfp.uga.edu/how/freeze/oysters.html
- ↑ https://www.nola.com/entertainment_life/eat-drink/freezing-seafood-here-are-some-considerations/article_c8df9521-64d8-5602-a81d-a582ce8db8b7.html
About This Article

If you're freezing whole oysters, tap the shells to make sure the oysters are alive. Wash the shells thoroughly and put the oysters into a large bag before placing them in the freezer. If you prefer, you can also save space by shucking the oysters first, then placing them into a container with their juices. For tips on shucking oysters, keep reading!