This article was co-authored by wikiHow Staff. Our trained team of editors and researchers validate articles for accuracy and comprehensiveness. wikiHow's Content Management Team carefully monitors the work from our editorial staff to ensure that each article is backed by trusted research and meets our high quality standards.
There are 12 references cited in this article, which can be found at the bottom of the page.
The wikiHow Culinary Team also followed the article's instructions and verified that they work.
This article has been viewed 103,650 times.
Learn more...
Freeze-dried strawberries are a delicious, nutritious snack great. When freeze-drying food, the water is extracted to keep the food from spoiling and reduce its total weight. Do this at home either with a freeze-dryer or with your conventional oven. Once the berries are dry, eat them right away, use them in meals, or vacuum-seal them for long-term storage.
Ingredients
- 1 lb (0.5 kg) of strawberries (or more)
- 2 tbsp (30 g) of sugar (if using an oven)
Steps
Washing and Cutting the Strawberries
-
1Rinse your strawberries in cool water. Use fresh strawberries for optimal taste and texture. Hold the berries under the faucet and wash them with cold water for 30-60 seconds.[1]
- This removes the surface dirt and debris.
-
2Dry the berries with a clean towel. When freeze-drying your berries, you don’t want them to have much extra moisture. Pat them dry with a clean kitchen towel or paper towel to get rid of the excess water. The berries should be mainly dry to the touch on the outside.[2]
- Drying the berries prevents them from getting a mushy texture.
Advertisement -
3Cut off the stems using a sharp knife. Use a small- or medium-sized knife to chop off the green stems from the berries. Since you don’t eat the green stems, they aren’t necessary for the drying process.[3]
- If you notice any brown spots, cut them off as well.
-
4Slice the strawberries so they are less than 1⁄4 in (0.64 cm) thick. Using your small- or medium-sized knife, cut the strawberries vertically into small slices. Try to keep the size of the slices around 1⁄4 in (0.64 cm) thick so the berries dry evenly.[4]
- If the sliced berries are all different sizes, some may get too dry while others may not be dry enough, which affects the taste and texture.
Using a Freeze-Dryer
-
1Read your instructions to ensure you use your freeze dryer correctly. A freeze dryer is an automatic device that first freezes your food at a low temperature and then extracts all of the moisture out of it. Every freeze dryer is slightly different, so be sure to check the directions before you get started.
- If you don't, you could mess up the strawberries or damage your machine.
-
2Line the trays with parchment paper or freezer paper. Your freeze dryer comes with trays to store the food during the drying process. Rip pieces of parchment or freezer paper to the size of the trays and place them on top.[5]
- This way, the berries don't stick to the metal.
-
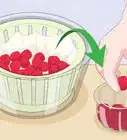
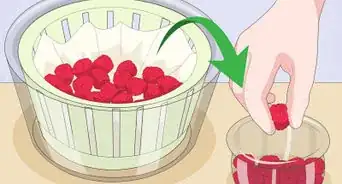
3Spread your berries on the pan in a single layer. After you lay down the parchment paper, arrange the strawberries on the tray so they are not overlapping. Leave a bit of space in between each berry for best results.[6]
- The freeze dryer is extremely efficient, so if the berries overlap slightly, it's okay. They'll still dry adequately.
-
4Load the trays into the freeze dryer and replace the insulated cap. After your trays are full of strawberries, they are ready for the freeze-dryer. Place the trays into their appropriate slots, and close the door of the machine. Replace the insulated cap on the outside by spinning it clockwise.[7]
- Double-check your directions to ensure you replace the insulated cap correctly. This controls the insulation level in your machine.
-
5Press "Start" after you lock the door. Close the door and turn the handle to the lock position. Once you lock the door, look for the large "Start" button located towards the top. By pressing this, the machine turns on and starts the drying process.[8]
- Soon the machine will reach −30 °F (−34 °C).
-
6Check on your berries the next day. Your berries should be completely dry in about 24 hours. The machine freezes the berries for about 9 hours and then dries them for 12+ hours. Open the machine after the drying cycle is complete, and do a taste test.[9]
- The strawberry should be completely solid and have a crunchy texture.
-
7Defrost your machine after the berries are finished drying. After you take your strawberries out of the machine, it will switch to the “Defrost” mode automatically. This is when the freeze-dryer gets rid of the remaining ice and comes back to room temperature. The process takes about 2 hours, and once it’s complete, the machine is ready to use again.[10]
- Make sure the drain is over a bucket or sink so the water doesn't spill out over your countertops.

Drying the Strawberries in the Oven
-
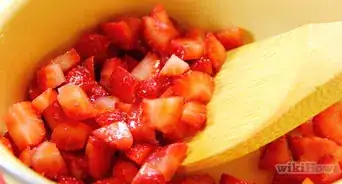
1Mix 1 lb (0.5 kg) of chopped strawberries with 2 tbsp (30 g) of sugar. To keep the strawberries sweet and flavorful, combine 2 tbsp (30 g) of sugar with your berries in a large bowl. Let the berries sit for 25-30 minutes to preserve the sweet taste.[11]
-
2Spread the berries in a single layer on a baking sheet. First, line a baking sheet with aluminum foil. Then, arrange the strawberries on top. As you do this, try not to have any strawberries overlapping so they can all dry completely.[12]
-
3Cook the berries at 185 °F (85 °C) or lowest setting for 3-3.5 hours. To dry the berries, use the lowest temperature setting on your oven. In total, it should take about 3 hours for the berries to dry completely.[13]
- While this doesn’t freeze your berries, it still adequately dries them out, making this a good substitute technique.
-
4Rotate the baking sheet every 30 minutes. To ensure the strawberries dry completely, set a timer for 30 minutes and then check on them. Put on an oven mitt, and spin the baking sheet around the opposite way. Do this every 30 minutes so the strawberries dry entirely.[14]
- For instance, if the pan is facing horizontally, flip it around so it is vertical.
- If you don't rotate the pan, the outside of the strawberries may be drier than the inside.
-
5Check to make sure the strawberries are adequately dry. After your berries cook for a while, taste one of them to see if it's dry enough. The center should not be cold, and the outside should be completely dry.[15]
- If the berries are not dry enough, put them back in the oven for 10 minutes or so.
-
6Remove the berries from the oven when they are dry. If the berries are dry on the outside, they are likely finished. When using an oven, the berries should look dark in color, and their outsides should be dry. Place the baking sheet on top of your stove so the berries can cool down.[16]
Eating and Storing the Strawberries
-
1Eat your freeze-dried berries right away for a delicious, nutritious snack. Freeze-dried strawberries have a crunchy texture and sweet yet sour taste. You can eat them as soon as they are finished drying if you’d like. You can throw some in a plastic bag to take with you, and eat them throughout your day.[17]
- Dried strawberries make a great snack for hiking and backpacking.
-
2Add your strawberries to other foods or recipes for a yummy touch. Chop up 1/4 cup (59 g) or so of freeze-dried berries, and sprinkle them into cereal, oatmeal, or granola for a yummy breakfast dish. Since the berries are already preserved, they add a sweet accent to nearly any dish you add them to.
- In addition, add freeze-dried berries to your trail mix.
-
3Make muffins with freeze-dried strawberries for a healthy addition. To make muffins, combine 1/3 cup (79 g) of dried strawberries, 2 1/2 cups (592 g) of flour, 1 cup (237 g) of granulated sugar, 1/2 cup (118 g) of brown sugar, 2 1/2 tsp (12 g) of baking powder, 3 large eggs, 1/3 cup (79 mL) of vegetable oil, and 1/4 cup (59 g) of butter. Mix the ingredients, pour them into a muffin baking pan, and cook at 425 °F (218 °C) degrees for 25-30 minutes.[18]
- After 25-30 minutes, remove the muffins from the oven and place them on a cooling rack.
-
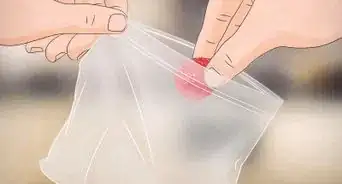
4Keep the berries in a resealable bag if using them within 1 year. Place your dried strawberries inside of a plastic bag with a resealable top. Fill the bag about 2/3 of the way full, and use your hands to squeeze out any air from the inside. Store the strawberries either in your pantry or in your refrigerator. Then, open the bag to eat or use your strawberries as needed. When you’re finished, be sure to close up the bag again.
- Your strawberries can stay fresh in a bag for up to 1 year, as long as you are mindful of air exposure. If the strawberries are exposed to lots of oxygen, they can get stale or develop a chewy texture.
- For ultimate freshness, place an oxygen absorber inside of the bag. Oxygen absorbers are small packages that help remove or lessen the level of oxygen inside of a package. You can find food-grade oxygen absorbers in the canning section of your local market.
-
5Use a vacuum sealer for a long-term storage method. Put your dried strawberries into a vacuum-sealable bag, and fill it about 2/3 of the way full. Place 1 oxygen absorber into the bag, and put the top of the bag into the vacuum sealer. Press the “Seal” button to start the process. The vacuum sealer removes the air from the bag while sealing it up with heat. This way, no oxygen can get into the bag and make your berries stale.[19]
- Write “strawberries” on the bag, and include the date you dried them as well. This helps you keep track of what is inside the bag and when you sealed it.
- The oxygen absorbers are a small pouch that help keep the fruit fresh. Purchase these in the canning section of the grocery store. They are helpful when preserving food and extending shelf life.
- You can keep the berries in a vacuum sealed bag for 10-15 years. Once you break the seal of the bag, the food has a shelf life of 1 year or so.
Things You’ll Need
- Knife
- Freeze-dryer OR oven
- Baking sheet
- Parchment paper or aluminum foil
- Plastic bags
- Vacuum sealer and bags (optional)
Warnings
- If your berries start to smell odd or sour, they may have spoiled. Throw them away if this is the case, as they could upset your stomach or make you sick.⧼thumbs_response⧽


References
- ↑ https://www.bonappetit.com/recipe/oven-dried-strawberries
- ↑ https://www.bonappetit.com/recipe/oven-dried-strawberries
- ↑ https://youtu.be/Gmm318vLlP8?t=1m17s
- ↑ https://youtu.be/3y9PgU0PrH4?t=36s
- ↑ https://youtu.be/3y9PgU0PrH4?t=13s
- ↑ https://youtu.be/3y9PgU0PrH4?t=50s
- ↑ https://youtu.be/3y9PgU0PrH4?t=1m
- ↑ https://youtu.be/3y9PgU0PrH4?t=1m35s
- ↑ https://youtu.be/3y9PgU0PrH4?t=2m9s
- ↑ https://youtu.be/3y9PgU0PrH4?t=3m
- ↑ https://www.bonappetit.com/recipe/oven-dried-strawberries
- ↑ https://www.bonappetit.com/recipe/oven-dried-strawberries
- ↑ https://www.bonappetit.com/recipe/oven-dried-strawberries
- ↑ https://www.bonappetit.com/recipe/oven-dried-strawberries
- ↑ https://www.bonappetit.com/recipe/oven-dried-strawberries
- ↑ https://www.bonappetit.com/recipe/oven-dried-strawberries
- ↑ https://youtu.be/vSMRqbAHb9A?t=2m52s
- ↑ https://www.bakersroyale.com/strawberry-muffins/
- ↑ https://youtu.be/rHpl2kj8pms?t=4s
About This Article

Freeze-drying your strawberries in the oven is a great way to make them last for longer. You'll need 2 tablespoons of sugar per 1 pound of strawberries. Start by rinsing your strawberries and drying them with a paper towel to remove any excess moisture. Cut off their stems and slice them into vertical slices less than a quarter-inch thick. Then, mix your strawberries with the sugar to keep them sweet and let them sit for 30 minutes. After that, spread them on a baking sheet lined with aluminum foil so that no strawberries are overlapping. Cook them at 185 degrees Fahrenheit for 3 to 3 ½ hours until the berries are completely dry. Rotate the baking sheet every 30 minutes to help them dry evenly. If you have any leftover freeze-dried strawberries, store them in a resealable bag in the fridge for up to 1 year. For more tips, including how to freeze-dry strawberries using a freeze-dryer, read on!