This article was co-authored by wikiHow staff writer, Eric McClure. Eric McClure is an editing fellow at wikiHow where he has been editing, researching, and creating content since 2019. A former educator and poet, his work has appeared in Carcinogenic Poetry, Shot Glass Journal, Prairie Margins, and The Rusty Nail. His digital chapbook, The Internet, was also published in TL;DR Magazine. He was the winner of the Paul Carroll award for outstanding achievement in creative writing in 2014, and he was a featured reader at the Poetry Foundation’s Open Door Reading Series in 2015. Eric holds a BA in English from the University of Illinois at Chicago, and an MEd in secondary education from DePaul University.
There are 8 references cited in this article, which can be found at the bottom of the page.
This article has been viewed 470,454 times.
Learn more...
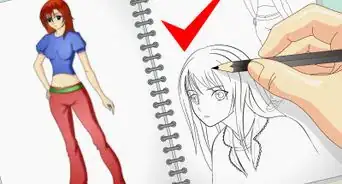
Drawing hair for manga characters is a ton of fun and quite easy—even if you’re not the greatest artist in the world! Since manga characters typically have simple, geometric hair, you can create excellent manga hair simply by layering shapes on top of one another and erasing the lines underneath the shapes on top. Create a simple oval to serve as a guideline for the head, add a larger circle behind it, then add spikes or rectangles to create the sides and fronts of the hair. With enough practice, you’ll master manga hair in no time!
Steps
Drawing Simple Messy Hair
-
1Draw an oval in pencil to create an outline for the face. Use a light-colored pencil to outline a simple oval wherever you want to place your head. Angle the cheeks down towards the bottom of the head at a sharper angle to give the jawline some contour. Use multiple lines to get the shape you want for the jaw and head.[1]
- You’re going to draw over the top of the head, so don’t worry if it isn’t perfect.
- You can place the chin slightly to the left or right to make your character face in a specific direction.
Tip: This hairstyle works for both men or women. In addition, you can easily extend the shapes in the back to make the hair bigger or smaller.
-
2Add 2 big spikes falling down over the center of the face. Slightly above the center of the head, in the center of the forehead draw two spikes pointing down and leaning away from one another. You can make them extend past the center of the head to make the hair hang over the character’s eyes, or you can keep them kind of smaller for a simpler hairstyle. Leave each spike open at the top to finish placing your bangs.[2]
- This should look like 2 connecting triangles that are missing the lines at the top. They can hang over the eyes or hang over the forehead.
- How sharp you make these lines will determine how spikey your hair looks. The straighter the lines, the sharper the hair.
Advertisement -
3Draw an uneven semi-circle around the back of the head leading into the cheeks. To draw the outline for the top and sides of the hair, draw a circle slightly larger than the outline of the head. Start in the bottom left of the cheek and draw a circle leading up around the top of the head. End your circle leading into the cheek on the opposite side. Make your lines slightly uneven to give the top of your hair a little natural variation.[3]
- You can turn this into simple longer hair by drawing lines running straight down from the sides of this semi-circle.
- Making the circle a little uneven will give the top of your hair some natural texture. You can make the circle perfectly smooth though if you’re trying to go for a cleaner look!
-
4Connect the 2 spikes in the middle to the cheeks and erase the inside of the hair. Connect the exterior edges of the spikes in the middle with the interior edges of the circle where it meets the cheek. Use lines that arc slightly away from the center of the face to give your head some shape. Erase the original guide lines for the top of the head that are inside of the hair you’ve just completed.[4]
- If you want the hair to seem like it’s leading away from the center of the head, end these lines by leading right into the cheeks. This will make it seem like the hair is wrapping around the sides of the head.
- If you want the hair to seem bigger and spikier, extend the edges of the uneven circle so that they end right in front of the cheek line and connect the lines there. This will make it seem like the hair is poking out in front of the head.
-
5Add smaller spikes falling over the face from the center to add detail. To give the hair some texture, layer some thinner, smaller spikes along the front of your hairline. Erase lines when you draw over them to make the hair seem like it has multiple layers. You can add a bunch of spikes for more detailed hair, or add 3-4 spikes for some simpler hair.[5]
- The curlier you make the spikes, the more natural the hair will look. This is mostly a matter of personal preference though, since manga hair is often pretty geometric and pointy.
- Adding 1-2 spikes arcing in a different direction than the rest of your hair is a great way to give your character a visual quirk!
-
6Include a tuft on the crown and erase guidelines to make hair overlap. Add a tuft on the top of the head on the left or right side to give the top of the hair some detail. Pick a point for the tuft and draw 1 tiny line arcing away to the left, one tiny line arcing away to the right, and a third tiny line pointing up from the center. Erase any guidelines where sections of the hair overlap to finish your hair. Add color or outline the hair in black marker if you want to give the hair some definition.[6]
- Most manga comics are in black and white. There’s nothing wrong with leaving your hair white.
-
7Finished.


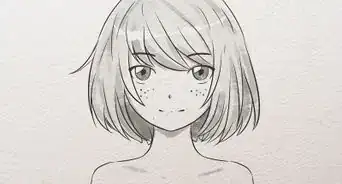
Illustrating Longer Hair
-
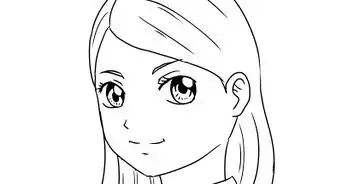
1Create an oval with sharper cheeks to make the outline of the head. In pencil, draw an outline for your character’s head by sketching a simple oval. Give your head a jaw by using sharper lines for the bottom left and right of the oval. If you’re drawing a female character, make the chin slightly pointer than you normally would, since female characters in manga typically have a thinner jaw.[7]
- If you’re drawing the entire body, add a rough outline for the neck and shoulders as well, since the hair in the back will flow behind the body.
Tip: You don’t have to make your character female just because you’re drawing long hair. From Vegeta to Inyuasha, there are plenty of manga characters with long hair that are men.
-
2Draw a larger arc over the top of the head, running straight down at the sides. Right above the oval, draw an arced line running around the top of the head to start the outline for the hair. When the arc meets the temple on both sides, extend the oval into a straight line running slightly away from the head to finish the larger outline for the hair.[8]
- If you want a thinner, wispier look, draw the lines on the side running straight down instead of slightly away from the head. This will make the back of the hair seem smaller. This will also make your character appear thinner.
- If you added shoulders and a neck, lead the hair behind the head by stopping the straight lines on either side when they meet the shoulders. Otherwise, make the hair as long as you’d like and connect the 2 lines at the bottom with a single line.
-
3Add 2 thin, symmetrical rectangles over the cheeks and temples. To give the sides of the head some hair, draw 2 rectangles on either side of the face. Start each rectangle near the temple above the center of the head and extend it down past the cheek, stopping at the same horizontal line where your chin ends. Angle the sides of the rectangle slightly away from the center of the face to make the sides of the head seem round. Erase the top line of the rectangle to lead the hair into the top of the head.[9]
- You can make theses rectangles longer if you want to give the character some longer hair.
-
4Draw an arc line connecting the sides of the rectangles to make bangs. Now that you’ve got the sides and back of the hair, it’s time to create the front. Draw a soft arc running from the middle of the rectangle on the left to the middle of the rectangle on the right. Lift the center of this line upwards in the middle towards the top of the head.[10]
- This line should rest right above the eyes for a standard haircut.
- Give this line less arc than a banana. If you make the line too round, the character won’t look natural. If the line is too straight, the hair will look flat. It should be a moderate arc that doesn’t stand out too much.
-
5Erase tiny sections at the bottom of the bangs and sides to add breaks in the hair. To give the hair some texture, erase 3-4 small lengths at the base of the bangs and sides. For each section you erase, draw 2 lines that meet one another in a point higher in the hair, like a tent or “A” with no middle bar. This will give the hair some texture and make the hair seem like it’s falling in separate sections.[11]
- Lean towards smaller details instead of bigger sections to avoid making the hair look like it’s missing giant clumps.
-
6Erase the guidelines and create texture by adding vertical lines to the hair. Use your eraser to remove the original outline for the top of the head. Erase anything in the middle of the rectangles on the sides that you’ve drawn. If you want to add some texture to the hair, add a tuft at the top of the crown by drawing 3 small lines running away from a point at the top of the head. Add individual lines in the back of the hair to give the hair more direction.[12]
- You can color the hair if you’d like, but it’s not mandatory for drawing manga.
-
7Finished.


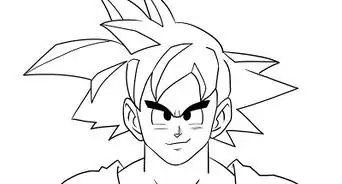
Creating Spikey Hair
-
1Draw a perfect circle for the top of the head. To emphasize this radical hair style, draw the head tilting down a little bit and start by creating an outline for the top of the head. Draw a perfect circle in pencil wherever you want to place the top of the head.[13]
- This hairstyle is perfect for a villain or main character since it’s a little more distinct and involves some sharper shapes. It works for male or female characters.
-
2Add a chin and include an ear if you want the character looking away. Draw a light guideline running horizontally through the center of the circle. Just below the guideline on either side, draw 2 lines rounding down towards a chin. You can draw the character facing forward by keeping these lines symmetrical, or make one jaw line sharper and put an ear on the side right before the jaw meets the bottom of the circle.[14]
- There are 2 styles of ears that you can choose from. A simple ear will just be a rounded half-circle that is slightly bigger on the top. You can also make the ear a little jagged and place a lobe sticking out a little at the bottom. It’s really up to you.
-
3Draw a rounded M-shape running from temple to temple for the part. Start on the left where the jaw line meets the circle. Draw large arc running upwards and dipping to a small point once it reaches the last third of the circle. Add a second, sharper arc by dipping back up before arching back down to the opposite side. This should look kind of like a lopsided “M” with a really small center, or a “3” on its side.[15]
- Even if you draw the character facing forward, you’re still going to put the part on the side of the head.
- If you’ve drawn an ear, place the smaller section of the line on the side with the ear. End the line slightly below the top of the ear in the circle.
- The point where the arcs dip and meet in the top of the head is the part.
-
4Erase your guide lines and add a sharper M-shaped form on top of the part. Erase the bottom of the circle to remove anything inside of the jaw lines and under the part. On top of the part, draw a smaller, spikey M-shape with the middle point layered on top of the point you made for the part. Draw it slightly askew, leaning to the right, and make the bar on the left thicker and sharper than the middle and the bar on the right.[16]
- This second “M” should cover a good portion of the hair line, but leave space on either side of the shape to make this form seem like it’s floating in the front of the hair.
Tip: If you struggling to picture this shape, look at the part in Goku’s hair when he turns super saiyan in Dragon Ball Z. Yugi’s hair in Yu-Gi-Oh! has a similar aesthetic, but your drawing shouldn’t be as symmetrical as his hair.
-
5Outline the top of the hair using a sequence of jagged points. Start right above the part at the top of the circle. Draw a sequence of spikes on the right side pointing away from the center of the head. On the opposite side, draw a larger sequence of spikes pointing to the left. You can point these spikes away from the head to make sharper, wilder hair, or bend the spikes slightly downward to make the hair seem more relaxed. Stop when you’ve gotten to the point where the hairline meets the base of the circle.[17]
- The spikes on the left should be slightly bigger than the spikes on the right.
- If you drew an ear, the spikes on the side where the ear is should flow behind the top of the ear.
-
6Erase the guide line on the longer side of the jagged M-shape. On the left of the big “M” you drew, erase the guide line representing the hairline. Leave the guide line on the right side though.[18]
-
7Fill in the hairline on the left with a few longer tufts of hair. To finish your hair’s outline, draw 2-3 larger, sharper points leading out of the “M” you drew. Point them in the same direction as the leftmost edge of the “M.” Connect the spike at the end of the left with the bottom of your hair outside the jaw. Leave the rightmost spike leading behind the “M” to keep it in front.[19]
- This will round your hair out and give it some attitude.
- If you drew an ear, leave the guide line to make it seem like your character has a clean sideburn on the side they’re facing.
-
8Add a few more spikes in the middle of the hair and color if you’d like. To give the hair some texture, add some smaller sets of spikes on the left or right side of the head. Leave the top of the part empty to make the hair there seem thicker. Lead each spike you draw away from the center of the part. You can color hair if you’d like but it’s perfectly fine to leave the hair black and white. You can also outline your drawing in black marker to give it some definition.[20]
-
9Finished.


Community Q&A
-
QuestionHow do I draw boys' hair from a front view?
 Community AnswerStart from the top left of the head and draw spikes in all directions, with some bent. Use these spikes as guides. The hair will be too straight, but don't worry. Now draw over the straight hair; this time, make uneven proportions - some small and some big.
 -
QuestionHow do I know where to put the eyes?
 Community AnswerDraw guidelines for this, like a cross on the head, bent in the direction your person/character is facing. Let these be your guidelines, so when you draw the hair, the draw the eyes, etc., all of it will look even.
 -
QuestionAm I supposed to draw the hair spiky?Community AnswerCreate 4 points on the head where the main points of hair will be and sketch lightly trying out different ideas until you find the right design. But you can make the hair however you want -- it's your drawing!
Things You’ll Need
- Pencil
- Paper
- Black marker (optional)
- Markers, colored pencils, or crayons (optional)
References
- ↑ https://www.drawingforall.net/how-to-draw-anime-hair/
- ↑ https://www.drawingforall.net/how-to-draw-anime-hair/
- ↑ https://www.drawingforall.net/how-to-draw-anime-hair/
- ↑ https://www.drawingforall.net/how-to-draw-anime-hair/
- ↑ https://www.drawingforall.net/how-to-draw-anime-hair/
- ↑ https://www.drawingforall.net/how-to-draw-anime-hair/
- ↑ https://www.animeoutline.com/how-to-draw-anime-and-manga-hair-female/
- ↑ https://www.animeoutline.com/how-to-draw-anime-and-manga-hair-female/
- ↑ https://www.animeoutline.com/how-to-draw-anime-and-manga-hair-female/
- ↑ https://www.animeoutline.com/how-to-draw-anime-and-manga-hair-female/
- ↑ https://www.animeoutline.com/how-to-draw-anime-and-manga-hair-female/
- ↑ https://www.animeoutline.com/how-to-draw-anime-and-manga-hair-female/
- ↑ https://youtu.be/Ua4a51XAMzQ?t=163
- ↑ https://easydrawingguides.com/how-to-draw-manga-hair-really-easy-drawing-tutorial/
- ↑ https://youtu.be/Ymbcwfb0w4o?t=189
- ↑ https://easydrawingguides.com/how-to-draw-manga-hair-really-easy-drawing-tutorial/
- ↑ https://youtu.be/Ymbcwfb0w4o?t=108
- ↑ https://youtu.be/Ymbcwfb0w4o?t=108
- ↑ https://youtu.be/Ua4a51XAMzQ?t=252
- ↑ https://youtu.be/Ymbcwfb0w4o?t=617
About This Article