This article was co-authored by Dean Theriot and by wikiHow staff writer, Amber Crain. Dean Theriot is a Personal Trainer and the Owner of Timberline Fitness in Houston, Texas. With over 25 years of experience in the fitness industry, Dean specializes in personal, group, and sport-specific training. Dean holds a BS in Exercise Physiology from LSU. Dean combines resistance and cardiovascular training with pilates exercises for comprehensive workouts for his clients. His sport-specific training includes football, basketball, and baseball.
There are 10 references cited in this article, which can be found at the bottom of the page.
This article has been viewed 25,257 times.
Tricep dips are an exercise that you can use to build your arms at home, at the gym, or even on a park bench during your morning run. The dip’s accessibility makes it a versatile exercise, but you need to be careful about form to stay safe and get the best results. Try tricep dips on a workout bench, on the floor, and using a dip machine at the gym to see which method works best for you.
Steps
Using a Bench or Chair
-
1Sit on the edge of a sturdy chair or bench.[1] Bring your arms down along your sides and rest your palms on your chair, wrapping your fingers under the front of the seat. Straighten your legs out in front of you and place your heels firmly on the ground.[2]
- Your seat should be stable enough that it doesn’t topple forward while you work. A workout bench is ideal if you have access to one.
- If you don't have a chair or bench, the edge of your bed will work too.[3]
-
2Scoot your buttocks off the chair, supporting yourself with your hands. Driving your weight into the palms of your hands and the soles of your feet, move your bottom forward until it’s completely off the chair. Keep your elbows tucked behind you, your shoulder blades back and down, and your forearms perpendicular to the floor.[4]
- Position your hands so that your fingers are facing forward rather than out to the side.
Advertisement -
3Lower yourself by bending your elbows back until they reach a 90-degree angle. Engage your triceps as you dip down so that your lowering motion is slow and controlled. Keep your elbows tucked straight back behind you instead of letting them flare out to get the best control for this exercise.[5]
- Don’t let your bottom touch the floor. If you can’t get down to a 90-degree angle to start, that’s perfectly normal. It’s better to not dip all the way to 90-degrees than to dip too far too fast.
-
4Straighten your elbows fully to lift yourself back up. Pause for 1-2 seconds at the bottom of your dip to make sure your motions are in-control. Then, engage your triceps to press your body back up, bringing your arms straight. Straighten your arm completely at the top of the move.[6]
-
5Repeat 5-7 times. If you are a beginner, start by building your strength rather than going all-out with tricep dips. Start your routine with 5-7 dips per set. Once you feel like you can safely and comfortably complete that, gradually increase the number of dips you do by 1 or 2 at a time.[7]

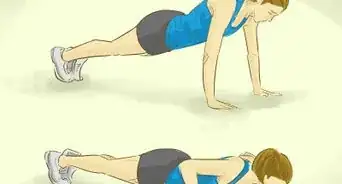
Performing Floor Dips
-
1Sit on an exercise mat with your knees bent and your feet on the floor. Keep your back straight and reach your arms back behind you, placing your palms flat on the floor. Face your fingers toward your hips.[8]
-
2Lift your hips off the ground to start the exercise. Push through the palms of your hands and the soles of your feet to support your weight. Your hips should hover 4–6 inches (10–15 cm) off the ground.
- If hovering your hips is too difficult, you can use foam blocks under your buttocks to help support you. You still need to engage your arms, but blocks can help you get used to the motion by offering some additional support.[9]
-
3Bend your elbows to lower yourself down. While keeping your shoulder blades down and back, bend your elbows until they reach a 90-degree angle or until your bottom hits the mat, whichever comes first. Be sure to keep your elbows tucked directly behind you to keep you stable and keep your arms engaged.
- Lower yourself slowly and with controlled movements.
-
4Straighten your arms to press yourself back up. Pause for a second at the bottom of your dip. Then, straighten your elbows to press yourself back to your starting position. It’s okay to slightly bend your elbows once you’re back in the starting position.[10]
- Continue using controlled movements for the best results.
-
5Repeat the exercise 5-7 times. A set of 5-7 reps is usually a good place for beginners. If you struggle with that, rest between your repetitions and do as many as you can while maintaining your form and avoiding pain. As you build your strength, you will be able to add additional reps to each set.[11]
- You can also add an additional challenge to the exercise by lifting one leg and bringing it parallel to the floor.

Working at a Dip Station
-
1Place your arms over the bars and lift yourself. Face the dip station and put your arms over the bars so your fingers point towards the floor. Lift your bodyweight and practice supporting yourself while your arms are straight. Make sure your shoulder blades are back and down so you avoid shoulder injury.[12]
- Keep your head facing forward and keep your neck and spine straight.
- If you can’t lift your bodyweight, use the steps built into the station or a stool to pull yourself up.
-
2Bend your knees back at a 90-degree angle if your station is not assisted. Dip assist machines will support your legs as you work. If you are using parallel dip bars rather than an assisted machine, pull your legs behind you so that you are hovering to start the exercise.[13]
- You will need enough room under you to ensure that you can dip down without hitting anything. If you can, bring your calves directly behind your knees parallel to the ground.
- If you can’t support your weight, suspend a resistance band between the bars and put your knees on it. This should relieve some of the weight.[14]
-
3Bend your elbows back until they reach a 90-degree angle. Dip yourself down into your station by bending your elbows. Keep them tucked in behind you so that they don’t stick out as you drop down.[15]
- Your dip should be a slow, controlled motion. Dipping too far could cause serious injury. Keep your shoulder blades back and down to limit your range of motion and stay safe. If you feel you cannot control your motions on parallel bars, look for an assisted dip machine to help you support some of your weight.
-
4Keep your arms slightly bent as you lift yourself. Straighten your elbows and push yourself up back to your starting position. Leave your arms slightly bent so your elbow doesn’t lock. If you feel like you cannot complete the dips, continue building up strength doing bench dips.[16]
- Keep your legs kicked back behind you. You do not want to drop them to support yourself between reps.
-
5Repeat the exercise 5-7 times. If you are new to tricep dips, start with a set of 5-7 reps. If you struggle to complete this, just do as many as you can safely and comfortably. As you build your strength, you can add onto your set 1-2 reps at a time.[17]

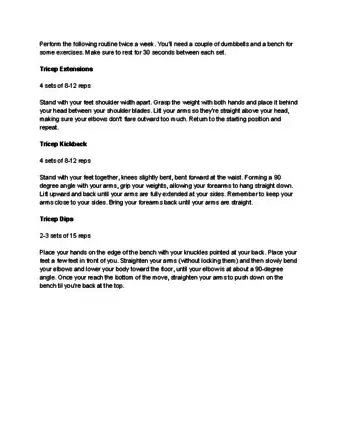
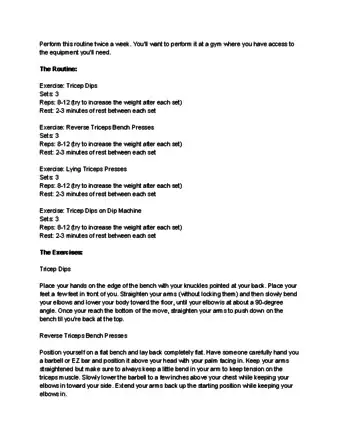
Sample Exercise Routines


-Step-10-Version-5.webp)

References
- ↑ Dean Theriot. Personal Trainer. Expert Interview. 22 January 2021.
- ↑ https://www.shape.com/fitness/tips/bench-triceps-dips-exercise
- ↑ Dean Theriot. Personal Trainer. Expert Interview. 22 January 2021.
- ↑ https://www.fitnessmagazine.com/workout/arms/exercises/how-to-do-tricep-dips/
- ↑ https://www.shape.com/fitness/tips/bench-triceps-dips-exercise
- ↑ https://www.fitnessmagazine.com/workout/arms/exercises/how-to-do-tricep-dips/
- ↑ https://www.theactivetimes.com/how-do-seated-tricep-dip
- ↑ https://gethealthyu.com/exercise/tricep-dip/
- ↑ https://www.healthination.com/fitness/how-to-tricep-dips-1
- ↑ https://gethealthyu.com/exercise/tricep-dip/
- ↑ https://www.healthination.com/fitness/how-to-tricep-dips-1
- ↑ https://www.bodybuilding.com/exercises/dips-triceps-version
- ↑ http://www.stack.com/a/dips
- ↑ https://youtu.be/Y9yM9k6YLxs?t=2
- ↑ https://www.bodybuilding.com/exercises/dips-triceps-version
- ↑ http://www.stack.com/a/dips
- ↑ https://breakingmuscle.com/fitness/the-3-building-blocks-to-performing-a-proper-dip
About This Article