This article was co-authored by Marta Nagorska. Marta Nagorska is a Nail Technician and Nail Art Blogger based in London, UK. She runs the blog, Furious Filer, where she gives tutorials on nail care and advanced nail art. She has been practicing nail art for over 5 years and graduated from Northampton College with distinction with a Nail Technician and Manicurist degree in 2017. She has been awarded the top spot in the OPI Nail Art Competition.
This article has been viewed 80,639 times.
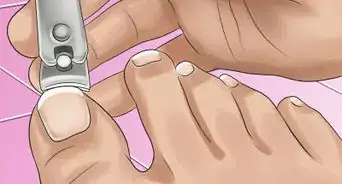
Over time, your nail clippers can accumulate buildup that looks unprofessional and is unsanitary. Invisible bacteria and fungus can easily be transferred from foot to foot by dirty nail clippers, so you should disinfect your clippers regularly to prevent this from happening. The surest way to clean your clippers is to sterilize them with heat, but you could also use a disinfectant and manual techniques to ensure your clippers are ready to use.
Steps
Sanitizing with a Disinfectant
-
1Purchase a suitable disinfectant. In the cleaning section of most stores, you should be able to find a "hospital grade" disinfectant (like barbicide). This will be more effective against a wide range of bacteria than other disinfectants. In many cases, you'll find this sold in concentrated form and will have to dilute it. [1]
- If hospital grade disinfectant is not available, use 70% concentration rubbing alcohol instead.
- Or, you can also use chlorine bleach. Just make sure that you dilute the mixture with water. The breakdown should be 90% water, 10% bleach.
-
2Dilute your disinfectant, if applicable. If your disinfectant came ready to use, you won't have to dilute it, but in many cases you'll have to add distilled water to the concentrated solution. The amount you'll have to dilute your solution will vary between products, so you should consult the directions on your disinfectant for best results.
- On the label of your disinfectant, there should be various suggested amounts for diluting. Use these to determine the amount you need to dilute your disinfectant.
- Impurities or additives, like fluoride, in your tap water can negatively impact the strength of your disinfectant. For this reason, you should only dilute with distilled water.[2]
Advertisement -
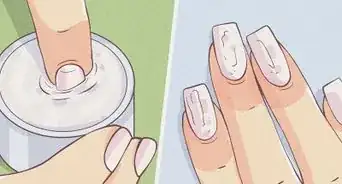
3Add your disinfecting solution to a suitable container. The disinfectant you'll be using will be very strong, so plastic containers might not hold up well to it. However, a simple glass container, like a cup, can be used for your disinfectant.
- Your disinfectant should be high enough in the glass to completely submerge the used part of the clippers.[3]
-
4Wait the time proscribed for full disinfecting. Different formulas of disinfectant may take less time than others to work. To guarantee your clippers are fully disinfected, soak them for full time indicated on the label of your disinfectant.
- After your clippers finish soaking, you can wipe away excess moisture with a clean, dry cloth or a piece of paper towel, or allow them to air dry. Your clippers are ready to clip![4]


Removing Stubborn Buildup Manually
-
1Use a toothpick. Small bits of buildup can become caked on your clippers. In some cases, this may have accumulated in a crevice. This kind of unsightly buildup may even remain after sterilizing or disinfecting. Use a toothpick to scrape the buildup from your clippers.
- After you've popped the buildup free from your clippers, loose remnants might remain. Wipe the area with a dry cloth after using your toothpick to remove any remaining buildup.
- You may find that more rigid tools, like tweezers or a paperclip, work best to remove exceptionally stubborn buildup.
-
2Soak your clippers. Allowing your clippers to soak in a cleaning solution or disinfectant can cause buildup to loosen or dissolve. Generally, the longer you soak your clippers, the greater the effect of your cleaning solution or disinfectant will have.
- It may be most time efficient to set an hourly alarm and periodically check your clippers to gauge whether or not they need more time to soak.
-
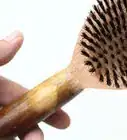
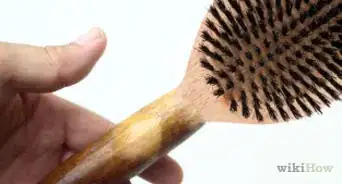
3Scrub your clippers. You might be surprised by how effective a simple dry scrubbing with a stiff bristle brush can be. Take your brush and apply it to your clippers. Switch your scrubbing direction and angle frequently while doing so.
- By changing the angle and direction of your brushing, you'll attack gunk and buildup from all sides, improving your chances of scrubbing it free.
- Since buildup has a tendency to accumulate in nooks and crevices, you may want to consider a small stiff bristle brush, like a toothbrush, to have better access to these narrow spaces.
- A manicure brush works well for this.[5]


Sterilizing with Heat
-
1Prepare your sterilizer. Sterilization requires you to get your clippers to a hot enough temperature to kill bacteria and micro-organisms. Autoclaves or bead sterilizers are special machines that are intended specifically for this purpose.[6]
- Each sterilizer will be different, so you should follow the setup directions for your sterilizer for best results.
- You could also use your oven to sterilize your clippers. To do this, lay your clippers on an oven-safe pan and bake your clippers at precisely 170°C (340°F) for 60 minutes.[7]
- If you use your oven to sterilize your clippers, you should remove them with caution, as they'll be hot after being sterilized.
- Plastic nail clippers, or any clippers you worry might not hold up to extreme heat, should be sanitized with another method.
- An autoclave is what most nail salons use. This is the best way to kill all bacteria on your clippers.[8]
-
2Wipe off your clippers. Use a clean cloth or a piece of paper towel to give your clippers a thorough wipe down before sterilizing. This will remove any loose bits of gunk or buildup from your clippers. Pay extra attention to ridges and contours on your clippers. Gunk and buildup love to hide in these places.
- After you finish wiping your clippers, you should wash or throw away your rag or paper towel to prevent the potential spread of bacteria or micro-organisms.
- A little bit of water or some cleaning agent on your cloth can add more cleaning power to your wipe down.
- If you get your clippers wet while wiping, be sure they are completely dry before sterilizing, especially with a bead sterilizer. The beads in bead sterilizers can become stuck to your clippers if you attempt to sterilize them while wet.[9]
-
3Allow your sterilizer time to warm up. Depending on your method of sterilization, the time it takes your sterilizer to reach heat up will vary. Many bead sterilizers, for example, only take about 15 to 20 minutes before they're ready for your clippers.
- Exercise caution whenever using heat to sterilize. The extreme temperatures can easily cause burns.
-
4Sterilize your clippers. Some methods of sterilization may require more time to completely sterilize your clippers than others. Generally, you can expect a metal tool to be sterilized if it has been held at a minimum of 170°C (340°F) for 60 minutes, but sterilizing machines may take as little as a single minute.[10]
- Heat conducts easily through metal, so you may want to use gloves or an oven mitt whenever handling tools that are freshly heat sterilized.
- When using a bead sterilizer, glass beads can sometimes stick to your clippers. Be careful, these will be extremely hot.[11]


Warnings
- Whenever using heat to sterilize an object, exercise caution. Sterilization requires extreme heat which can cause burns.⧼thumbs_response⧽
- Be responsible when handling chemicals, like hospital grade disinfectant. These can be harmful to young children, and should be stored somewhere safe.⧼thumbs_response⧽
Things You'll Need
Sterilizing with Heat
- Bead sterilizer, autoclave, or oven
- Clean rag (or paper towel)
Sanitizing with a Disinfectant
- Hospital grade disinfectant
- Container (to hold disinfectant)
- Clean rag (or paper towel)
- Distilled water
Removing Stubborn Buildup
- Toothpicks
- Container (to soak clippers)
- Scrub brush (or toothbrush)


References
- ↑ http://onlinelibrary.wiley.com/doi/10.1034/j.1601-5037.2003.00032.x/abstract;jsessionid=2894060F5D9EED28E9F4768495EE5E5F.f02t01
- ↑ https://www.youtube.com/watch?v=hfqd2r2QqxE
- ↑ https://www.maximintegrated.com/en/app-notes/index.mvp/id/5068
- ↑ https://www.youtube.com/watch?v=hfqd2r2QqxE
- ↑ Marta Nagorska. Nail Artist. Expert Interview. 26 May 2021.
- ↑ https://www.youtube.com/watch?v=hfqd2r2QqxE
- ↑ https://www.cdc.gov/hicpac/Disinfection_Sterilization/13_10otherSterilizationMethods.html
- ↑ Marta Nagorska. Nail Artist. Expert Interview. 26 May 2021.
- ↑ https://www.youtube.com/watch?v=hfqd2r2QqxE
About This Article

You can easily disinfect your nail clippers with a toothpick, a brush, and some cleaning liquid. Start by wiping off your clippers with a clean cloth to remove any buildup or gunk. If there’s buildup in the crevices, use a toothpick or tweezers to dislodge it. You can also use a bristle brush to remove gunk from the clippers. To sanitize the nail clippers, soak them in a glass bowl of store-bought disinfectant for the recommended amount of time. Most disinfectants need to be diluted with water, so make sure to follow the instructions on the packaging. To learn how to use a heat sterilizer to clean your nail clippers, read on!