This article was co-authored by wikiHow Staff. Our trained team of editors and researchers validate articles for accuracy and comprehensiveness. wikiHow's Content Management Team carefully monitors the work from our editorial staff to ensure that each article is backed by trusted research and meets our high quality standards.
There are 7 references cited in this article, which can be found at the bottom of the page.
This article has been viewed 30,457 times.
Learn more...
Cakes are delicious enough on their own, but you can take things to the next level by decorating them. Some decorations, such as a light dusting of cocoa powder, won't affect the flavor too much. Other decorations, such as strawberries and whipped cream, can make your cheesecake even tastier! Some decorations, such as a chocolate ganache topping, can be combined with others, such as powdered sugar stencils. Once you know the basic ways to decorating a cheesecake, you can experiment with other combinations, and create your own unique design!
Ingredients
- 4 cups (800 grams) strawberries
Glaze
- 2 tablespoons (15 grams) cornstarch
- ¼ cup (60 milliliters) water
- 1 jar (12 ounces/340 grams) strawberry jelly, seedless
- 3 tablespoons (45 milliliters) orange-flavored liqueur or lemon juice
- Red food coloring (optional)
Whipped Cream
- ⅔ cup (160 milliliters) heavy whipping cream
- ⅓ cup (40 grams) powdered sugar
- ¾ cup (180 milliliters) heavy cream
- 12 ounces (350 grams) milk chocolate or semi-sweet chocolate chips
- 2 tablespoons (30 grams) butter
- 12 ounces (375 grams) fresh raspberries (optional)
- Powdered sugar, for dusting (optional)
- ¼ cup (25 grams) cocoa powder (or powdered sugar, cinnamon, dehydrated fruit, etc.)
Steps
Using Strawberries and Whipped Cream
-
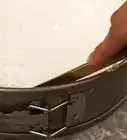
1Take the cake out of the pan shortly before you plan on serving it. It is best to decorate this cake just before you plan on serving it, so plan accordingly.[5]
-
2Consider spreading a thin layer of jam or curd on top of the cake. Although not necessary, this will give the cheesecake extra flavor. It will also give the strawberries something to stick to.[6]Advertisement
-
3Cut the strawberries into thin slices. Use a paring knife to chop off the stems first, then to cut the strawberries into ⅛ to ¼-inch (0.32 to 0.64-centimeter) thick slices. Leave one strawberry whole for the center.[7]
- You can also choose to leave the strawberries whole.
-
4Arrange the strawberries on top of the cheesecake in overlapping rings. Staring from the edge of the cake, arrange the strawberries side-by-side, with the pointy ends facing out. Keep setting down the strawberries in rings, overlapping each one slightly, until you reach the center of the cake. The strawberries will start to stand up as you reach the center, sort of like a flower. Place the remaining, whole strawberry in the center.
- If you are using whole strawberries, place the strawberries stem-side down onto the cake. You won't be able to overlap them.
-
5Prepare the whipped cream topping. Whip the heavy whipping cream using an electric mixer or handheld beater until it starts to thicken. Add the powdered sugar, and continue to mix it until it forms stiff peaks.[8]
- You can also use a food processor fitted with whisks for this step.
-
6Use a piping bag fitted with a star-shaped decorating tip to pipe the frosting around the edge of the cake. It's okay if the frosting overlaps the strawberries a little. If you have any frosting left over, consider piping more "starts" around the base of the cake.
-
7Prepare the glaze. Stir together the cornstarch and water in a small saucepan using a whisk. Add the jelly and cook over medium-high heat until the jelly has dissolved and the mixture thickened. Be sure to stir continuously.[9]
-
8Take the glaze off the heat, stir in the liqueur/lemon juice and let it cool. If you want to give the glaze a more vibrant color, stir in some red food coloring. You can speed up the cooling process by placing the saucepan into an ice bath (a large pot or sink filled with ice) or by sticking it into the fridge.
-
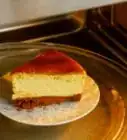
9Pour the glaze over the cake. You can pour it just over the strawberries, or extend it past the frosting and let it spread down the sides of the cake.


Using Chocolate Ganache
-
1Take the cake out of the pan a few hours before you plan on serving it. Loosen and remove the sides of the springform pan. The chocolate ganache will need a few hours to cool and set, so it is best to decorate this cake 2 to 4 hours before you serve it.
-
2Heat the heavy cream and the butter in the microwave. Pour the heavy cream into a heat-safe mug, then add the butter. Cook it in the microwave for 2 minutes, stirring it every 30 seconds.[10]
- If you don't own a microwave, heat the heavy cream and butter in a small saucepan until both melt.
-
3
-
4Let the mixture sit for 30 seconds, then stir it with a whisk. Keep stirring until the chocolate has melted and the mixture is smooth. Be sure to scrape the bottom and sides of the bowl often.[13]
-
5Let the mixture cool, then pour it over the top of the cheesecake. Let the mixture cool for about 15 minutes first so that it can thicken. Next, pour the mixture evenly over the top of the cheesecake.[14]
-
6Arrange fresh raspberries on top, if you'd like.[15] You can also add other types of berries too, such as blueberries and black berries.
- Sift some powdered sugar over the top of the berries for that final touch.
-
7Put the cheesecake into the fridge for 2 to 4 hours before serving it. This will allow the chocolate ganache to cool and set.[16]


Using Stencils and Cocoa Powder
-
1Find a stencil. You can cut your own stencil, or use a pre-made one, such as a doily or a piece of lace. The stencil should be a little bit wider or larger than your cake so that you will have something to lift it up with.
-
2Choose your powder. Popular choices include powdered sugar, cocoa powder, and powdered, dehydrated fruit. Choose something that will contrast nicely with your cheesecake. Cocoa powder will show up the best on plain cheesecake, but powdered sugar will show up nicely on a chocolate ganache-covered cheesecake.
- You can create an ombre design by using three batches of cocoa powder. One batch is pure cocoa powder, while the other two have varying amounts of powdered sugar mixed into them.[17]
-
3Sift your powder onto a sheet of wax paper. Hold a fine, mesh sieve over a sheet of wax paper. Pour your chosen powder into it, then tap it to sift the powder onto the wax paper. Carefully discard any clumps.[18]
- If you are using more than one powder, sift the powder onto separate pieces of wax paper.
- If you don't have any wax paper, you can use a plate instead.
-
4Place the stencil down onto the cake. Gently press it against the surface of the cake so that it sticks.[19]
-
5Sift the powder over the cake. Place the powder back into the sieve. Hold the sieve over the cake, and gently tap it to sift your powder over the stencil. You can use as much or as little powder as you want. Keep in mind that if you use too thick of a layer, the design is more likely to "smudge."[20]
-
6Grab the edges of the stencil, then carefully lift it away. Hold the stencil as flat as you can so that the powder doesn't fall back onto the cake. Once the stencil is out of the way, dump the excess powder into the sink.[23]
-
7Finished.


Community Q&A
-
QuestionIs it okay to decorate a cheesecake with fruit the day before serving it?
 Mr. PinnappleCommunity AnswerYes, as long as the fruit you are decorating with stays the same color. Try organizing it, so it can set well.
 -
QuestionCan they be decorated?
 Community AnswerYes. You can really decorate anything, but don't overdo it, because it is meant to taste like cheesecake, and not frosting or other things.
 -
QuestionCan I use fondant to decorate the top of a cheesecake?
 Community AnswerNo, fondant does not do well for decorating cheesecake. You should use fresh fruit instead.
Things You'll Need
Using Strawberries and Whipped Cream
- Paring knife
- Butter knife or offset cake decorating spatula (optional)
- Electric mixer
- Piping bag
- Star-shaped decorator's tip
- Small saucepan
- Small whisk
Using Chocolate Ganache
- Microwave (or stove)
- Heat-safe mug (or small saucepan)
- Mixing bowl
- Whisk
- Refrigerator
- Fine, mesh sieve
Using Stencils and Cocoa Powder
- Stencil
- Fine, mesh sieve
- Wax paper or plate
References
- ↑ http://www.tasteofhome.com/recipes/strawberry-cheesecake
- ↑ http://www.lifeloveandsugar.com/2015/12/21/strawberry-brownie-cheesecake
- ↑ http://www.eazypeazymealz.com/raspberry-chocolate-ganache-cheesecake/
- ↑ http://www.pepperknit.com/2010/12/let-them-eat-cake/
- ↑ http://www.tasteofhome.com/recipes/strawberry-cheesecake
- ↑ https://www.craftsy.com/blog/2016/05/how-to-decorate-a-cheesecake/
- ↑ http://www.realsimple.com/food-recipes/cooking-tips-techniques/baking/decorate-cake-with-strawberries
- ↑ http://www.lifeloveandsugar.com/2015/12/21/strawberry-brownie-cheesecake
- ↑ http://www.tasteofhome.com/recipes/strawberry-cheesecake
- ↑ http://www.eazypeazymealz.com/raspberry-chocolate-ganache-cheesecake/
- ↑ http://www.iwashyoudry.com/2013/11/18/nanaimo-cheesecake/
- ↑ http://www.eazypeazymealz.com/raspberry-chocolate-ganache-cheesecake/
- ↑ http://www.iwashyoudry.com/2013/11/18/nanaimo-cheesecake/
- ↑ http://www.eazypeazymealz.com/raspberry-chocolate-ganache-cheesecake/
- ↑ http://www.eazypeazymealz.com/raspberry-chocolate-ganache-cheesecake/
- ↑ http://www.eazypeazymealz.com/raspberry-chocolate-ganache-cheesecake/
- ↑ https://www.craftsy.com/blog/2016/05/how-to-decorate-a-cheesecake/
- ↑ http://www.pepperknit.com/2010/12/let-them-eat-cake/
- ↑ https://www.craftsy.com/blog/2016/05/how-to-decorate-a-cheesecake/
- ↑ https://www.craftsy.com/blog/2016/05/how-to-decorate-a-cheesecake/
- ↑ http://www.pepperknit.com/2010/12/let-them-eat-cake/
- ↑ https://www.craftsy.com/blog/2016/05/how-to-decorate-a-cheesecake/
- ↑ http://www.pepperknit.com/2010/12/let-them-eat-cake/
About This Article