wikiHow is a “wiki,” similar to Wikipedia, which means that many of our articles are co-written by multiple authors. To create this article, volunteer authors worked to edit and improve it over time.
The wikiHow Culinary Team also followed the article's instructions and verified that they work.
This article has been viewed 139,653 times.
Learn more...
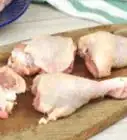
Chicken thighs are a fairly inexpensive cut of chicken, and you can save even more money by deboning them yourself instead of buying previously deboned ones. Don't be intimidated by cutting; all you have to do is cut in precisely the same spot almost every time. Here's how to do it.
Steps
Deboning the Chicken Thigh
-
1Detach the drumstick. If the drumstick or leg is still attached to the chicken thigh, you will need to slide your cutting instrument in between the connecting joint to sever it. Cut through the rest of the meat in the surrounding area to separate the thigh and drumstick completely.
- Bend the leg to locate the joint in between the thigh and drumstick. Try to bend in several places until you succeed. The point at which the chicken leg bends is the joint.
- Place the thigh skin-side-down and cut into this joint, severing it all the way through to detach the two pieces.
- If you accidentally hit the bone as you try detaching the thigh and the drumstick, move the knife over slightly until you find the right spot, which should be fairly easy to sever.
- All work should be done on a clean cutting board if at all possible. Using a clean cutting board minimizes the risk of getting germs from your counter or another work surface onto the meat as well as minimizing the risk of accidentally damaging your counter with the blade of your cutting instrument. Moreover, a cutting board can be easier to clean than a kitchen counter, which reduces the risk of salmonella or other food-borne bacteria and viruses from spreading.
- There are several cutting instruments you can use. Some people find that a knife with a long, narrow blade, like a fillet knife, works best. For others, clean kitchen shears or scissors are easiest to work with. In a pinch, you could also use a simple paring or boning knife.
-
2Slice off the skin, if desired. If the recipe in question calls for chicken thighs that are both skinless and boneless, you can remove the skin cutting off the membrane in between the skin and muscle. Use your fingers to peel back the skin as you cut the membrane away.
- Note that you could also slip off the skin after deboning and trimming the thigh if necessary. Some cooks prefer to do this step beforehand, while others wait until after. There is no single correct time to do it, though, so it is merely a matter of personal preference.
Advertisement -
3Cut down the length of the bone. Working on the bottom side of the chicken thigh, make an incision from the top end of the thigh down to the bottom, cutting as close to the bone as possible.
- The side that either has or had the skin on it should face down during this part of the process.
- The cut needs to be deep so that you can reveal as much of the bone as possible. Work carefully, though, since you do not want to cut straight through to the other side of the thigh.[1]
- Cut along both sides of the bone to reveal as much of it as possible.
-
4Remove the cartilage on the top or bottom of the bone. Use your cutting instrument to slice away the tough piece of cartilage holding the bone onto the meat at the top or bottom of the cut.[2]
- If you do not remove the cartilage, you might not be able to pry the bone away from the meat enough to slip your cutting tool in between the two.
-
5Cut underneath the bone. Glide your cutting instrument from one end of the bone to the other, slicing through the connecting membrane that otherwise keeps the bone attached to the meat.
- If using shears or scissors, simply cut through the muscle and membranes directly. If using a knife, you might need to cut using a slightly sawing motion.
- Keep the knife as close to the bone as possible to avoid losing more meat than necessary.
- Never cut toward your fingers since doing so could result in you accidentally slicing into your hand.
- Grab the bone and pull it up and away from the thigh meat as you cut.
- It may take several passes before you succeed in removing the bone from the thigh.
- Use short, scraping cuts to finish severing the bone from the meat.
-
6Trim the fat. Once the bone has been removed, inspect the thigh for pockets of fat. Use your cutting instrument to remove these now.
- It is better to wait until the bone has been removed and the thigh has been opened up before doing this. More of the thigh meat will be exposed by the end of the deboning process than at the beginning, and being able to see more of the meat will make it easier to spot and remove more of the fat.
-
7Check for gristle and bone fragments. Sometimes, bone fragments and gristle can be left behind, even if you deboned the thigh properly. Inspect the chicken thigh for any of these types of debris and cut them away before using the thigh.
- At this point, the chicken thigh has been deboned and prepped for cooking. You can use it in whatever recipe you would like now.

Improving the Process
-
1Debone chicken thighs in large batches and freeze the leftovers. Buying in bulk can save you money, and if you prepare enough chicken thighs in advance to use for several meals, you can minimize the amount of time you spend on a weeknight preparing dinner.
- Wrap the meat in plastic freezer wrap, butcher paper, or heavy duty aluminum foil. Place the thighs in airtight freezer-safe plastic containers or plastic resealable bags. Vacuum-sealed bags are even better.[3]
- Store the chicken in the coldest part of the freezer.
- Freezing raw chicken thighs in 0 degrees Fahrenheit (-18 degrees Celsius) will keep the food safe indefinitely, but for the sake of quality, it is strongly recommended that you use frozen chicken thighs within 9 months.[4]
-
2Save the thigh bones for chicken stock. The thigh bones and the scraps of meat attached to them may not be edible, but they do pack a lot of flavor. You can make use of this flavor by using your bones and scraps for stock that can be used in soups, stews, gravies, and other recipes.
- If you want to use the the bones for stock but do not have time immediately after deboning the thighs, you can wrap them up in heavy duty aluminum foil or in an airtight, freezer-safe resealable plastic bag. Save the bones and scraps up to 3 or 4 months before using.
- You can prepare a simple stock by putting leftover bones from 2 to 4 lbs (900 to 1800 g) of thighs in a large stockpot and covering the bones with cold water.[5]
- Add chopped celery, onions, carrots, and parsley to the water, along with roughly 1 tsp (5 ml) of salt and 1/4 tsp (1.25 ml) of black pepper.
- Boil all the ingredients.
- After the contents of the pot reach a boil, reduce the heat and let simmer gently, uncovered, for 4 hours or more. Skim off the foam that develops from time to time.
- Strain out the bones and vegetables and save the liquid stock.
- This stock can be used immediately or saved for later.
-
3Use chicken thighs instead of chicken breasts. Since chicken thighs tend to stay more moist than chicken breasts and are harder to overcook, many people prefer using them over chicken breasts. If you have extra chicken thighs and you do not have a recipe handy that calls for them, you can simply use the thigh meat in another recipe that originally calls for chicken breasts.
- Note that when using chicken thighs instead of chicken breasts, you may need to cook the chicken for a longer period of time than indicated in the original recipe's instructions since thigh meat takes longer to cook than breast meat.


Community Q&A
-
QuestionHow long do I boil chicken thighs for deboning?
 MicheleTop AnswererDeboning is done with raw chicken, not cooked.
Warnings
- Always clean up thoroughly after handling raw chicken meat. Chicken meat has been known to carry salmonella, which poses a considerable health risk. Scrub your counters, knife, and hands with hot water and antibacterial soap after you finish preparing the chicken thighs.⧼thumbs_response⧽
- While working with raw chicken meat, you should also avoid touching anything with unwashed hands since you may forget to clean it later. Remove any rings, bracelets, or watches before beginning, and do not open any cupboards or drawers while working with the meat.⧼thumbs_response⧽
Things You'll Need
- Cutting board
- Kitchen shears, fillet knife, or a sharp paring knife
- Aluminum foil, plastic wrap, or butcher's paper (optional)
References
- ↑ http://www.home-ec101.com/boning-chicken-thighs/
- ↑ http://www.olgasflavorfactory.com/olgastips/kitchen-tips/how-to-debone-a-chicken-thigh/
- ↑ http://www.favoritefreezerfoods.com/freezing-chicken.html
- ↑ http://www.fda.gov/downloads/Food/ResourcesForYou/HealthEducators/UCM109315.pdf
- ↑ http://www.simplyrecipes.com/recipes/how_to_make_chicken_stock/
About This Article
To debone a chicken thigh, first cut through the joint connecting the thigh and drumstick to separate them. Peel and cut off the skin if your recipe calls for skinless chicken thighs. Then, flip the thigh over and cut down the length of the bone on either side, cutting as close to the bone as possible. Cut off the cartilage at the top or bottom of the bone. Now, grab the bone and pull it up and away from the meat. Carefully cut underneath the bone to separate it until you're able to remove it from the thigh. Finally, trim the fat off of the meat, and inspect the meat for any leftover pieces of bone. To learn how to debone chicken thighs in large batches for freezing, keep reading!