This article was co-authored by wikiHow staff writer, Eric McClure. Eric McClure is an editing fellow at wikiHow where he has been editing, researching, and creating content since 2019. A former educator and poet, his work has appeared in Carcinogenic Poetry, Shot Glass Journal, Prairie Margins, and The Rusty Nail. His digital chapbook, The Internet, was also published in TL;DR Magazine. He was the winner of the Paul Carroll award for outstanding achievement in creative writing in 2014, and he was a featured reader at the Poetry Foundation’s Open Door Reading Series in 2015. Eric holds a BA in English from the University of Illinois at Chicago, and an MEd in secondary education from DePaul University.
There are 12 references cited in this article, which can be found at the bottom of the page.
The wikiHow Video Team also followed the article's instructions and verified that they work.
This article has been viewed 26,992 times.
Learn more...
Zip ties, also known as cable ties or wire ties, provide a useful and cheap way to secure wires, fencing, electronics, and other building materials that you don’t want to nail or screw together. Unfortunately, there’s always a piece of the zip tie sticking out after you pull the zip tie tight. Most people simply cut this piece off with scissors like they’d cut anything else, but that can leave a sharp edge behind that can cut you if brush against it in the future. You can make the zip tie flush by using a single scissor blade or simply twist off the excess. If you have flush cutters or a cable tie gun, use these instead to get a perfectly flush cut.
Steps
Cutting with Scissors
-
1Put the bottom scissor blade against the head of the zip tie. Open your scissors. One blade will be on the bottom and the other will be on top of it. Stick the lower blade against the side of the zip tie’s head. The head refers to the small plastic piece that holds the zip tie in place when you pull the plastic through it.[1]
- To clarify here, your scissor blade is not pressing against the tie that you’re cutting. It’s pressing against the head underneath the portion that is sticking out.
- Scissors are not the ideal tool for cutting zip ties flush, but you can certainly get a flush cut with them if you don’t have anything else sitting around.
Tip: You have to use standard scissors with smooth blades to do this. Serrated or kitchen scissors will not leave a flush cut behind.
-
2Close the scissors until the blade on top is against the tie that’s sticking out. Keep the bottom blade pressed against the head of the zip tie. Close the blades together until the blade on top is pressing against the part of the zip tie that is sticking out past the head.[2]
- Adjust your grip and the position of the blades until the bottom blade is against the head and the top blade is against the tie you’re cutting.
Advertisement -
3Apply pressure to the blade on top until the zip tie snaps off. Close the blade that’s on top. Keep the blade sticking against the head still and brace it in place. Continue applying pressure to the blade on top without moving the bottom blade until the zip tie snaps off. The cut you leave behind will be perfectly flush.[3]
- Remember that the handle for a given blade is on the opposite side of the blade. In other words, when the scissor blades are open, the handle on the right controls the blade on the left and vice versa.
Twisting the Zip Tie Off
-
1Use a pair of pliers to twist a zip tie off so it won’t cut you. Pliers won’t always cut a zip tie perfectly flush, but they will leave a soft tip behind at the point where you cut them. This is a great way to ensure that you don’t harm yourself on the tip of the zip tie after you remove the excess portion of the plastic.[4]
- Depending on how your zip tie ends up tearing, you may actually end up with a flush tear. It’s not going to be flush every time, though.
Warning: Do not use this method if your zip tie is wrapped around sensitive cables or electronics. Twisting the zip tie to break it will apply pressure to whatever the zip ties is attached to.
-
2Grip the base of the zip tie where it meets the head with pliers. You can use any kind of pliers to do this so long as they don’t have a sharp edge in the middle of the jaws. Open your pliers and wrap the jaws around the portion of the zip tie that’s sticking out right where it meets the head. Squeeze firmly to hold the pliers in place.[5]
- You don’t need to squeeze so hard that your knuckles turn white or anything like that, but you do need a solid, firm grip on the zip tie.
-
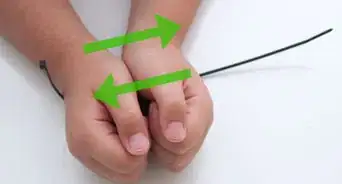
3Maintain your grip on the pliers as you twist them in a circle. Keep applying the same amount of pressure to the zip tie. Using both hands, twist the pliers around the head of the zip tie without letting go.[6]
- It doesn’t matter if you go clockwise or counterclockwise so long as you keep going in the same direction.
-
4Continue twisting the pliers until the zip tie tears off at the base. It may take 5-8 rotations with your pliers to do this. Continue turning the pliers without releasing your grip. After multiple rotations, the pressure from the zip tie twisting around itself will cause the zip tie to tear. Even if some of the zip tie is still sticking out, it will be soft and malleable. This will prevent cuts in the future if you rub against it.[7]
Using a Flush Cutter
-
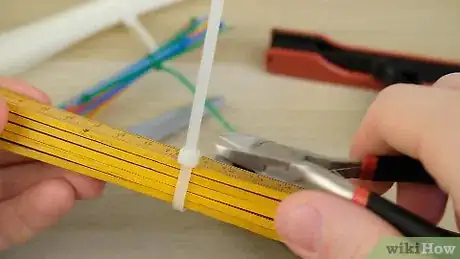
1Get a pair of flush cutters designed for cutting wires. Flush cutters look a little like wire cutters or snips. Flush cutters are used to cut wires and leave one side of the cut perfectly flat. These are the perfect tool for cutting zip ties flush. Pick a pair up at a hardware store or online.[8]
- Expect to spend $3-5 on flush cutters.
- The blades on flush cutters are typically around 1–2 inches (2.5–5.1 cm) in length. This is fine for zip ties, which are typically around 0.25 inches (0.64 cm) in width.
-
2Hold the blades with the flat side of the jaws facing down. The jaws on flush cutters have 2 sides. The side with the rounded metal on top of the blades will not make create a flush cut. To cut your zip tie flush, make sure that the flat side of the jaws is facing your zip tie.[9]
- Flush cutter jaws usually stick out from the handles at an angle. The flat side is usually the side of the jaws that are facing towards the handles, not away from them. They’re designed this way so that you can cut wires flush when they’re sticking out of the ground.
-
3Wrap the jaws around the base of the zip tie’s head where the tie sticks out. The head of the zip tie refers to the box-like case that you slide the zip tie through to secure it. With the flat side of the flush cutter’s jaws facing the head, wrap the blades around the zip tie that you want to cut.[10]
Tip: Be sure to keep the jaws flush against the zip tie’s head to ensure that your cut stays even and flat while you’re making it.
-
4Apply pressure to the handles to close them and make your cut. Keep the flush cutters still and you close the handles. Continue applying pressure while keeping the blades flush against the top of the zip tie’s head until the zip tie snaps off. The flush cutters will leave a perfect cut behind and the top of the zip tie will be flush with the head.[11]
- If you mess up, you may be able to trim the remaining zip tie down with your flush cutters if there’s enough sticking out.
Installing and Cutting with a Cable Gun
-
1Buy a cable tie gun if you go through a ton of zip ties. If you use cable ties frequently for work or at home in your workshop, buy a cable tie gun. Cable tie guns make it easier to install zip ties and they’re designed to leave a flush cut at the end of your tie.[12]
Tip: There are 2 types of cable guns. The guns that look like literal guns use special rolls of cable ties and are kind of complicated to use. They also cost $60-250 depending on the model. The easier option, which is covered here, is to use the guns that resemble staplers and rely on manual pressure. These guns typically cost $15-25.
-
2Run the excess cable tie through the opening at the tip of the gun. Wrap your dominant hand around the 2 hands of the tie gun. Use your nondominant hand to thread the excess zip tie through the slot at the tip of the gun where the two handles meet. Continue sliding the zip tie through until you see some of it sticking out at the top of the gun.[13]
-
3Adjust the slide or knob at the end of the gun to change the tension. Zip tie guns can be adjusted to cut zip ties when they’re really tight or really loose. Each model is different, but there is usually a slide or knob in the handle that you can turn or twist to adjust the tension. Typically, turning the slide or knob to the right increases the tension, while turning it all the way to the left will clip the zip tie as soon as pull the handles.[14]
- If you want to total control over the pressure, set the slide or knob all the way to the left and tighten the zip tie by hand. This way, you can simply use the cable tie gun to cut the zip tie.
-
4Squeeze the handles repeatedly to tighten the zip tie. Slide the tip of the zip tie gun down to the base of head. Keep the gun pressed down against the head of the zip tie to ensure you don’t accidentally cut it above the head. Squeeze the handles gently to close them together. The head of the cable tie gun will open and close each time you squeeze the handles. Doing this will tighten the zip tie.[15]
- If you are only using the gun to cut the zip tie, pull it through the head by hand and pull it tight to secure it. Then, slide the zip tie through the gun but don’t pull the handles. Stop when the tip of the gun is flush against the base of the head.
- The zip tie will continue to tighten until the gun senses the pressure you set it at, so don’t worry about harming whatever you’re tying.
-
5Continue squeezing the handles until the cable tie gun cuts the zip tie. Continue to hold the gun down against the base of zip tie where it meets the head. Keep squeezing the handles together. Once the gun sense the pressure that you set the gun at, it will automatically cut the zip tie. Your cut will be flush so long as you keep the head of the gun held against the base of the head while you were squeezing it.[16]
- If you’re only using the cable tie gun to cut the zip tie, you only need to press the handles once.
Things You’ll Need
Cutting with Scissors
- Scissors
Twisting the Zip Tie off
- Pliers
Using a Flush Cutter
- Flush cutter
Installing and Cutting with a Cable Gun
- Cable tie gun
References
- ↑ https://youtu.be/XOOwvlj-v7c?t=41
- ↑ https://youtu.be/XOOwvlj-v7c?t=45
- ↑ https://youtu.be/XOOwvlj-v7c?t=65
- ↑ https://youtu.be/aqIJcgxEZMQ?t=30
- ↑ https://youtu.be/aqIJcgxEZMQ?t=66
- ↑ https://youtu.be/aqIJcgxEZMQ?t=73
- ↑ https://youtu.be/aqIJcgxEZMQ?t=80
- ↑ https://www.hotrod.com/articles/wrenchin-wednesday-cut-zip-ties-flush-save-flesh/
- ↑ https://www.hotrod.com/articles/wrenchin-wednesday-cut-zip-ties-flush-save-flesh/
- ↑ https://www.hotrod.com/articles/wrenchin-wednesday-cut-zip-ties-flush-save-flesh/
- ↑ https://www.hotrod.com/articles/wrenchin-wednesday-cut-zip-ties-flush-save-flesh/
- ↑ https://youtu.be/dQklUW7YyKU?t=19
- ↑ https://youtu.be/iBP7kMi-mN4?t=25
- ↑ https://youtu.be/iBP7kMi-mN4?t=33
- ↑ https://youtu.be/iBP7kMi-mN4?t=28
- ↑ https://youtu.be/iBP7kMi-mN4?t=28

