X
This article was co-authored by Lois Wade, a trusted member of wikiHow's volunteer community. Lois Wade has 45 years of experience in crafts including sewing, crochet, needlepoint, cross-stitch, drawing, and paper crafts. She has been contributing to craft articles on wikiHow since 2007.
This article has been viewed 357,833 times.
Learn more...
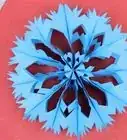
We all probably learned how to make a simple paper snowflake at some point when we were kids, but here's the "grown-up" version of this favorite childhood wintertime craft.
Steps
Part 1
Part 1 of 3:
Folding the Paper
Method One: Four Pointed Snowflake/Star
-
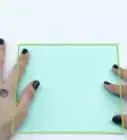
1Fold the paper in half.
-
2Fold the paper in half again, making quarters.Advertisement
-
3Fold each folded edge over to touch its opposite folded edge.
Advertisement
Method Two: Six Pointed Snowflake/Star
-
1Fold the paper in half.
-
2First fold by one third (60-degree angle).
-
3Turn over and make the second 60-degree fold.
-
4Fold the paper into 60-degree angles from the folded edge of the paper.
-
5Cut away waste paper (anything that is less than six layers). Stop at this point to make a star/snowflake with a pattern that repeats only three times.
-
6Fold the paper in half again, so that the two folded edges lie atop each other. This will make a 6 pointed snowflake with a pattern that repeats six times.
Advertisement
Part 2
Part 2 of 3:
Cutting
-
1Cut the raw edges first. These will become the outside edge of your snowflake, so make them as interesting as you like. Cutting one side of the outer edge further away from the center than the other will yield "points" that stick out in the manner of a "real" snowflake.
-
2Cut one divot from each folded edge, keeping your cuts parallel to previous cuts, and taking large chunks of paper from the base.
- If your scissors begin cutting on one folded side, they must also end cutting on that same side. If you begin on one side and end on the other side, you will suddenly be making a much smaller snowflake.
-
3Keep in mind that elegant means simple. Three larger cuts to your snowflake blank will generally yield better results than 10 smaller cuts.
-
4Make your cuts parallel and equidistant from each other, to give a more "finished" or "polished" look to the craft.
-
5Leave only 20-25% of your blank. (Cut away 75-85% of your blank.)
- Use smooth, flowing curves for best results at first - This will make achieving the look easier. Attempt cutting the more angular flakes after you've mastered the tips.
Advertisement
Part 3
Part 3 of 3:
Getting Ideas for Designs


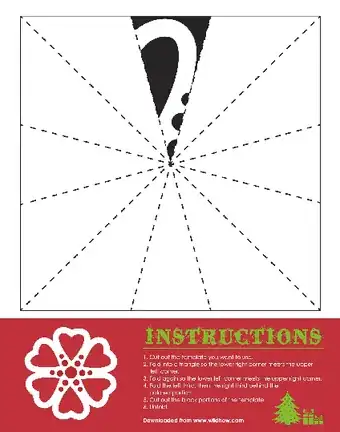
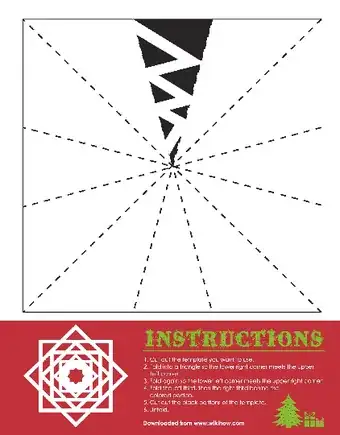
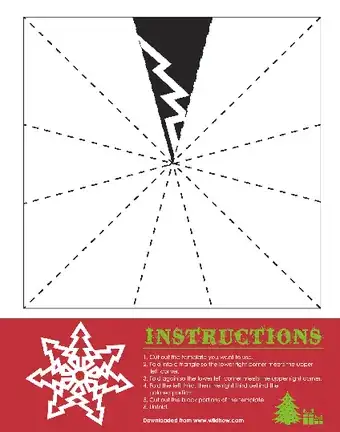
Printable Templates
Community Q&A
-
QuestionHow do I make a snowflake without cutting it into pieces?
 Community AnswerMy suggestion would be to go to your local craft store and find a lace pattern paper that already has the holes cut into it to make it look like lace. Then simply cut out a snowflake pattern.
 -
QuestionI tried making one of the snowflakes and it didn't work. It just fell apart and I followed the instructions very carefully. What should I do?
 Community AnswerJust keep at it. Some things take practice. If you keep trying, you will get it right.
Advertisement
Warnings
- Scissors are edged tools. Handle with appropriate caution.⧼thumbs_response⧽
Advertisement
Things You'll Need
- White paper
- Utility Knife (optional)
- Sharp Scissors

About This Article

Lois Wade
wikiHow Crafts Expert
This article was co-authored by Lois Wade, a trusted member of wikiHow's volunteer community. Lois Wade has 45 years of experience in crafts including sewing, crochet, needlepoint, cross-stitch, drawing, and paper crafts. She has been contributing to craft articles on wikiHow since 2007. This article has been viewed 357,833 times.
Co-authors: 28
Updated: July 1, 2021
Views: 357,833
Categories: Featured Articles | Paper Craft
Advertisement