wikiHow is a “wiki,” similar to Wikipedia, which means that many of our articles are co-written by multiple authors. To create this article, 129 people, some anonymous, worked to edit and improve it over time.
wikiHow marks an article as reader-approved once it receives enough positive feedback. This article received 21 testimonials and 83% of readers who voted found it helpful, earning it our reader-approved status.
This article has been viewed 1,491,841 times.
Learn more...
A ouija board is a flat panel with letters, numbers, and other symbols printed on it that you can use to hold a seance. Though you can purchase ouija boards from various Halloween and novelty shops, you can save money by making your own version at home.
Steps
Printable Board
Using Paper Boards
Method 1: Written
-
1Start by obtaining a large piece of paper. Cover it with letters of the alphabet, the numbers 0-9, and the words "Yes", "No", "Hello" and "Goodbye".
-
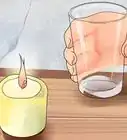
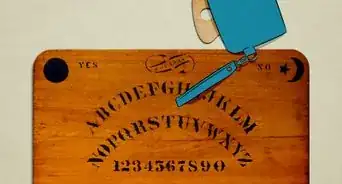
2Lay the letters in a circle. Put a sun on the top left hand corner, next to the word "yes". On the top right corner, put a moon next to the word "no". Put the numbers outside the circle on a table. Use a tumbler turned upside down on top of the paper as a pointer.Advertisement
-
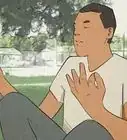
3Sit around the table with a couple of friends. Each of you place one hand lightly on the up-turned glass. Decide who will ask the questions. Another person could be taking notes.


Method 2: Cut
-
1Create letters. Start by writing out all of the letters in one or two rows. Make sure that the characters are large enough to read easily.
-
2Add numbers. In the row below the letters write the numbers 0-9.
-
3Write out “Yes”, “No”, "Hello" and “Goodbye” symbols. These will make communicating with the spirits easier. You can add any other phrases if you wish.
-
4Make cut outs. Take scissors to cut out each of the characters, numbers, words, and phrases.
-
5Adhere them with glue to the paper. Lay them out according to your desired layout.
-
6Create the pointer slide. You can make it a smooth surface. A glass or sheet protector should work well.
-
7Prepare to invite some guests. You are now ready to have your first talking board séance!


Constructing Wooden Boards
-
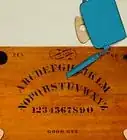
1Gather your materials. You will need a wood board, sanded and smooth. Also, find some paint or varnish (or another clear coating), and a soldering iron with a calligraphy tip will be required. A pencil and paper will also be useful.
-
2Practice using the soldering iron. Soldering irons can be a little tricky. Practice on some scrap wood first, so that you can see how slow you need to go and how hard you need to press. It will also give you the chance to figure how to move the iron, in order to get different shapes.
-
3Get your board prepped. Make sure the wood is clean and smooth.
-
4Draw out your design. You can draw the design free-hand or you can use a "cheat". This means printing the characters onto a transfer paper. You can also purchase ink stamps from a craft store.
- Make sure the designs are not too small or detailed, especially if you do not have a lot of experience with a soldering iron.
-
5Go over the designs with the soldering iron. Draw over the design with the iron. Do not rush. Look at it in different lights to be sure that it looks right.
-
6Let it cool, then clean the surface. Let the burned areas cool and then brush off any excess material. Erase pencil marks and other marks and gently wipe the whole surface with a lightly damp cloth. Let it dry before continuing.
-
7Varnish the surface. The varnish or other clear coating will create the smooth surface necessary to make the planchette work. Carefully follow the manufacturer's instructions regarding the finish you decide to use. You will likely need to do several coats. Let each coat dry before applying the next. Set aside plenty of time for this project.
-
8Add finishing details. You can paint on more details once the varnish has dried completely. Details are best painted on before the second to last layer of varnish. This will keep the color clear.


Designing Your Board
-
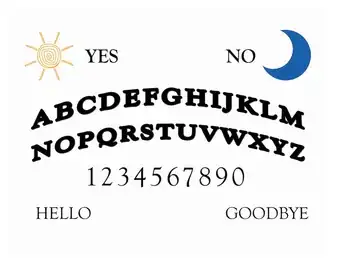
1Choose your layout. There are a number of ways that you can lay out your board. The design is not as important as having all of the necessary symbols. You need to include at least the letters of the alphabet, numbers 0-9, and the words "Yes","No", and "Farewell".
- Use the traditional layout if you want to. This is where the letters are written out in two slightly-arced lines at the center, with "Yes" and "No" above and the numbers and "Farewell" below.
- You could also use a diamond layout. In this design, the letters are written in a diamond shape, with each of the four points lining up with the center of that side of the board. The numbers are written inside this diamond and the corners are allocated for the words (allowing for an additional phrase, like "not now").
- You could also try a circular layout. This design is similar to the diamond, but uses an oval shape instead.
-
2Choose your font. Choose a font which fits with the design of your ouija board. Gothic fonts are good choices for this use. As well, there are many Western-themed fonts. You can, however, choose whatever you like best. Test out some the the words in a word editor, to get an idea of what you think looks best.
-
3Choose your embellishments. Many believe it is a good idea to add certain symbols to the corners or some random location on your board. Beliefs vary, but common symbols include: the moon, sun, and stars; the symbols for the elements; the symbols for the planets; and symbols or images in neurologically significant quantities (For example 12, 13, 7, 3).
- You can also embellish your board with physical objects, such as set spots for candles, attached stones (quartz is good for this purpose), or places to put the elements (a bowl of water, a branch, and other such items).
-
4Pick your colors. Choose a color scheme for your board. Darker, earth tones tend to be better at calling forth the spirits. If you are looking to contact particularly cheerful spirits, there is nothing wrong with using colors you think they would prefer. If you are trying to contact someone in particular, try their favorite color.
- Try to use colors that contrast well. You want to be able to read your text easily.
-
5Choose your planchette. A planchette is the device where you place your fingers and watch as it moves around the board, with messages from the spirits. You can rescue one from a random set you find at a dollar store, or you can make your own.


Community Q&A
-
QuestionWhere should the glass be when we begin?
 Community AnswerThe most common starting place is over the letter "G."
 -
QuestionDo you really end the game?
 Community AnswerIt's very important to end the session/game. Be polite to any spirit and say something along the lines of "it's been nice talking to you, rest in peace," and move the pointer to goodbye. If you don't end the session, it can be very dangerous and any spirit can escape through the board. Always end the game/session!
 -
QuestionCan I use anything other than the glass?Community AnswerYou could use a piece of paper cut into a triangle. Be sure to cut a circle in the center that will fit your letters or font.
Warnings
- The real danger is when you ask for physical proof of the existence of the spirits you attempt to contact. When you "ask for a sign", you literally open a door between the physical and spiritual world, allowing the spirits to enter. As a result, future problems can and often do arise.⧼thumbs_response⧽
- Any attempts to communicate with the dead or other spirits should not be taken lightly. In other words do not attempt to speak with certain spirit in particular. Let the spirit come to you. Attempting to communicate with spirits should not be done by the inexperienced. There are plenty of stories on the net. Take some time and read some of them before considering playing with a Ouija.⧼thumbs_response⧽
- Just remember that homemade Ouija boards made of wood tend to work better than those of paper. If the paper is bent or folded, the spirits will be appalled and stay away. This is a good thing when you are too afraid to play. All you have to do is bend the paper and not tell them that it would not work then.⧼thumbs_response⧽
- Scientifically, there is, of course, no evidence that the above points apply, since the words are formed in the subconscious of the user rather than 'spiritual intervention'. In some cases, words are deliberately formed by the user as a trick to others. Hence, although the results can be surprising, scientific evidence would suggest they arise in the user through a process similar to dreams or hallucinations.⧼thumbs_response⧽
Things You'll Need
Paper Boards
- A pair of scissors
- A sheet of cardboard or cardstock
- A pen or a marker
- Glue
Wood Boards
- A wood board, sanded and smooth
- Paint
- Varnish or another clear coating
- A soldering iron with a calligraphy tip or similar
- Pencil and paper (optional)
- Transfer paper (optional)
- Ink stamps (optional)


References
- http://en.wikipedia.org/wiki/Ouija
- The Museum of Talking Boards - By far, the best site about talking boards around. They have excellent photographs of various types of talking boards and extensive background information. http://www.museumoftalkingboards.com
About This Article
To create a simple ouija board, first grab a piece of paper and write “YES” in the top left corner and “NO” in the top right corner. Then, write “HELLO” in the bottom left corner and “GOODBYE” in the bottom right corner. Finally, create 3 rows in the center of the board listing the letters A through M, the letters N through Z, and the numbers 1 through 9 with a 0 at the end. To learn how to make a ouija board out of paper cut outs or wood, or for tips on how to decorate your ouija board, read on!