This article was co-authored by wikiHow Staff. Our trained team of editors and researchers validate articles for accuracy and comprehensiveness. wikiHow's Content Management Team carefully monitors the work from our editorial staff to ensure that each article is backed by trusted research and meets our high quality standards.
There are 13 references cited in this article, which can be found at the bottom of the page.
This article has been viewed 38,685 times.
Learn more...
The I-9 Form is used to establish that a person has the right to work in the United States. The first part is filled out by the employee, who then presents documents proving they are allowed to work in the U.S. to the employer. The employer examines the documents, determines their veracity, and then finishes the form by filling in the second section. In the case of a reverification or a rehire, the employer fills in just the third section of the form.
Steps
Filling in the Employee Section
-
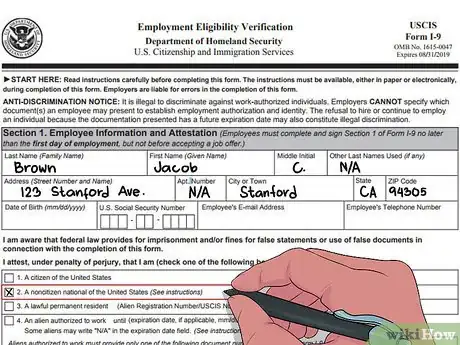
1Put your full legal name on the form. Include both names if you have 2 first names or 2 last names. You only need to use your middle initial, not your full middle name. You'll also need to add any other last names you've had, such as your maiden name, if you have one.[1]
- If you happen to only have 1 name, place it in the last name field and "unknown" in the first name field.
- Add the hyphen if your name is hyphenated.
-
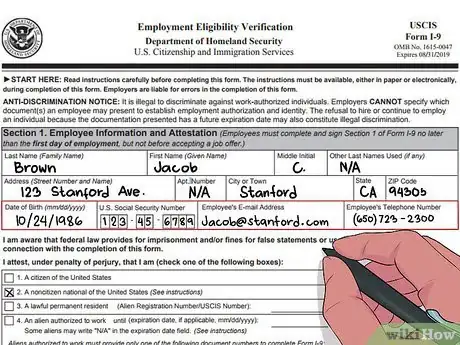
2Add your address and birth date. You'll need to fill in your address, including an apartment number if you have one. Add your date of birth, as well, using the month, day, and year.[2]Advertisement
-
3Provide information on your legal status. Check the box that applies. Your choices are U.S citizen, noncitizen national, lawful permanent resident, or an alien authorized to work in the U.S. If applicable, you'll also need to provide your Alien Number/USCIS number, foreign passport number with the country, or a Form I-94 admission number, as well as when your work permit expires.[3]
- You need either an Alien Number/USCIS or a Form I-94 admission number, not both. Your Alien Number is much like a Social Security number, as it is a unique number assigned to you, though it can have anywhere from 7 to 9 digits.[4]
-
4Add optional information. You'll also add your Social Security number and email if your employer wants to use E-Verify. There's a place for your phone number, too, if you want to include it as a way to be contacted.[5]
- E-Verify is a way to verify electronically that you are legally allowed to work in the U.S.
Finishing the Form and Presenting Documentation
-
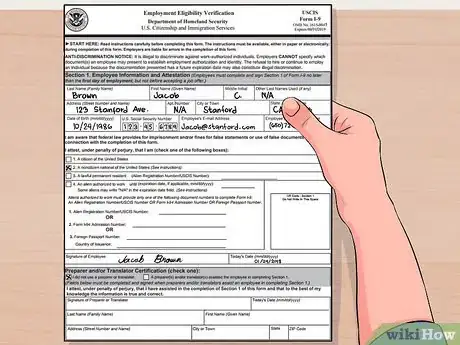
1Sign and date the form. Once you've completed the form to the best of your knowledge, you'll need to provide a signature and date. However, you can sign it electronically.[6]
- Usually, your employer will set up your electronic signature. You'll use software provided by the company to create a signature and date, and you'll agree that you read the form.
- Another option is printing the form, signing it, and then scanning it to create an electronic copy.
-
2Complete the I-9 on the first day of work. As the employee, it's your job to fill this out before or on the first day you work. This timeline is mandated by the government.[7]
-
3Present your documentation to the employer. After you've completed the form, you must present documents to show you're able to work legally in the U.S. Your employer will then examine them and finish the form.[8]
- You can present 1 item from List A, or a combination of 2 items from List B and List C.
- List A includes the following:
- U.S. Passport or Passport Card
- Permanent Resident or Alien Registration Receipt Card
- Employment Authorization Document Card
- A foreign passport with a Form 1-94 or a I-551 stamp/Form I-551
- A passport from the Federated States of Micronesia (FSM) or the Republic of the Marshall Islands (RMI) with Form I-94 or Form I-94A[9]
-
4Present 2 documents from List B and List C. If you don't have a document from List A, present 1 each from List B and List C. You can use the following documents:[10]
- List B includes the following:
- A driver's license
- A government-issued photo ID card with basic biographical information
- A hospital, school, or doctor record, if you're under 18 with no other ID[11]
- List C includes the following:
- An unrestricted Social Security card
- Consular Report of Birth Abroad (Form FS-240)
- Certification of Birth Abroad issued by the U.S. Department of State (Form FS-545)
- Certification of Report of Birth issued by the U.S. Department of State (Form DS-1350)
- An original birth certificate
- A Native American tribal document
- A U.S. Citizen ID Card (Form I-197)
- An Identification Card for Use of Resident Citizen in the United States (Form I-179)
- An authorization document issued by the Department of Homeland Security (DHS)[12]
- List B includes the following:
Filling in the Employer Section
-
1Check the first section. Before filling in the employer section, make sure the first section is completely filled in by the employee. Also, ensure the employee signed and dated it.[13]
- Keep in mind that only the employer should fill out this section, not the employee.
-
2Examine the documentation. The employee must present their documentation to you upon completion of the form. It's your job to examine the documents and ensure they look valid, as well as make sure they meet the requirements of 1 document from List A or a document each from List B and List C.[14]
-
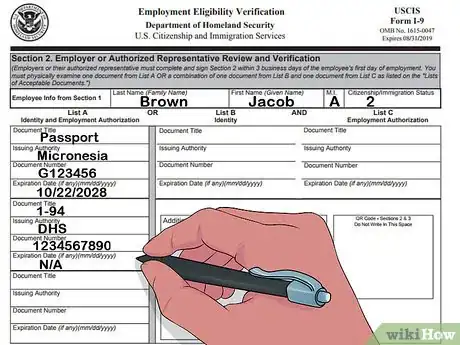
3Fill in the employee's information. You'll need to fill in the employee's name in the second section, as well as their employment status. Fill in the information for each document, including the document number, the issuing authority, document title, and expiration date (if needed).[15]
-
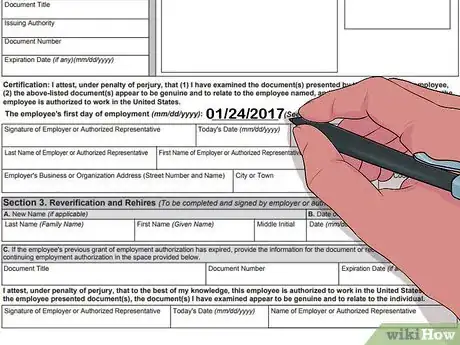
4Add the date the employee began. You'll need to add the date your employee began working for the company. It can be a date in the future if the employee hasn't started yet.[16]
-
5Enter your information and the company's information. Add your full name and title. Put in the company's name and most appropriate company address in regards to the employee. Sign and date the form.[17]
-
6Give the documentation back to the employee. Once you've verified that the documentation is correct, return it to the employee. You should hold on to the documentation only as long as necessary.[18]
Completing Section 3 for Rehiring or Reverification
-
1Complete the third section and the employee's name. If you rehire an employee within 3 years of them leaving or your employee changes their name, you can complete section 3 only for reverification. The only exception is you must fill in the employee's name in the employer section.[19]
-
2Re-verify when an employee's documentation expires. When you fill in the form the first time, note when the employee's documentation expires. You'll need to re-verify it when it does. You won't need to do this for U.S. Citizens or noncitizen nationals.[20]
- Request the same documentation as before. Examine it. If it checks out, record the document's information, and then sign and date the form.
-
3Examine the original I-9 for rehires. Check to see if the documentation has expired. If it hasn't, simply enter the new date of employment. If it has, examine either a List A OR List C documentation. You don't need to look at the List B documentation.[21]
- Enter the documentation information if you examined them. Sign and date the form.
References
- ↑ https://www.uscis.gov/i-9-central/complete-correct-form-i-9/completing-section-1-employee-information-and-attestation
- ↑ https://www.uscis.gov/i-9-central/complete-correct-form-i-9/completing-section-1-employee-information-and-attestation
- ↑ https://www.uscis.gov/i-9-central/complete-correct-form-i-9/completing-section-1-employee-information-and-attestation
- ↑ https://www.investopedia.com/articles/personal-finance/042215/stepbystep-how-fill-out-i9-form.asp
- ↑ https://www.uscis.gov/i-9-central/complete-correct-form-i-9/completing-section-1-employee-information-and-attestation
- ↑ https://www.uscis.gov/i-9-central/complete-correct-form-i-9/completing-section-1-employee-information-and-attestation
- ↑ https://www.uscis.gov/i-9-central/complete-and-correct-form-i-9
- ↑ https://www.uscis.gov/i-9-central/complete-correct-form-i-9/completing-section-1-employee-information-and-attestation
- ↑ https://www.uscis.gov/node/41814
- ↑ https://www.uscis.gov/i-9-central/complete-correct-form-i-9/completing-section-2-employer-review-and-attestation
- ↑ https://www.uscis.gov/i-9-central/acceptable-documents/list-documents/form-i-9-acceptable-documents?topic_id=1&t=b
- ↑ https://www.uscis.gov/i-9-central/acceptable-documents/list-documents/form-i-9-acceptable-documents?topic_id=1&t=c
- ↑ https://www.uscis.gov/i-9-central/complete-correct-form-i-9/completing-section-1-employee-information-and-attestation
- ↑ https://www.investopedia.com/articles/personal-finance/042215/stepbystep-how-fill-out-i9-form.asp
- ↑ https://www.uscis.gov/i-9-central/complete-correct-form-i-9/completing-section-2-employer-review-and-attestation
- ↑ https://www.uscis.gov/i-9-central/complete-correct-form-i-9/completing-section-2-employer-review-and-attestation
- ↑ https://www.uscis.gov/i-9-central/complete-correct-form-i-9/completing-section-2-employer-review-and-attestation
- ↑ https://www.uscis.gov/i-9-central/complete-correct-form-i-9/completing-section-2-employer-review-and-attestation
- ↑ https://www.uscis.gov/i-9-central/complete-correct-form-i-9/completing-section-2-employer-review-and-attestation
- ↑ https://www.uscis.gov/i-9-central/complete-correct-form-i-9/completing-section-3-reverification-and-rehires
- ↑ https://www.uscis.gov/i-9-central/complete-correct-form-i-9/completing-section-3-reverification-and-rehires







-Status-Step-6.webp)

