This article was co-authored by wikiHow Staff. Our trained team of editors and researchers validate articles for accuracy and comprehensiveness. wikiHow's Content Management Team carefully monitors the work from our editorial staff to ensure that each article is backed by trusted research and meets our high quality standards.
wikiHow marks an article as reader-approved once it receives enough positive feedback. In this case, 80% of readers who voted found the article helpful, earning it our reader-approved status.
This article has been viewed 239,948 times.
Learn more...
As with any component, a drill chuck wears down over time, or gathers rust or dust that cause it to seize up. Whether you want to clean your chuck or replace it with a new part, the first step is detaching it from the drill. Follow the keyless chuck instructions if you can adjust your chuck by hand. Follow the tapered chuck instructions if adjustments require a key.
Steps
Changing a Keyless Drill Chuck with an Allen Wrench
-
1Remove the screw in the center of the chuck. Loosen the jaws of the chuck to their widest extent. On most keyless chucks, you'll see a screw at the base of the chuck, fastening it to the drill case. Insert a screwdriver of appropriate size and turn clockwise to remove the reverse-threaded screw. The screw is usually coated with thread-locking fluid, so this may require some force.
- Skip this step if your model does not have a screw.
- If the screw is completely stuck, follow the steps below to knock the screw loose, then remove the screw and repeat the steps below.
-
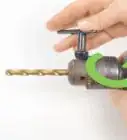
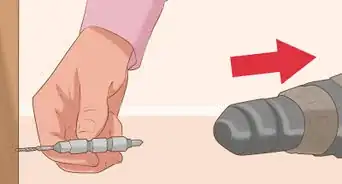
2Insert an Allen wrench into the chuck. Choose the largest Allen wrench you can insert. Turn the Allen wrench to tighten the chuck, until it is held firmly in place.Advertisement
-
3Set the gearbox to the lowest setting. This will reduce resistance from the gears to a minimum.[1]
-
4Tap the Allen wrench with a mallet. Position the drill so the Allen wrench lies horizontal and overhangs your workbench. Give the end of the Allen wrench a sharp downward strike with a wooden or rubber mallet. Most drill chucks have a standard thread, so striking the Allen wrench in a counterclockwise direction should loosen the chuck from the drill. If you'd like to be certain, contact the manufacturer and ask whether your model is standard or reverse threaded onto the drill spindle.
- This can bend or crack the drill casing if the strike is too forceful or at an angle. Start with light force and increase if necessary. This is especially important if you are just trying to loosen a stuck screw.
-
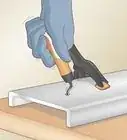
5Remove the chuck by hand. Once the chuck is loosened from the drill casing, you can unscrew it by hand.
-
6Replace thread-locking fluid on the screw (recommended). Once you are ready to install a new chuck, dab a bit of thread-locking fluid onto the end of the screw. Roll it on your finger to spread the fluid evenly.[2]
- If your keyless chuck has no screw, you may need to use thread-locking fluid on the threads of the chuck where it screws onto the drill.
-
7Mount the new chuck. You can use the same tools to install a new chuck, or to replace the original chuck after cleaning:[1]
- Thread the base of the chuck onto the spindle.
- Open the chuck.
- Insert the Allen wrench and tighten by hand.
- Insert the screw and tighten by turning counterclockwise.


Changing a Keyless Drill Chuck with an Impact Wrench
-
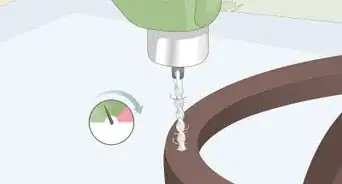
1Insert a hex socket into the chuck. If the method above failed to loosen your chuck, an impact wrench can provide more force. Insert a hex socket into the center of your chuck and tighten the chuck to hold it in place.[3]
- If there is a screw in the center of your chuck, unscrew it first with a clockwise turn.
- This method may have a higher risk of damaging your chuck or drill.
-
2Set the drill out of gear. Set the drill's gearbox to the locked position, neither forward nor reverse.
-
3Spin the hex socket in reverse with your impact wrench. Place the impact wrench onto the hex socket and set it to reverse. Engage the impact wrench in short bursts until the chuck loosens off the drill.
-
4Unscrew by hand. You can now remove the chuck the rest of the way by hand.


Changing a Tapered Drill Chuck
-
1Measure the diameter of the spindle. Keyed drill chucks do not typically thread onto the drill. Instead, the chuck's tapered end inserts onto a matching spindle.[4] Look at the gap between the chuck base and the drill, and you should see this spindle. Measure its diameter.
-
2Buy a chuck removal wedge. This is a cheap, two-armed wedge. Choose one with a gap between the two arms larger than the spindle diameter, but as close to it in size as possible.
- If you're in a hurry, skip to the end of this section for another method.
-
3Insert the wedge between the chuck and the drill. Position the two arms of the wedge around the spindle in this gap.
-
4Hammer the wedge in. Hammer the thick end of the wedge until the chuck pops off the drill.
-
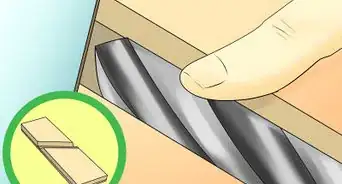
5Insert a new tapered chuck. Clean and degrease the tapered portions of the spindle and chuck. Place the chuck on the spindle and retract its jaws completely. Place a thin piece of wood over the chuck nose to protect it, then tap the chuck nose with a mallet until it fits securely onto the spindle.
-
6Remove the entire spindle. If you do not want to go out and buy a wedge, it may be possible to remove the whole spindle instead. This will only work if the chuck has an open center, allowing you to access the spindle beneath. Here's how to do it:[5]
- Open the chuck all the way.
- Place the chuck above a pair of vise jaws, with the spindle hanging loose beneath it.
- Place a metal punch through the center hole.
- Hammer the metal punch until the spindle comes off the drill.


Community Q&A
-
QuestionHow do I remove and replace a new chuck in a chuckie with no key?
 Community AnswerThere is no good way to tighten the chuck without a key. You need to go to a hardware store and buy a key.
 -
QuestionWhat if the chuck is stripped or off-track and turns freely?
 Community AnswerTake apart the drill, take out the spindle and chuck, then use a slide hammer to pull off the chuck. Please note that this solution will damage the chuck or spindle and will only work for tapered spindles.
 -
QuestionWhat do I do if my key-less Craftsman drill has no screw to remove the chuck and the teeth are jammed open?Community AnswerIf it's jammed open, soak it in oil overnight and put it in a vise. Using a small blowtorch, blast it for a few seconds at a time (being careful of the plastic). Next, jam an Alan key in with wedges till tight, then hit it with a hammer. It should release itself.
Things You'll Need
Keyless Chuck
- Screwdriver
- Hex key
- Small mallet
- Screw-locking thread (optional)
- Impact wrench (optional)
Tapered Chuck
- Chuck removal wedge
- Mallet

References
- ↑ 1.01.1https://www.youtube.com/watch?v=bp_mXt3Zo5w
- ↑ https://www.youtube.com/watch?v=NIV_XuHeQUY
- ↑ https://www.youtube.com/watch?v=xagFLCseeDk
- ↑ http://www.ereplacementparts.com/article/890/How_to_Remove_a_Drill_Chuck.html
- ↑ http://www.ereplacementparts.com/article/890/How_to_Remove_a_Drill_Chuck.html
- ↑ http://toolmonger.com/2008/05/29/change-out-the-chuck-on-your-drill/
- Videos provided by eReplacementParts.com
About This Article

To change a keyless drill chuck, all you’ll need is an Allen wrench and a mallet. The first thing you’ll need to do is remove the screw in the center of the chuck. Once you’ve removed the screw, insert an Allen wrench into the chuck and turn it to tighten the chuck. When the wrench is firmly in place, set the drill’s gearbox to the lowest setting to reduce resistance from the gears. Then, tap the Allen wrench with a mallet to loosen the chuck from the drill. Once it’s loose, you can unscrew the chuck by hand. Screw your new chuck in its place, tighten it with your Allen wrench, then replace the screw in the center. For more tips, including how to change a tapered drill chuck, read on!