This article was co-authored by wikiHow Staff. Our trained team of editors and researchers validate articles for accuracy and comprehensiveness. wikiHow's Content Management Team carefully monitors the work from our editorial staff to ensure that each article is backed by trusted research and meets our high quality standards.
There are 18 references cited in this article, which can be found at the bottom of the page.
This article has been viewed 360,626 times.
Learn more...
For many people, slacklining is a sport, a hobby, and more. It’s like tightrope walking at a safe distance from the ground and requires very little setup. In fact, you can build your own slackline at home with ordinary climbing gear. You will need to anchor the line to a couple of trees or posts to create a bouncy, tensioned line to walk. Once you have your supplies, you can set up a line within minutes.
Steps
Choosing Supplies and Anchors
-
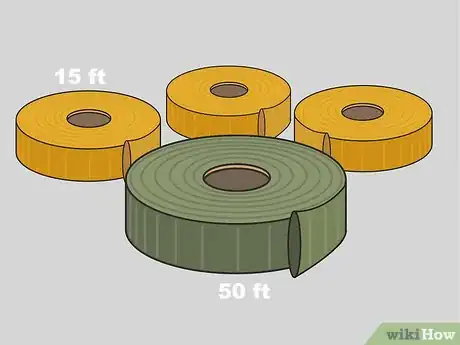
1Choose thick tubular webbing for the slackline and slings. Slacklines are typically made from nylon cords 1 to 2 in (2.5 to 5.1 cm) wide. You will need a long piece for the slackline and 3 smaller “slings” to anchor the line. For the main line, 50 ft (15 m) is a good length for beginners. Get shorter lines 10 to 15 ft (3.0 to 4.6 m) long.[1]
- The cords, along with other components, are available online and at outdoor activity supply stores.
- Get the webbing and other supplies you need in one go by purchasing a slackline kit. Online stores and outdoor activity suppliers sell them.
- You can make a slackline out of other material, including car tow lines or bungee cords.
-
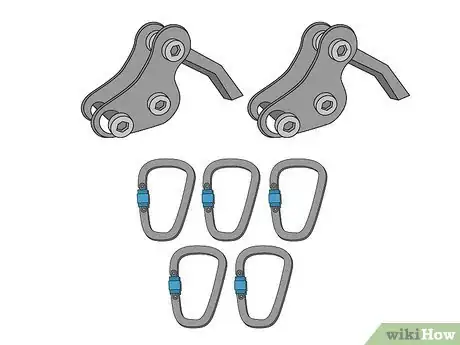
2Purchase line lockers and carabiners to connect the webbing. Pick up 2 line lockers and 5 carabiners to set up your line. The line lockers are metal rings that prevent the slackline from coming undone. Make sure the carabiners are oval-shaped and climbing-strength to ensure they support your weight on the line.[2]
- You can also use metal rings from the hardware store or rappel rings from an outdoor activity supply store.
Advertisement -
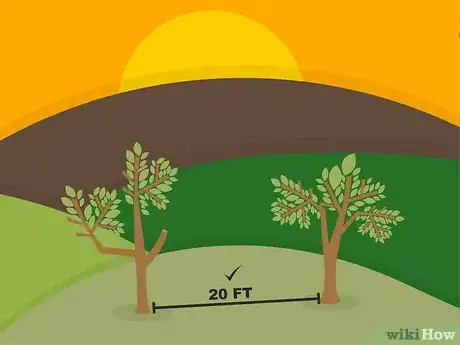
3Select strong anchor points to tie the slackline to. Find 2 trees, posts, concrete walls, or other solid objects. Measure the distance between them to make sure your slackline is long enough. Shorter spans are easier to learn on and allow you to keep the line closer to the ground.[3]
- For a 50 ft (15 m) line, look for anchor points about 20 to 30 ft (6.1 to 9.1 m) apart. The distance between the anchors has to be about 20 ft (6.1 m) shorter than your slackline so you can tie the line around them.
- Make sure the anchors are capable of sustaining 500 to 1,000 lb (230 to 450 kg) of force. If the anchors feels loose in the ground, don’t use them. Fragile surfaces like wood walls aren’t safe anchor points.
- If you don’t have anchor points available, you will need to make some. Build your own A-frames or purchase them in a kit.
Building A-Frame Anchors
-
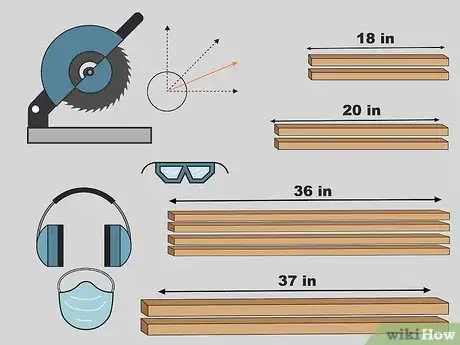
1Cut wood boards to create the A-frame components. You will need approximately 4 2 in × 4 in (5.1 cm × 10.2 cm) planks about 8 ft (2.4 m) long. This will be enough to create 2 A-frame. Use a miter saw set at a 22.5 degree angle. Wear safety goggles, ear muffs, and a dust mask if you cut the boards yourself. You can also rent a saw at a home improvement store or have store employees cut the following boards:[4]
- 2 planks 18 in (46 cm) long.
- 2 planks 20 3⁄4 in (53 cm) long.
- 4 planks 36 in (91 cm) long.
- 2 planks 37 7⁄8 in (96 cm) long.
-
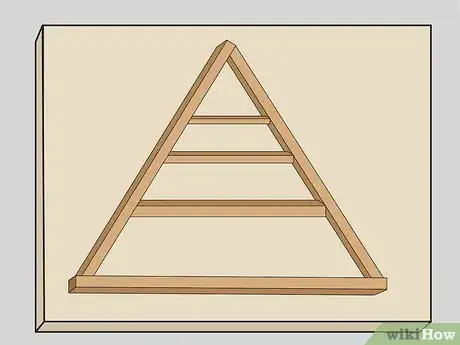
2Arrange the boards in an A-shape on a workbench. Set the boards out on a flat surface so you can fasten them together. Work on 1 A-frame at a time. To create the frame, place the 2 medium boards on the sides. Fit the remaining boards between these medium boards. Place 1 of the long boards at the bottom, then fit the shorter boards at the top and in the middle.[5]
- Each A-frame uses 5 boards. When you’re done, the boards will create the shape of an A. Make sure all of the boards fit snugly together.
-
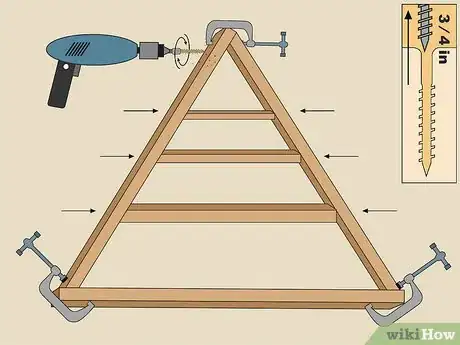
3Clamp the boards and drill pilot holes through them. Countersinking pilot holes prevents the boards from cracking and weakening. Use a drill with a 3⁄4 in (1.9 cm) countersink bit to drill a pair of holes in each of the middle boards. Measure about 2 in (5.1 cm) from the ends of each board, then drill the holes diagonally into the side boards.[6]
- Work from the bottom edges of lower support boards in the middle of the A-frame. For the small board at the top, drill through the side boards to reach it.
- Use a pair of wood clamps to hold the boards in place as you work.
-
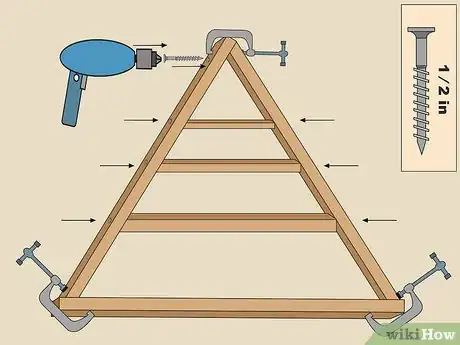
4Bolt the boards together with 2 1⁄2 in (6.4 cm) decking screws. Place a screw in each of the pilot holes. The screws will pass through the support planks and into the frame planks on the side. Make sure the boards fit together well and feel sturdy when you try to move them. That way, they won’t fall apart when you’re walking on your slackline.[7]
-
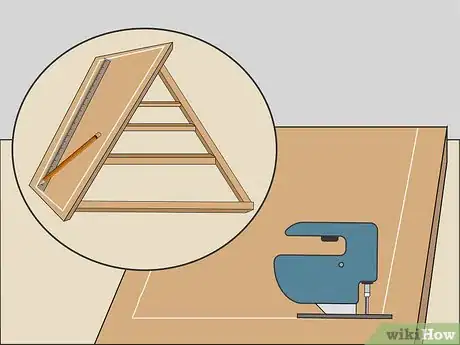
5Cut plywood to fit over the A-frame. The plywood creates a spot for you to attach the slackline and anchor lines. You will need a 8 in (20 cm) sheet of plywood 1⁄2 in (1.3 cm) thick for each A-frame you wish to make. Set the A-frame on top of the plywood, then trace its outline with a pencil. Cut the outline using a reciprocating saw.[8]
- You can also use a jigsaw or circular saw to cut the plywood.
- To avoid cutting the plywood too short, leave it a little longer than the outline. You can always cut it down further or sand it, but you can’t fix it once it’s too small for the A-frame.
-
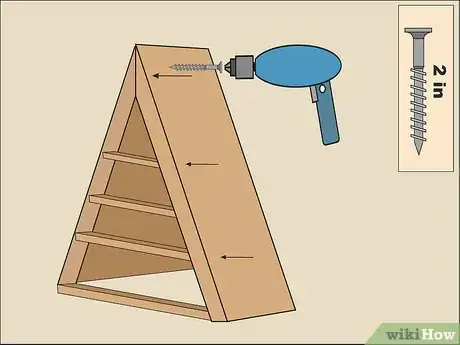
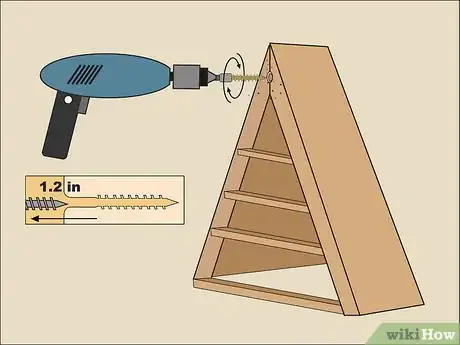
6Fasten the plywood to the A-frame with 2 in (5.1 cm) decking screws. Place the plywood over the A-frame. Place a screw about every 12 in (30 cm) along each of the boards in the frame. Screw through the plywood and into the frame boards to secure everything together.[9]
- The frame boards are a little difficult to find underneath the plywood. Feel for the solid boards through the plywood. If you’re unsure, lift up the plywood to locate them. Outline them with a pencil to help you place the screws.
-
7Drill a pair of holes through the plywood to create anchor points. Use a 1 1⁄2 in (3.8 cm) drill bit to make the holes. Position them underneath the top board on the A-frame. Make the holes about 2 in (5.1 cm) apart. Use a reciprocating saw or another tool to remove the wood between the holes.[10]
- Basically, you create a slot in the A-frame to thread the slackline webbing through.
-
8Tie the A-frames to anchor points using nylon webbing. Find an anchor point for each A-frame. One way to do this is by planting metal stakes or struts firmly in the ground. Use extra line lockers and carabiners to run the webbing from the stakes to the slot in the A-frame. Make sure the stakes are well-planted so the frames can’t move when you touch them.[11]
- Another way to plant the A-frames is by burying concrete cinder blocks in your yard. Tie a chain around each cinder blocks, then run the chains to the A-frames.
- To preserve the webbing for longer, sand your A-frames smooth before using them.
Setting up Your Slackline
-
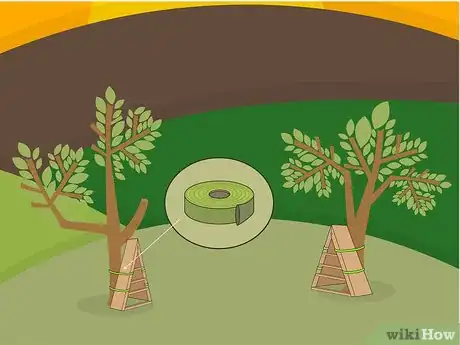
1Secure a sling to the first anchor point at waist height. Position the loop of webbing about 2 to 3 ft (0.61 to 0.91 m) off the ground for a 15 to 20 ft (4.6 to 6.1 m) slackline. Loop the webbing tightly around the tree, then connect the ends with a carabiner.[12]
- Before using trees for anchors, cover the bark with padding like a towel or carpeting.
- If you’re creating a longer slackline, you may need to raise the slings up further to keep the line off the ground. If the line touches the ground when you climb onto it, take it apart and raise the webbing.
-
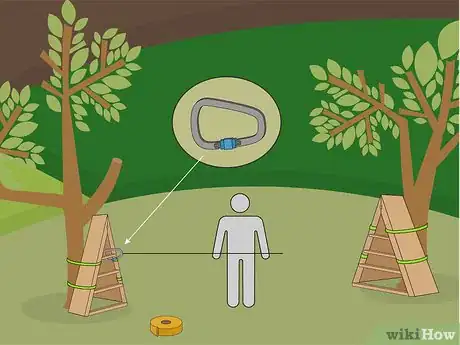
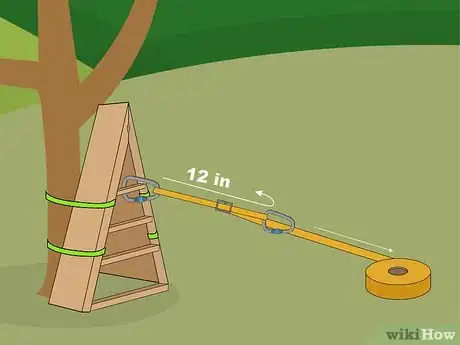
2Hook the slackline to the sling with a carabiner Fold the first 12 in (30 cm) of the line over on itself to create a small loop. Push the loop through a line locker to keep the slackline secure later. Then, pull about 5 in (13 cm) of the line back around and through the line locker again to create a double loop. Clip a single carabiner to it.[13]
- Pull on the line to make sure the sling feels secure in the loop. If it feels loose, take it out of the line locker and carabiner, then knot it again.
-
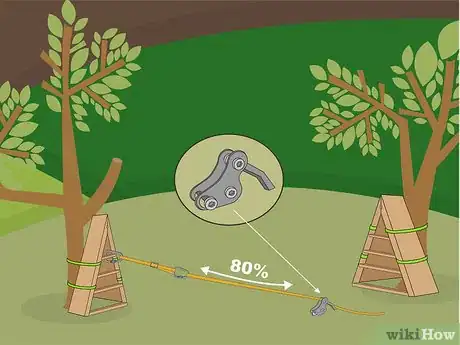
3Place a line locker and carabiner about 80% of the way from the second anchor. Lay the slackline out on the ground between the anchor points. Walk towards the loose end of the line and the second anchor point. Estimate when 80% of the line is behind you, then pull the line through a line locker. Tie the end of the line to a carabiner using a double loop like you did earlier.[14]
- You can usually get a good estimate of where to place the line locker by looking at the line as you walk. If you need to, measure it out with a ruler or tape measure.
- For example, if you’re using a 20 ft (6.1 m) line, place the line locker 15 to 16 ft (4.6 to 4.9 m) along the slackline.
-
4Wrap 2 slings with carabiners around the far anchor point. Place the slings on the anchor point closest to the free end of the slackline. Keep the slings close together. Connect the ends of each sling with a single carabiner. Lay the carabiners on top of one another, positioning them so the “gate” parts that open face in opposite directions.[15]
- Remember to protect trees by placing padding underneath the slings.
- Test the slings when you’re done to make sure they are knotted tightly in place.
-
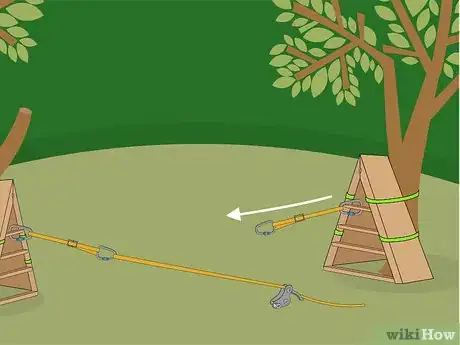
5Loop the slackline around the carabiners to anchor it in place. Bring the slackline underneath and through the lower carabiner on your anchor point. Then, pull the line back towards you and through the carabiner with the line locker. Pass the line under and through the upper carabiner on the anchor point. Finally, pull the line underneath and back through the carabiner with the line locker.[16]
- This is called a “primitive” 4-carabiner pulley system. It can be a little tricky to get at first, but it’s a safe, fun way to create a slackline without any extra tools or knots.
- If you have a ratchet system, attach the ratchet to an anchor point, then feed the slackline webbing through it.[17]
Tightening and Undoing the Line
-
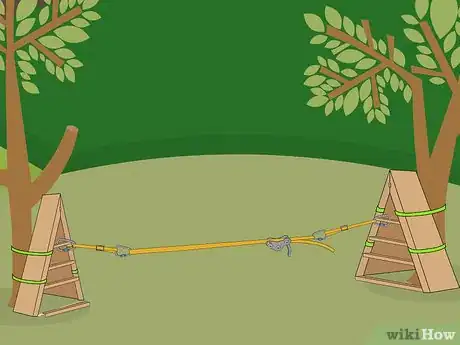
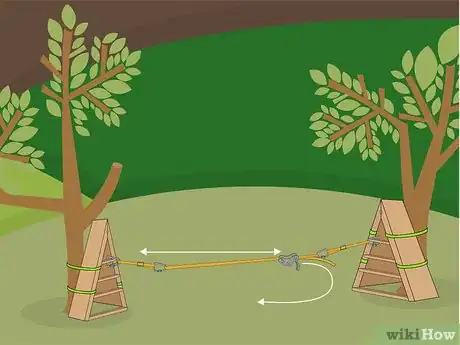
1Pull the line toward the far anchor to tighten it. Grab onto the tail end of the slackline and pull it towards the first anchor with the single carabiner. Get the line moderately taught, enough to keep it from sagging. Tighter lines are better for bouncing and doing tricks. Adjust the line to get the amount of tension you desire.[18]
- If you’re using a ratchet, pull the ratchet handle down to tighten the line. Don’t tighten it too much. Keep at least a little slack in the line to prevent it from snapping.
- You may need help pulling a line over 30 ft (9.1 m). Have a friend help you pull the line.
- Another way to pull a long line is by installing a pulley system. Hook the pulley to the anchor point. Run a cord from the locking anchor in the line to the pulley. Then, tug the webbing through the pulley to tighten it.[19]
-
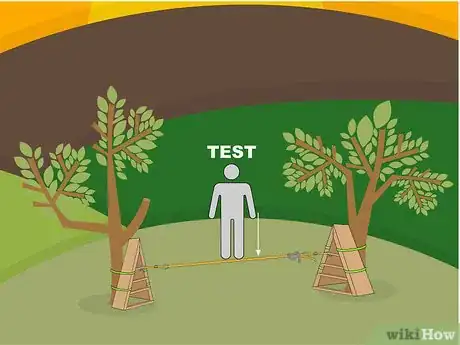
2Test the line by sitting or bouncing on it. Climb onto the line. Walk across it or bounce on it a little bit to stretch out the anchors and knots. Make sure the line feels secure but doesn’t touch the ground when you walk the middle of it.[20]
- If the line needs adjustment, tug on the end of the slackline to tighten or loosen it. If you need to raise the line, loosen it first before untying the webbing around the anchors.
-
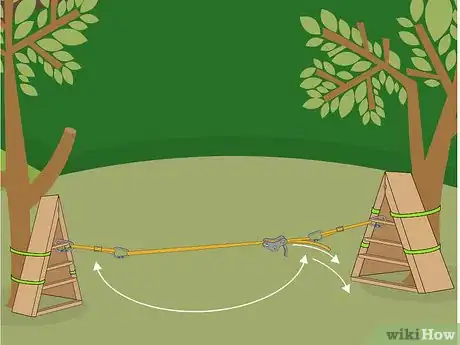
3Release the line by pulling it in the opposite direction. Pull the tail end of the line away from the anchor point to undo it. This is very safe and easy to do in a primitive pulley system. Once you have lowered the line, removing all tension from it, unhook the carabiners to take down all of the webbing.[21]
- If you’re using a ratchet, unlock the ratchet to release the tension. Pull the slackline out of the ratchet to take it down.
Warnings
- Slacklines generate enormous forces on the anchor points. Choose your anchors carefully to avoid damaging them or breaking the line.⧼thumbs_response⧽
- Damaged webbing is very dangerous. Don’t use it in a slackline. Also, avoid using webbing and carabiners for climbing after they have been tensioned in a slackline.⧼thumbs_response⧽
- Tight slacklines can snap, so be careful if you’re using a ratchet system. You can’t really overdo a line in a primitive pulley system, so tighten the line by hand if you have reservations.⧼thumbs_response⧽
Things You'll Need
Choosing Supplies and Anchors
- 2 anchor points
- At least 40 ft (12 m) of 2 in (5.1 cm)-thick tubular webbing
- 3 pieces of tubular webbing at least 10 ft (3.0 m) long and 1 in (2.5 cm) thick
- 5 carabiners
- 2 line lockers
- Towel or other padding to protect trees used as anchors
Building A-Frames
- 2 planks 18 in (46 cm) long.
- 2 planks 20 3⁄4 in (53 cm) long.
- 4 planks 36 in (91 cm) long.
- 2 planks 37 7⁄8 in (96 cm) long.
- Wood clamps
- Power drill
- 3⁄4 in (1.9 cm) countersink drill pit
- 2 1⁄2 in (6.4 cm) decking screws.
- 2 8 in (20 cm) sheet of plywood 1⁄2 in (1.3 cm)
- Reciprocating saw or alternative
- 2 in (5.1 cm) decking screws.
- A 1 1⁄2 in (3.8 cm) drill bit to make the holes
- Pencil
- Safety goggles
- Ear muffs
- Dust mask
References
- ↑ https://www.youtube.com/watch?v=Rme3uBR1d2I&feature=youtu.be&t=73
- ↑ http://www.nwslackline.org/96/howto-setting-up-a-basic-primitive-slackline
- ↑ https://www.youtube.com/watch?v=YRyCC5e3Z5o&feature=youtu.be&t=47
- ↑ https://www.youtube.com/watch?v=MVJCIckKVCM&feature=youtu.be&t=44
- ↑ https://www.youtube.com/watch?v=MVJCIckKVCM&feature=youtu.be&t=155
- ↑ https://www.youtube.com/watch?v=MVJCIckKVCM&feature=youtu.be&t=246
- ↑ https://www.youtube.com/watch?v=MVJCIckKVCM&feature=youtu.be&t=357
- ↑ https://www.youtube.com/watch?v=NkolT_879ZA&feature=youtu.be&t=16
- ↑ https://www.youtube.com/watch?v=NkolT_879ZA&feature=youtu.be&t=174
- ↑ https://www.youtube.com/watch?v=NkolT_879ZA&feature=youtu.be&t=275
- ↑ https://www.youtube.com/watch?v=y4o5XePFCbA&feature=youtu.be&t=10
- ↑ https://www.youtube.com/watch?v=EhPOzZ7j9Y4&feature=youtu.be&t=81
- ↑ http://www.nwslackline.org/96/howto-setting-up-a-basic-primitive-slackline
- ↑ https://www.youtube.com/watch?v=MdDzz5H2VQA&feature=youtu.be&t=76
- ↑ https://www.youtube.com/watch?v=MdDzz5H2VQA&feature=youtu.be&t=125
- ↑ http://www.nwslackline.org/96/howto-setting-up-a-basic-primitive-slackline
- ↑ https://www.youtube.com/watch?v=7oMdsAi9nCg&feature=youtu.be&t=97
- ↑ https://www.youtube.com/watch?v=MdDzz5H2VQA&feature=youtu.be&t=178
- ↑ https://www.youtube.com/watch?v=-gKMeeAk460&feature=youtu.be&t=118
- ↑ https://www.youtube.com/watch?v=YRyCC5e3Z5o&feature=youtu.be&t=176
- ↑ http://www.nwslackline.org/96/howto-setting-up-a-basic-primitive-slackline
