This article was co-authored by Steve Linton and by wikiHow staff writer, Christopher M. Osborne, PhD. Steve Linton is the President of Deltec Homes, a custom home building company in Asheville, North Carolina. With nearly 20 years of experience, he oversees all home building projects for Deltec Homes. He specializes in hurricane-resistant homes, green home design, and sustainable building. Steve holds a BS in Structural Engineering from Cornell University and is a LEED Accredited Professional.
There are 8 references cited in this article, which can be found at the bottom of the page.
This article has been viewed 49,418 times.
You should know how to board up a window with plywood if you live in an area that’s prone to big storms,[1] or even if you’re just dealing with a broken window. To help out, we’ve outlined a pair of methods that work for both storm prep and broken windows—one using screws (best for wood framing or vinyl siding), the other using clips (ideal for masonry or stucco homes). We’ve also included a tip on securing your windows from the inside for some last-minute protection. And it’s all very DIY friendly!
Steps
Securing Plywood with Screws (Wood/Vinyl Siding)
-
1Measure the window’s height and width. Use a tape measure to determine the height and width of the window, including the window’s framing (but not the surrounding trim or structural framing). If the window has an extended bottom sill that protrudes out further than the rest of the window, make your height measurement from the top of the sill.[2]
- Write down your measurements—they’re easy to forget, especially if you’re boarding up multiple windows!
-
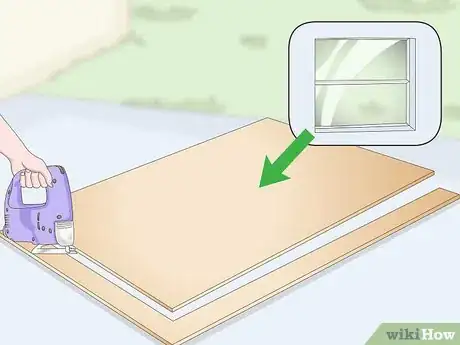
2Cut the plywood 8 in (20 cm) larger than your measurement. Transfer your height and width measurements to a 4 by 8 ft (1.2 by 2.4 m) sheet of 5⁄8 in (16 mm) thick exterior-grade plywood. Then add 8 in (20 cm) to both the height and width measurements and mark out your cutting lines. Cut the plywood with a circular saw.[3]
- For example, if your window measures 48 inches (120 cm) tall and 24 inches (61 cm) wide, then your piece of plywood should be 56 inches (140 cm) tall and 32 inches (81 cm) wide.
- If the window has an extended (protruding) lower sill, add only 4 inches (10 cm) to the height before cutting the plywood. The bottom of the sheet of plywood will rest on the sill.
- If you don’t have a circular saw, take your measurements to the home improvement store when you buy the plywood and ask an employee to cut it to size for you.
Advertisement -
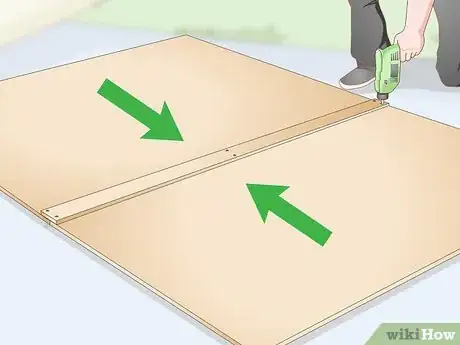
3Attach 2 sheets of plywood together if you need a bigger piece. If your window is too big for one sheet of plywood, cut 2 separate sheets that are each half the size you need. Lay them edge-to-edge on a flat surface so they equal the shape and size you need, then cut a board of 2 by 4 in (5.1 by 10.2 cm) lumber to the length of the connecting edge of the plywood sheets. Use a power drill to make pilot holes in the board and drive 2.25 in (5.7 cm) screws through the board and into the plywood.[4]
- Drive at least 6 screws (2 at the top of the bracing, 2 in the middle, and 2 at the bottom) through the board and into the plywood—8, 10, or even 12 screws is that much better.
-
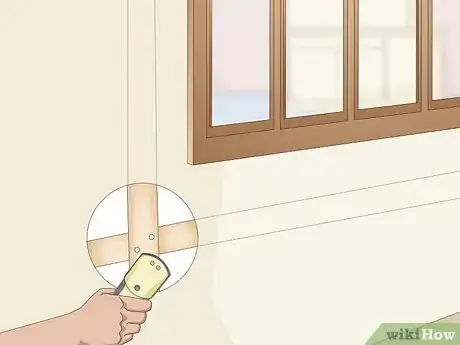
4Locate the framing studs surrounding the window. A wood-framed house will always have framing studs against each side of a window opening, and should also have sturdy framing right above and below the opening. If you have wood siding, look for rows of nail holes to confirm the location of the studs to the sides. If you have vinyl siding, use a stud finder or estimate the location of the studs and make one or more small, discreet pilot holes with your drill to confirm there’s solid wood framing underneath.[5]
- Don’t rely just on the exterior window trim to hold your plywood in place—it’s important that your screws end up in sturdy structural framing.
-
5Drill holes in the corners of the plywood that match the studs or framing. Transfer the measurements of the stud locations to your plywood sheet, then drill pilot holes in each of the 4 corners based on the stud locations. The pilot holes should be equal or just slightly greater in diameter than the size of the screws you’ll be using.[6]
- Plan to use 1⁄4 in (6.4 mm) diameter, 2.25 in (5.7 cm) long lag screws if the window is less than 4 by 3 ft (1.22 by 0.91 m) in size, and 3⁄8 in (9.5 mm) diameter, 3 in (7.6 cm) long lag screws if it’s larger than that.
- Ideally, these pilot holes should be at least 2 in (5.1 cm) in from all sides of the plywood sheet. But you can get by with slightly less than this if that’s what the stud locations dictate.
-
6Drill pilot holes around the plywood with 12 in (30 cm) spacing. Start at one of the corner pilot holes and mark out a series of perimeter pilot hole locations that are no more than 12 in (30 cm) apart. Drill out these pilot holes with the same diameter drill bit you used for the corner holes.[7]
- If the window has a protruding bottom sill that the installed plywood sheet will rest on, you don’t need to drill pilot holes along the bottom of the sheet.
-
7Have a friend hold the panel as you screw it into place over the window. While your pal holds the plywood sheet firmly in place, drill through each of the pilot holes on the sheet and make corresponding pilot holes into the home’s framing—this time use a drill bit that’s slightly smaller in diameter than the screws you’ll be using. As your friend continues to hold the panel, drive a screw into each of the 4 corner pilot holes. At this point your buddy can let go and you can drive screws into the remaining pilot holes.[8]
- Unless the window has an extended lower sill that allows you to rest the plywood on it while you work, it’s virtually impossible to do this part of the job alone. So make sure you have that second set of hands to help!
- While it’s not absolutely necessary, consider slipping metal washers onto each screw to ensure that the screw heads don’t sink too deeply into the plywood and weaken it.
Securing Plywood with Clips (Masonry/Stucco)
-
1Record the height and width of the window you’re boarding up. Use a tape measure to determine the height and width of the window from the edges of the window frame, right up against the surrounding exterior wood framing, masonry, or stucco. Write the measurements down so you don’t lose track of them.[9]
- Window clips only work with windows that are in-set by at least 2.5 in (6.4 cm) and surrounded by a sturdy material like masonry, stucco, or solid wood (though the clips may cause surface damage to the wood). The clips won’t work with windows that are flush (even) with the house exterior or if your home has vinyl or thin aluminum framing around the window.
- Take accurate measurements so that the cut plywood board will fit snugly into the window opening.
-
2Cut a plywood sheet so it’s 1⁄4 in (0.64 cm) less than your measurements. Mark out the dimensions of the window, minus 1⁄4 in (0.64 cm) for both the height and width, on a 4 by 8 ft (1.2 by 2.4 m) sheet of 5⁄8 in (16 mm) thick exterior-grade Plywood. Use a circular saw to cut the plywood to size, working carefully so that the measurements of the cut sheet are just slightly smaller than the dimensions of the window.[10]
- For example, if your window frame measures 48.25 inches (122.6 cm) tall and 24.5 inches (62 cm) wide, then your cut piece of plywood should be 48 inches (120 cm) tall and 24.25 inches (61.6 cm) wide.
- Have your plywood cut to size for you at a home improvement store if you don’t have a circular saw.
-
3Join 2 plywood sheets together if the window opening is too large. For a window opening that’s bigger than a standard sheet of plywood, cut 2 separate sheets so they’re each half the size of the opening. Put them side-by-side and lay a 2 by 4 in (5.1 by 10.2 cm) board, cut to length, over the seam. Use your power drill to make at least 6 pilot holes through the board—at the top, middle, and bottom, if not more in between—and into the plywood. Drive 2.25 in (5.7 cm) screws through the bracing and into the plywood to join everything together.[11]
-
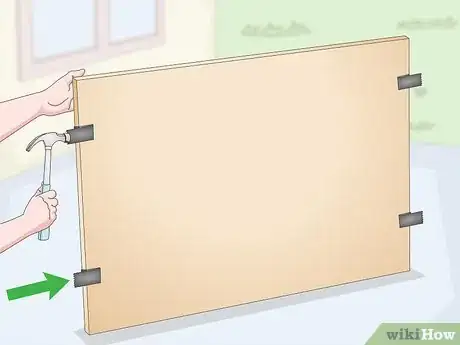
4Hammer clips onto the sides of the plywood with 24 in (61 cm) spacing. Press on a clip near the top left corner of the plywood sheet, positioned so the tension legs are facing toward you. Put another clip near the bottom left corner, then space out a series of clips between them—keep the spacing at or below 24 in (61 cm). Tap the clips lightly with a hammer until they are securely in place. Repeat the process on the right side.[12]
- You may be able to simply push the clips into place. However, using a hammer will ensure that they are as securely attached to the plywood as possible.
- Don’t worry about putting clips along the top or bottom. The clips on the side will be sufficient to hold the plywood in place.
-
5Press the plywood sheet into the window frame to secure it in place. Line up the sheet over the window opening, then slowly but firmly press it into the opening until the “teeth” on the tension legs of the window clips securely grip the surrounding material (brick, concrete, stone, etc.). Keep pressing until the sheet won’t budge any further.[13]
- Strong winds generate lift on the plywood that can cause it to be pulled out of the window frame. If the window clips are securely gripping the sides of the frame, they will keep the plywood in place.[14]
- When you’re ready to remove the plywood, simply push down on the board and pull up on the window clips on 1 side to remove it.
Expert Q&A
Did you know you can get expert answers for this article?
Unlock expert answers by supporting wikiHow
-
QuestionHow do you cover windows with wood?
 Steve LintonSteve Linton is the President of Deltec Homes, a custom home building company in Asheville, North Carolina. With nearly 20 years of experience, he oversees all home building projects for Deltec Homes. He specializes in hurricane-resistant homes, green home design, and sustainable building. Steve holds a BS in Structural Engineering from Cornell University and is a LEED Accredited Professional.
Custom Home Builder
-
QuestionHow do you protect windows without plywood?
 Steve LintonSteve Linton is the President of Deltec Homes, a custom home building company in Asheville, North Carolina. With nearly 20 years of experience, he oversees all home building projects for Deltec Homes. He specializes in hurricane-resistant homes, green home design, and sustainable building. Steve holds a BS in Structural Engineering from Cornell University and is a LEED Accredited Professional.
Custom Home Builder
Things You’ll Need
Securing Plywood with Screws
Securing Plywood with Clips
Warnings
- If you’re worried that you won’t be able to securely install the plywood over your windows before a big storm hits, hire a professional to do it for you. Although this is more expensive, you’ll want your house to be adequately protected for the storm.⧼thumbs_response⧽
References
- ↑ Steve Linton. Custom Home Builder. Expert Interview. 16 September 2020.
- ↑ http://flash.org/peril_inside.php?id=104
- ↑ https://flash.org/peril_inside.php?id=104
- ↑ http://flash.org/peril_inside.php?id=104
- ↑ https://www.goodhousekeeping.com/home/renovation/a33754682/how-to-find-find-wall-studs/
- ↑ https://www.thisoldhouse.com/windows/21015378/emergency-window-board-up
- ↑ https://www.thisoldhouse.com/windows/21015378/emergency-window-board-up
- ↑ Steve Linton. Custom Home Builder. Expert Interview. 16 September 2020.
- ↑ http://flash.org/peril_inside.php?id=104
- ↑ https://www.southernliving.com/travel/how-to-board-up-windows-for-hurricane
- ↑ http://flash.org/peril_inside.php?id=104
- ↑ https://housemethod.com/windows/how-to-board-up-windows-before-storm/
- ↑ Steve Linton. Custom Home Builder. Expert Interview. 16 September 2020.
- ↑ Steve Linton. Custom Home Builder. Expert Interview. 16 September 2020.
- ↑ https://edis.ifas.ufl.edu/pdf/AE/AE41200.pdf
About This Article
To board up a window, try using plywood. First, measure the height and width of the window so you know how much wood you’ll need. Then, cut a piece of plywood so it’s 8 inches higher and wider than the window. If your window is larger than the piece of plywood, attach 2 pieces together by screwing a 2 by 4 along the seam between the 2 pieces of wood. Next, drill holes about 2 inches from the corner of the plywood, which should line up with the studs in the wall when you screw it in place. Drill additional holes at 12 inch intervals around the board. Finish by placing the board over the window and screwing it into place. For tips on how to attach a board to brick using window clips, read on!


