This article was medically reviewed by Luba Lee, FNP-BC, MS. Luba Lee, FNP-BC is a Board-Certified Family Nurse Practitioner (FNP) and educator in Tennessee with over a decade of clinical experience. Luba has certifications in Pediatric Advanced Life Support (PALS), Emergency Medicine, Advanced Cardiac Life Support (ACLS), Team Building, and Critical Care Nursing. She received her Master of Science in Nursing (MSN) from the University of Tennessee in 2006.
There are 27 references cited in this article, which can be found at the bottom of the page.
wikiHow marks an article as reader-approved once it receives enough positive feedback. In this case, 100% of readers who voted found the article helpful, earning it our reader-approved status.
This article has been viewed 84,426 times.
Most injuries happen because of an accident or an unexpected event, so you might not always be prepared with a first aid kit at the ready. Sometimes, this means treating a wound or injury with whatever you have on hand. To help yourself be a little better prepared, consider getting CPR or first aid training from an organization like the Red Cross or American Heart Association.
Steps
Assessment of Vital Signs
-
1Check the scene for danger before you act. While you may be eager to help the injured person, you will be of no help if you, too, become injured. Before approaching the person, make sure there are no hazards, such as fire, traffic, unstable structures, downed electrical lines, swift-moving water, violence, explosions, or toxic gas. If the hazards are still present and it is too dangerous for you to reach the person, call for help and keep yourself out of harm's way.[1] If the hazard is not a threat to your safety, then you should approach the injured person.
- Wear any personal protective equipment you may have access to, such as gloves to protect you from bloodborne disease if the person is bleeding.
-
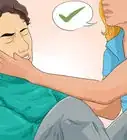
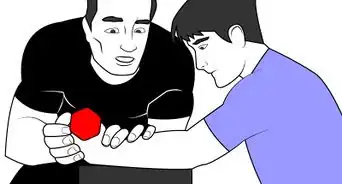
2Obtain consent before providing care if possible. Before you give first aid, it’s a good idea to get the person’s consent. If the person is conscious, they have the right to refuse help. They must give verbal consent or consent with a gesture, like a nod or a thumbs-up. Identify yourself, indicate your level of training, and ask the person if you may provide first aid.[2]
- If the person is unconscious, confused, mentally impaired, seriously injured or seriously ill, then consent is implied and you may assist them.
- If the injured person is a minor, get consent from their parent or guardian if possible.
- If this person is not available and the situation is life-threatening, then consent is implied and you may assist the child.
- If the person refuses aid, you must respect this. Even if the person is seriously injured and the situation is life-threatening, if they refuse care you cannot attempt first aid.
Advertisement -
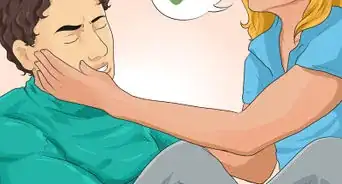
3Evaluate the person’s vital functions. These include assessing the victim's ABCs: Airway, Breathing, and Circulation. First, tap the person on the shoulder and say their name to find out if they are conscious. If not, lay them on their back and put yourself close to their head and neck so you can better evaluate their vital functions.[3]
- If the person is conscious, begin working, while talking to them to keep them calm and help slow their heart rate.
- If possible, try to keep the victim's eyes averted so they can't see the wound.
-
4Check the airway if the person is unconscious. If the person is unconscious and there is no possibility of neck or spine injury, place one hand on their forehead and another underneath their chin. Put gentle pressure on the forehead with one hand and gently tilt their chin up toward the sky with the other hand to open the airway. Make sure the person's airway remains open; check inside their mouth for obstructions.[4]
- If the person is conscious, they may be able to indicate to you whether their airway is blocked. For example, they might grab at their neck to show that they’re choking.
- If you suspect a neck or spine injury, use the jaw-thrust method.
- To perform the jaw-thrust method, grab the patient's jaw on either side and pull it forward.
- This opens the airway without compromising the neck or spine.
-
5Look, listen, and feel for signs of breathing. Look for a rise in the chest area; listen for the sound of air coming in and out of the lungs; feel for air by hovering the side of your face just above the person's mouth.[5]
-
6Put the person in the recovery position if they’re breathing. If your casualty is unconscious but breathing normally, put them on their side with their head tilted back and the hand further away from the ground under their head. Leave the arm closest to the ground either bent or straight out. The leg further away from the ground (the top leg) should be bent for stability and to keep the victim from rolling forward. Monitor the person's breathing.[6]
- Do not put someone in the recovery position if you suspect they have a spinal injury.
-
7Check for signs of a pulse (circulation). You do not need to measure the pulse, only detect it. You can quickly feel for a pulse by placing 2 fingers on the person's throat, in the hollow area just beside the windpipe.[7] Apply gentle pressure.
- You can also check for a pulse on the person’s wrist. Place 2 fingers on the underside of person’s wrist on the side closest to their thumb.[8]
-
8Perform CPR if the person is not breathing or doesn’t have a pulse. If the victim is not breathing or you can’t detect a pulse, do CPR, or cardiopulmonary resuscitation. Note that the recommended method for performing CPR has changed in recent years; research suggests that compression-only CPR (no mouth-to-mouth breathing) is as effective as the traditional approach (which had included mouth-to-mouth breathing).[9]
- To prepare for an emergency, it is strongly recommended you attend a CPR training class to learn the proper procedure to administer CPR and get some practice.
- Be aware that CPR is not pretty. The chest compressions often break ribs. Prepare yourself for this possibility.
-
9Examine the person for wounds or bleeding. Look for signs of severe bleeding once the other vitals have been evaluated. Once you know the person is breathing, you can then move on to treating any open wounds by applying pressure and raising the affected area above heart level.[10]
- If you notice that the person is bleeding, immediately apply direct pressure to the area and try to stop the bleeding.
- Minimizing blood loss will help improve their chances of survival.
- Watch for signs of shock, such as cold, pale skin, rapid breathing, nausea, confusion, or loss of consciousness.
- Keep the victim warm and comfortable.
- Both shock and loss of blood can cause the victim to suffer from lowered body temperature.
- Throw a blanket, coat, or some other warm item over the victim to keep them warm.
- Keep the victim as still as possible. Whether lying or sitting down, the person should be kept still and calm.
-
10Call for help when you can do so safely. Once the person is stabilized, call for emergency help immediately. If the person is bleeding out, get someone else to call emergency services while you help the victim.[11] For this to be effective, you must ask one person specifically to call emergency services. Do not shout this at a crowd of people—select one person and say something like, "You! Man in the Hawaiian shirt! Call 911!"
- If you are the only person around, use your phone to call for assistance.
- If you don't have a phone with you, look for a passerby or a place that may have a phone.


Wound Cleaning
-
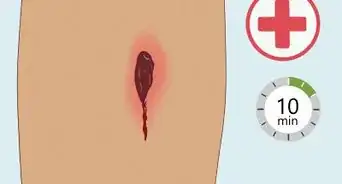
1Apply pressure first if the wound is bleeding a lot. Most minor wounds stop bleeding on their own pretty quickly. However, if the wound is bleeding heavily or persistently, try to get that under control before you do anything else. Grab a clean cloth, elevate the wound above the level of the heart, and press the cloth down firmly over the wound until the bleeding stops.[12]
-
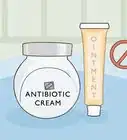
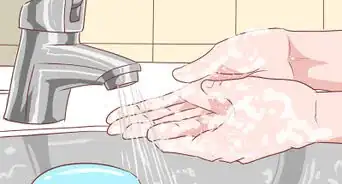
2Cleanse the wound with clean water. Use clean, cool tap water or bottled water to rinse the wound. If possible, let the water run over the wound for several minutes to rinse out dirt and bacteria. Saline solution is even better, if you have it. Wash the area around the wound with soap and water, but try not to get soap directly in the wound.[15]
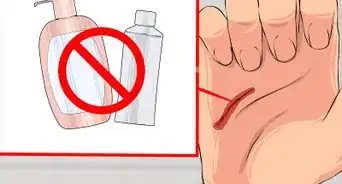
- Do not introduce anything that would increase the chances of infection, such as juice, grease, or milk. The same goes for scummy-looking pond or creek water sources.
- While it’s okay to clean the area around the wound with alcohol or other disinfectants, try not to get them in the actual wound.
- Harsh disinfectants can irritate the damaged tissue and slow down healing.
-
3Pat the area dry. Find something that you can dry the wound with, such as a piece of cloth, towel, or other soft material. Avoid using anything fluffy, such as cotton balls, that could leave fragments in or get stuck to the wound.[16]
- Paper towels will also work if you don’t have a cloth towel or pad available.
-
4Brush away debris from the wound if you can’t rinse it. If you don't have any water available or if you're in a desert area, use a portion of your clothing to brush away any debris from the wound.[17] If you don’t have a clean towel or paper towel, try to find the cleanest portion of your shirt or pant leg to use.


Severe Bleeding
-
1Inspect the wound to determine how severe it is. You want to get an idea of the how much blood loss you are dealing with. Immediately after cleaning the wound, inspect it for depth and any signs of damaged blood vessels, such as squirting or pulsing blood flow.
- The average person has approximately 170 fluid ounces (5.0 l) of circulating blood.[18]
- If someone loses around 30% of their blood, they could experience a dangerous drop in blood pressure and go into shock.[19]
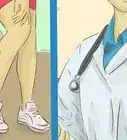
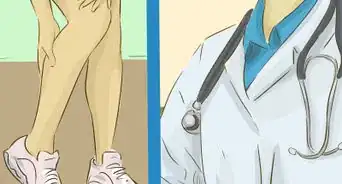
- Take this opportunity to evaluate for wound depth, as a wound of .4 inches (1.0 cm) or deeper will usually require sutures once you can get some medical care.
- Do not remove an object if it is embedded in the wound.
- Removing the object will actually increase blood flow.
- Medical professionals will be better able to remove the object without damaging any internal organs or causing massive blood loss in the process.[20]
-
2Apply pressure to stop the bleeding. Since you don't have gauze or bandages, apply firm pressure on the wound with a clean and absorbent material, like a shirt, towel, or sock. If the item becomes soaked with blood, don't remove it, as this can disturb any blood clots that may be starting to form. Instead, place another piece of material on top of the soaked one and keep applying direct pressure.[21]
- If there is an object is still in the wound, press firmly around it. Applying pressure to the wound will help to slow the flow of blood.
- If the wound is gaping and bleeding profusely, try stuffing the wound with a clean cloth, such as a towel or blanket, or with tampons if they are available, and then applying pressure.[22]
- Right now, it is more important to stop the person from bleeding out than worry about possible infection.
- If possible, apply pressure to the major artery leading to the area with your hand, while your other hand continues to apply pressure on the wound.
- These areas are called "pressure points".
- For example, to slow bleeding in the arm, press the inside of the arm just above the elbow or just below the armpit.
- If the wound is on the leg, press just behind the knee or in the groin.
-
3Reposition the victim so the wound is above the heart. This will help reduce blood loss. If the victim can sit, get them to move themself into an upright position; if not, then help the victim sit if possible.[23]
- Make sure the patient doesn't walk. Walking, and especially running, can increase blood flow and make the bleeding worse.
-
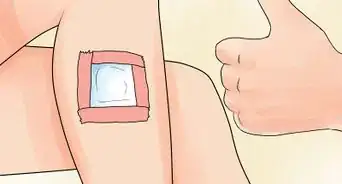
4Dress the wound with a clean cloth. Since you don't have gauze or bandages, use a piece of your clothing (shirt, coat, socks, etc.) or other material (from a tent, raft, etc.) to cover the wound once the bleeding slows or stops.[24] Alternately, you can also use plant life to cover the wound to stop any bleeding. Look for plants that have leaves large enough to cover the wound.
- Avoid using tissue paper or toilet tissue as these are quite fragile and may actually contaminate your wound with fragments and debris.
- Any fabric that absorbs the blood effectively can be used to apply pressure.
- Do not lift or remove the dressing as this will disrupt clot formation and re-start the bleeding.
- If the dressing becomes soaked with blood, add more cloth material on top of it.
- If the person has a serious chest wound, leave it uncovered until emergency medical personnel arrive.
- If the wound is sealed, it could trap air in the chest cavity and cause the lungs to collapse.[25]
-
5Fasten the dressing in place. Use string, tape, rope, or torn strips of clothing to tie the dressing in place. Do not tie the dressing on so tightly that blood flow to the affected area is cut off.[26]
- If you don't have any materials to fasten the dressing in place, simply continue to apply pressure with your hands. This will help the blood clot.
-
6Use a tourniquet as a last resort if you can’t stop the bleeding. In certain situations, it may be necessary to use a tourniquet. If the person is bleeding uncontrollably from a limb and you can’t stop it with pressure, wrap something like a narrow strip of cloth, a belt, or a necktie around their limb 2 inches (5.1 cm) above the wound. Tighten the wrapping until the bleeding stops or you can’t feel a pulse below the tourniquet. To create extra tension, knot an object such as a pen or a stick into the fabric and twist it.[27]
- Use a strip of material that’s at least 2 inches (5.1 cm) wide. Don’t use rope, cable, or wire, since it could cut into the person’s flesh and cause serious damage.
- Only use a tourniquet on a person’s limbs (arms or legs), and never on their neck or torso.
- Don’t apply the tourniquet over a joint, such as an elbow or knee, since it won’t be effective that way.
- A tourniquet can cause tissue damage, so only use one if the bleeding is extremely severe and you can’t stop it with pressure alone.


Fractures
-
1Be cautious about moving an injured person. Only move someone if there is imminent danger, such as a fire, car accident, or other potential surrounding hazards. If there has been a fall and the person is having neck pain or cannot move their legs or arms, do not move them at all. For a suspected spinal cord injury, leave the person until emergency services arrive with backboards and cervical collars. Immobilize them in the position in which you find them and call for emergency help immediately.[28]
- Any movement could cause paralysis if the person has a spinal injury, so keep them still and reassure them until help arrives.
- For other fractures, such as an arm or limb, only provide first aid if emergency medical treatment is not expected soon.
- Moving and tending to the fracture can do more harm than good.
- If treatment in a medical facility is not immediately available, help to stabilize the bone and relieve the pain using the following guidelines.[29]
-
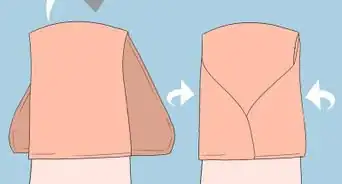
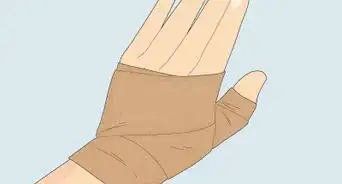
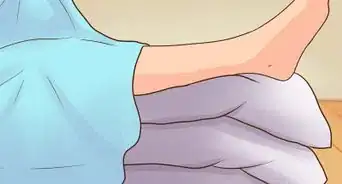
2Create a sling out of fabric for an arm fracture. If the affected limb is an upper extremity, like an arm, you can create a ready-made shoulder sling easily with the injured person’s shirt or sweatshirt. Carefully maneuver the uninjured arm out of the sleeve while keeping the shirt around their neck. Pull the fabric up so that their elbow is bent at 90° and rest their elbow in the lip of the uplifted shirt. This will safely immobilize any fracture in the shoulder, elbow, forearm, and wrist.
- You can also cut a more traditional sling out of your shirt or other fabric, like a pillowcase, if you have scissors or other cutting utensils.
- Cut the cloth into a big square, about 40 inches (100 cm) square, and then fold the square diagonally into a triangle.
- One end of the sling should go under the person’s arm and over the shoulder.
- The other end should go over the other shoulder. Tie the 2 ends together behind the neck.[30]
- A sling will not only provide significant pain relief, but will also keep bone fragments from moving around.
-
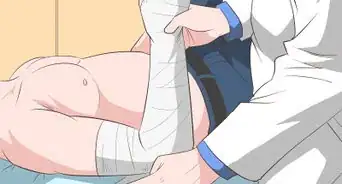
3Splint a broken arm or leg to give it support. Do not try to realign the bone.[31] To make a splint, use material you have on hand or can find nearby. Look for rigid material to make the splint, such as a board, stick, or rolled up newspaper.[32]
- Extend the splint to beyond the joint above and below the break.
- For instance, if the lower leg is broken, the splint should go above the knee and lower than the ankle.[33]
- A cardboard box makes an excellent splint for a leg. Tear or cut the sides to fit the affected area.
- Place the box flush with the ground and slide it under the leg, encircling the leg with the cardboard.
- Secure the cardboard with tape, rope, or torn cloth strips from what you are wearing.
- Fold an edge of the box at the bottom to support the ankle joint so that it is not freely flopping.
-
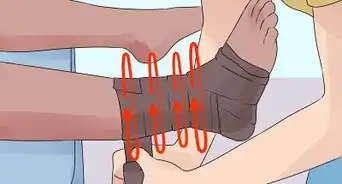
4Pad the splint with soft material. Use clothing, towels, blankets, pillows, or anything else that is soft that you have with you. Secure the splint to the area. You can use a belt, rope, shoelaces, or anything that is handy that will keep the splint in place. Be careful when you apply the splint not to cause further injury to the body. Pad the splint well so it doesn’t add pressure to the injured area but only immobilizes it.[34]
-
5Minimize swelling with ice or a cold pack. If ice is available, such as from an ice chest or an ice pack, apply it to the area to minimize swelling. In a pinch, you can really use anything cold, such as cold cans of soda.[35]


Warnings
- This article is not a substitute for professional medical advice, emergency treatment, or formal first-aid training.⧼thumbs_response⧽

References
- ↑ http://www.redcross.org/images/MEDIA_CustomProductCatalog/m48840210_CPRO_Handbook.pdf
- ↑ http://www.redcross.org/images/MEDIA_CustomProductCatalog/m48840210_CPRO_Handbook.pdf
- ↑ https://www.ncbi.nlm.nih.gov/pmc/articles/PMC3273374/
- ↑ https://www.nhs.uk/conditions/first-aid/after-an-accident/
- ↑ http://www.nlm.nih.gov/medlineplus/ency/article/000022.htm
- ↑ http://www.nhs.uk/conditions/accidents-and-first-aid/pages/the-recovery-position.aspx
- ↑ http://www.nhs.uk/chq/Pages/2314.aspx?CategoryID=72&SubCategoryID=725
- ↑ https://www.mayoclinic.org/how-to-take-pulse/art-20482581
- ↑ http://circ.ahajournals.org/content/122/18_suppl_3.toc
- ↑ https://www.nhs.uk/conditions/first-aid/after-an-accident/
- ↑ http://www.health.harvard.edu/family_health_guide/emergencies-and-first-aid-direct-pressure-to-stop-bleeding
- ↑ https://www.mayoclinic.org/first-aid/first-aid-cuts/basics/art-20056711
- ↑ https://medlineplus.gov/ency/article/000045.htm
- ↑ https://www.uofmhealth.org/health-library/tp22233spec
- ↑ https://www.cdc.gov/disasters/woundcare.html
- ↑ https://www.nhs.uk/common-health-questions/accidents-first-aid-and-treatments/how-do-i-clean-a-wound/
- ↑ https://www.berkeley.il.us/?SEC=665F79B0-B903-4218-AB0B-17CB9765AA94
- ↑ https://www.ncbi.nlm.nih.gov/books/NBK526077/
- ↑ https://www.ncbi.nlm.nih.gov/books/NBK470382/
- ↑ http://www.mayoclinic.org/first-aid/first-aid/basics/art-20056604
- ↑ http://www.health.harvard.edu/family_health_guide/emergencies-and-first-aid-direct-pressure-to-stop-bleeding
- ↑ https://dps.utah.edu/stopthebleed/wound-packing-direct-pressure/
- ↑ http://www.health.harvard.edu/family_health_guide/emergencies-and-first-aid-direct-pressure-to-stop-bleeding
- ↑ http://www.health.harvard.edu/family_health_guide/emergencies-and-first-aid-direct-pressure-to-stop-bleeding
- ↑ https://www.ahajournals.org/doi/10.1161/CIR.0000000000000269
- ↑ http://www.health.harvard.edu/family_health_guide/emergencies-and-first-aid-direct-pressure-to-stop-bleeding
- ↑ http://www.ncbi.nlm.nih.gov/pmc/articles/PMC2660095/
- ↑ https://www.mayoclinic.org/first-aid/first-aid-spinal-injury/basics/art-20056677
- ↑ https://www.mayoclinic.org/first-aid/first-aid-fractures/basics/art-20056641
- ↑ http://www.health.harvard.edu/family_health_guide/emergencies-and-first-aid-how-to-make-a-sling
- ↑ http://www.mayoclinic.org/first-aid/first-aid-fractures/basics/art-20056641
- ↑ http://www.nlm.nih.gov/medlineplus/ency/article/000040.htm
- ↑ http://www.nlm.nih.gov/medlineplus/ency/article/000040.htm
- ↑ http://www.nlm.nih.gov/medlineplus/ency/article/000040.htm
- ↑ http://www.mayoclinic.org/first-aid/first-aid-fractures/basics/art-20056641
- ↑ http://www.csus.edu/aba/police/documents/erg/erg_cpr.pdf
About This Article