This article was co-authored by wikiHow staff writer, Eric McClure. Eric McClure is an editing fellow at wikiHow where he has been editing, researching, and creating content since 2019. A former educator and poet, his work has appeared in Carcinogenic Poetry, Shot Glass Journal, Prairie Margins, and The Rusty Nail. His digital chapbook, The Internet, was also published in TL;DR Magazine. He was the winner of the Paul Carroll award for outstanding achievement in creative writing in 2014, and he was a featured reader at the Poetry Foundation’s Open Door Reading Series in 2015. Eric holds a BA in English from the University of Illinois at Chicago, and an MEd in secondary education from DePaul University.
There are 15 references cited in this article, which can be found at the bottom of the page.
This article has been viewed 14,190 times.
Learn more...
If your pinball flippers don’t feel right, an exciting game of pinball can quickly turn frustrating. Occasionally, flippers may not feel right if they’re sitting at the wrong angle. Flippers may also not fire hard or fast enough, which can lead to obnoxious, boring gameplay. While the adjustments required to fix these problems may seem fairly complicated, you can usually make these adjustments yourself without hailing a repair technician, which can save you hundreds of dollars! Remember, before you work on a pinball machine, you must unplug your machine to avoid shocking yourself or shorting a component.
Steps
Accessing the Flipper Switches
-
1Turn the pinball machine off and unplug it to stay safe. Flip the power switch to the off position. This switch is usually located under the machine on the right or left side, but it may be on the back panel depending on your model. Then, unplug the machine from the wall outlet. This will keep you safe while you work on the machine.[1]
- Adjusting the flippers involves messing around with some electrical components, and you may shock yourself or damage the machine if you skip this part!
- You always adjust the flippers from underneath the playfield, which is where all of the circuits and game pieces are installed. Think of this process kind of like opening the hood of a vehicle. You cannot adjust or modify the flippers without accessing the underside of the playfield.
-
2Open the coin door or front panel to access the release lever. Use the key that came with your pinball machine to open the coin door on the front panel. If you have a non-commercial pinball machine and there’s no coin door, open the front panel based on your machine’s instructions. Usually, you simply open a latch and swing the front panel open like a door.[2]
- The release lever locks the glass molding in place. The molding is the horizontal bar that blocks the edge of the glass and keeps it from sliding off the playfield. The release lever is always inside of the front panel or coin door.
Advertisement -
3Turn the release lever to the left to unlock the glass molding. With the front panel or coin door open, look for a lever that’s sticking down from the top of the machine on the right side. Grab this lever and swing it from the right to the left to unlock the molding and glass.[3]
- Once the front panel is open, the lever should stand out fairly easily. It’ll be the only thing poking down from the front of the machine.
- The glass molding is the (usually plastic) strip that covers the edge where the glass meets the frame of the machine.
-
4Brace the glass with one hand and remove the glass molding. Keep one hand near the edge of the playfield to catch the glass and use your other hand to lift the glass molding off of the machine. Once the molding is removed, nothing is holding the glass in place and it may slide out to the ground if you don’t catch it. [4]
- The playfield glass normally doesn’t shoot out particularly quickly, so don’t be nervous about breaking the glass. So long as you stop it from sliding out all the way, you’ll be fine.
-
5Slide the glass out carefully and set it aside. With the molding removed, use both hands to slowly guide the playfield glass out of the machine. This is extremely easy to do and the glass should slide freely, so just monitor the speed of the glass as its sliding out. Remove the glass and set it down on a soft surface away from your machine to keep it from scratching or breaking.[5]
- If the glass doesn’t slide out on its own, just pull the end of the glass gently to guide it out of the machine.
-
6Lift the playfield up by the apron and pull it out until it clicks. The apron is the raised portion of the playfield that covers the ball return under your flippers. Grip the edge of the apron and pull the machine up vertically to raise the bottom of the playfield. Then, pull the playfield away from the machine until you hear a clicking noise.[6]
- The playfield may be kind of heavy, so hold it with both hands to guide it. Most play fields won’t fall if you drop them, but the older models may fall if you let go so keep one hand on the playfield at all times just to be safe.
- Some machines don’t click when you pull the playfield out all the way. If you don’t hear a clicking noise, just stop whenever you can’t pull the playfield out any further.
-
7Raise the playfield up and rest it on the adjustable bar on the side of the machine. Push the playfield up so the apron is at eye level or slightly above your head. Look on the inside frame of your pinball machine for a long metal rod that’s resting flat inside the machine, usually on one of the sides. Lift this metal rod up with one hand so it’s sticking up and lower your playfield until the metal rod is resting on an open portion of the playfield to prop the underside of the playfield up.[7]
- If you’ve ever used a hood prop to keep your hood from falling down while you’re working on your vehicle or checking the oil, this is the exact same process.
- There may be a noticeable divot on the underside of your playfield. If there is, this is where the metal rod rests. If there isn’t a divot, place the rod on any unoccupied portion of the playfield to balance the machine in an upright position.
- Some older machines do not have this metal rod. On these machines, simply raise the playfield so it’s resting against the back panel at a roughly 100-degree angle.[8]
-
8Find the two symmetrical coils near the top to find your flippers. The flipper is a general term for the entire assembly that causes the flipper bat to move. To find the flippers, look at the top of the playfield. Underneath each flipper bat, there are two symmetrical coils with switch assemblies attached to them. These are the components you need to work on to adjust your flipper bats.[9]
- There are a lot of little working parts here—flippers are fairly complicated and delicate—but try not to get overwhelmed. The most common adjustments you’ll need to make are fairly easy.
-
9Get the coils replaced if the flippers don’t move at all. The large coil assemblies on top of the EOS switch are the solenoids. If your flippers aren’t moving at all, you probably need to replace these solenoids. This is not a DIY repair, so hire a service technician if the bat doesn’t move when you hit the button on the side of the machine.[10]
- Replacing the coils involves working with some powerful electrical currents, and these pieces can catch fire if you replace the coils with an incompatible part or you don’t wire them correctly. It’s much safer to hire a professional to do this for you.
-
10Inspect the EOS switch to get a sense for how the flipper works. Look at the flipper bat on the top of the playfield. The flipper bat runs through a bushing, which is a plastic case, and connects the bat to the switch you see on the underside of the machine. This switch, called an EOS switch (short for “end of stroke”), looks a little like a door hinge, and it rotates when you press the button on the side of the machine.[11]
- When the bat rotates, the switch strikes a pin that closes a current and causes your flipper bat to rotate.


Changing a Flipper Bat’s Position
-
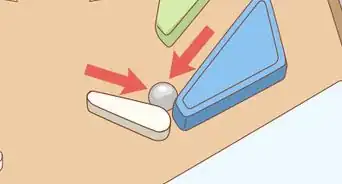
1Find the pawl by looking for the metal bar that rotates under the coil. The pawl is a metal bar that’s usually the size of your pinkie finger, and it has two nuts on either end of it. A spring connects one of the hex nuts to the coil above it. Move the pawl with your finger to confirm that you’ve found it—the pawl will move freely when you slide it back and forth. This is the piece you need to work on to adjust the angle of the flipper bat.[12]
- When you press the button on the side of the machine to fire the flipper bat, the pawl spins and pushes a pin into another pin to close an electrical current and fire the flipper bat.
-
2Loosen the hex nut furthest from the middle of the playfield on the pawl. The hex nut on top of the pawl that’s furthest from the middle of the playfield holds the flipper in place. Grab an Allen wrench that matches the size of this hex nut and turn it 2-3 times counterclockwise while bracing the pawl to keep it in place. This will loosen the flipper bat on the playfield.[13]
- This can require a fair bit of force and many people spend 20-30 minutes just trying to loosen this nut. Don’t get discouraged if it’s a little hard to do this at first. You’ll get it eventually!
- Don’t remove this nut entirely. Just loosen it up a little bit.
-
3Move the flipper bat from the other side by hand to change the angle. Keep the Allen wrench in the hex nut with one hand and use your other hand to reach over to the other side of the playfield and grab the flipper bat. Rotate the flipper bat by hand to change the angle it rests at. On the vast majority of pinball machines, there is a small mark on the playfield that is supposed to line up with the end of the bat. When in doubt, move the flipper to line up with this mark.[14]
- The mark for the flipper position varies from machine to machine. On some pinball machines, the mark is built into the design of the playfield. On other machines, there is a small arrow or dot that you may not immediately notice.
- If you can’t find the mark, just move the flipper bat so that it lines up perfectly with the bracket holding it in place. The flipper bat and the bracket holding it (which is usually part of the bumper) are almost always designed to rest in a straight line with one another.
-
4Lift the bat out a little to leave a small gap between the bushing and bat. Before you tighten the hex nut, lift the flipper bat away from the playfield so it isn’t resting perfectly against the bushing underneath. The size of this gap doesn’t matter so long that a gap exists, so don’t beat yourself up over making this gap perfect. If there isn’t a gap, the flipper bat will rub against the bushing underneath when it fires, which will make the flipper bat feel slow and clunky.[15]
- There’s a tool called a flipper gauge that you can slide under the flipper to ensure there’s a small gap between the bushing and the flipper bat when you’re tightening it. You can use one of these to do this if you’d like, but the size of the gap doesn’t really matter so long as a gap is there.
-
5Hold the flipper bat in place and retighten the loose hex nut. Use one hand to hold the flipper bat. Use your other hand to retighten the loose hex nut as tight as you can. Go slowly as you’re retightening the nut to keep the pawl from taking on too much pressure. Tighten the hex nut as hard as you can to secure it. This can be kind of a pain, but you really need this hex nut tight to keep the flipper bat responsive when you play.[16]
- Once this hex nut is retightened, lower the playfield back into place, put the glass back in, and set the molding on top of the machine. Then, pull the release lever to its original position and you’re done!


Improving the Flipper’s Strength
-
1Move the pawl back and forth manually to see how the switch works. The pawl is the metal bar with two hex nuts on it. It rests under the coil and it’s the part that moves when you press the button on the side of the machine. Use your finger to move this piece up and down to get a sense for how it works. This process is a lot easier if you have a sense for what happens when the pawl rotates.[17]
- This entire mechanism is collectively known as the EOS switch.
- On the exterior side of the pawl, look at the leaf switch to see how the two metal pins connect. The moment these pins touch one another is the exact moment your flipper bat would fire if the machine were on.
- On the interior side of the pawl, follow the metal plunger as it slides into the coil. The plunger is the metal bar that connects to the hex nut on the interior side of the pawl.
-
2Determine when the leaf switch closes while you move the switch. Look at the two metal pins on the leaf switch to see when they touch as you’re moving the pawl by hand. The exact moment they touch, look at the plunger on the other side of the pawl. You want this plunger to be almost entirely inside of the coil as the pins touch if you’re looking for highly responsive and powerful flipper bat.[18]
- Here’s how it works. The electrical signal from the solenoid starts when plunger goes into the coil. The current closes at the exact moment when the two metal pins on the leaf switch touch, which fires the bat. If the leaf switch closes right as the plunger completely disappears in the coil, you are getting more bang for your buck in terms of how much energy is moving the bat.
- This is why it’s called and “end of stroke” switch! You want the two pins on the leaf switch to connect as late as possible.
-
3Bend the leaf switch’s pins away from the coil so they touch as late as possible. Grab a flathead screwdriver or leaf switch adjustment tool and insert it in between the two metal pins at the top of the leaf switch. Gently tug these pins away from the coil to bend them further away from the pawl. You normally don’t need to make major adjustments; moving the pins 5–15 millimetres (0.20–0.59 in) is more than enough in most cases.[19]
- When you move one pin, the other pin should move automatically. If they don’t move together, adjust each pin separately, but continue to maintain a small gap between the pins. If you don’t maintain this gap and you turn the machine on, you may damage the switch. This gap must be visible by eye, but it shouldn’t be too big.
- A leaf switch adjustment tool is a special pinball tool that maintains the gap between the two pins. These tools normally come in a pinball repair kit, but you can use a flathead screwdriver if you don’t have one of these.
-
4Test the switch again and make additional changes as needed. Slide your screwdriver or leaf adjustment tool out and move the pawl by hand again. Check to see when the pins connect in relation to the plunger on the other side. If you need to move the pins in or out a little further, use your screwdriver or leaf switch tool to make the adjustment. You’re finished when the pins connect at nearly the same time as the plunger disappears inside the coil.[20]
- The pins must connect at some point if the flippers are going to work. If you reassemble the machine and the flippers don’t fire when you press the button, you need to move the pins closer to the pawl.
- When you’re done, lower the playfield back inside of the frame, slide the glass back into place, and set the molding on top of the machine before swapping the release lever back into place.


Warnings
- Never use oil or lubricant on your flippers. These components are designed to stay dry and you’re more likely to short the flippers than anything else.[21]⧼thumbs_response⧽
Things You’ll Need
Changing a Flipper Bat’s Position
- Allen wrench
- Flipper gauge (option)
Improving the Flipper’s Strength
- Flathead screwdriver or leaf switch adjustment tool.


References
- ↑ https://youtu.be/phc6K8A6IFs?t=22
- ↑ https://youtu.be/11kT-_1tQKI?t=44
- ↑ https://youtu.be/11kT-_1tQKI?t=46
- ↑ https://youtu.be/11kT-_1tQKI?t=46
- ↑ https://youtu.be/JHRDUpiss78?t=20
- ↑ https://youtu.be/phc6K8A6IFs?t=31
- ↑ https://youtu.be/phc6K8A6IFs?t=39
- ↑ https://youtu.be/kmocCyAzxnw?t=208
- ↑ http://homepinballrepair.com/index.php/pinball-flipper-rebuilding-how-to-fix-and-replace/
- ↑ https://www.funwithpinball.com/learn/flippers-coils-and-power
- ↑ http://homepinballrepair.com/index.php/pinball-flipper-rebuilding-how-to-fix-and-replace/
- ↑ http://techniek.flipperwinkel.nl/desega/index3.htm
- ↑ http://homepinballrepair.com/index.php/pinball-flipper-rebuilding-how-to-fix-and-replace/
- ↑ https://youtu.be/2JKKMNccPso?t=555
- ↑ https://youtu.be/2JKKMNccPso?t=627
- ↑ http://homepinballrepair.com/index.php/pinball-flipper-rebuilding-how-to-fix-and-replace/
- ↑ http://homepinballrepair.com/index.php/pinball-flipper-rebuilding-how-to-fix-and-replace/
- ↑ https://www.flippers.be/basics/101_adjust_pinball.html
- ↑ https://youtu.be/2JKKMNccPso?t=222
- ↑ https://www.flippers.be/basics/101_adjust_pinball.html
- ↑ https://youtu.be/jlfI_JtLAws?t=412
About This Article