wikiHow is a “wiki,” similar to Wikipedia, which means that many of our articles are co-written by multiple authors. To create this article, 15 people, some anonymous, worked to edit and improve it over time.
wikiHow marks an article as reader-approved once it receives enough positive feedback. In this case, 88% of readers who voted found the article helpful, earning it our reader-approved status.
This article has been viewed 384,423 times.
The bridge exercise is a back bend, a core strengthener, and a balance pose all in one. The regular bridge exercise requires you to move your hips up toward the ceiling, while the yoga bridge pose requires you to extend your rib cage closer to your front body. Whichever form of the bridge you choose, though, you'll be getting a great workout for your hips, glutes, core, and hamstrings. If you want to know how to do the bridge exercise, see Step 1 to get started.
Steps
Doing the Bridge Exercise
-
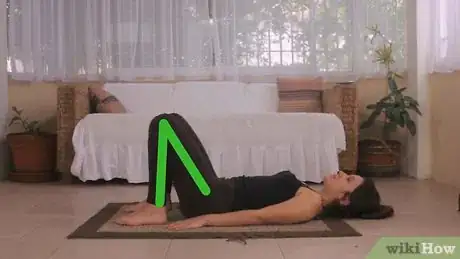
1Lie down on your back. It's recommended that you use a yoga mat for this exercise, but any padded floor will do. You don't want to hurt yourself by doing the bridge on a hard surface. As you lie down, make sure to keep your knees bent and hip distance apart, and the soles of your feet planted firmly on the floor. Walk your heels back as close to your buttocks as possible. If it is easier, scoot your buttocks toward your heels. You'll need to use the strength of your feet and your glutes to help you lift up.
-
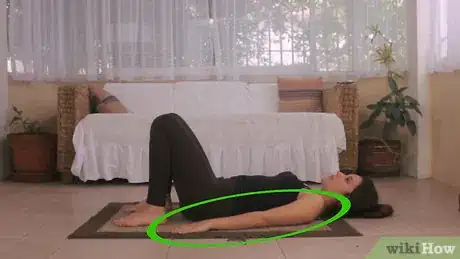
2Keep your arms at your sides. You can lie with your elbows turned inward and your palms up, just a few inches away from your hips to help stabilize your core. Draw your shoulder blades together to pull your shoulders back toward the floor. Alternately, you can also place your hands and your elbows down. This can offer you a bit more support and will protect your wrists as you lift up.
-
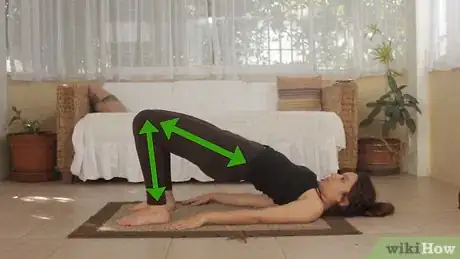
3Lift your hips toward the ceiling. As you do this, make sure to tilt your pelvis and to pull your belly button toward your spine to engage your transverse abdomens. Press your feet into the floor and lift your hips to the ceiling as high as is comfortable. Think of it as lifting your hips to the sky or the ceiling. As you lift, you should squeeze your buttocks to make them more firm, but not harden them too much.
-
4Keep your knees and thighs parallel. Do not let them splay out to the side or you can injure your knees and your back. Keep your shoulders on the floor to protect your neck. Remember to pull your shoulders into the mat as you lift up.
-
5Hold the pose for 5 full breaths and release back to the start position. Make sure to relax your rib cage as you do this. Gently lower yourself down, doing it slowly so you don't collapse onto your back and neck. Slide your feet down a bit until you are comfortably on the floor.
-
6Perform the exercise in reps of 10 lifts. You can repeat this three times to get the benefit of a good workout.
-
7Mix it up. Extend one leg straight and perform the same lifting motion. Make sure you hold your weight in the heal of the bent knee. Bridge up keeping your hips parallel.
- Alternately, you can use the same position, but move your hips up for one second, lower them almost all the way down, and repeat this 25 times to get a nice solid workout for your core and your glutes.
- Alternately, you can lift your hips all the way in the air and then just pulse up there for 25 seconds, 25 times, before bringing it all the way down and repeating the exercise for 2 more reps.
- You can even do a bit of both, mixing up traditional lifting for 10 reps followed by pulsing for 10 reps.
Doing the Bridge Pose in Yoga
-
1Lie flat on your back with your knees bent and your feet hip distance apart. Your toes should point straight forward, and your arms should be out at your sides, just a few inches away from your hips, with your palms down. Keep your chin away from your sternum so you don't injure your neck when you lift off the ground.
-
2Press your weight into your feet. You'll need the strength in your feet to help your hips lift off the floor. As you do this, relax your glutes (your thigh muscles) instead of tightening them up, which may be tempting. As your hips come up, your shoulders and back should press down more deeply into the mat. As you lift your hips up, you should inhale to gain strength and energy.
-
3Interlock your hands as you move your torso and lower back up further. You should keep moving upwards until your middle and upper back are at the height of your knees. You can press into the inner edges of your feet to make sure that your knees and legs are parallel and so that your legs don't flop open. As you move your hands up under your back, interlock them and use the pressure of your hands to help you get a nice lift. You can press down and back toward your hands to get that nice, deep stretch in your back.
- As you move up, you can lift your chin a bit away from your sternum, while pressing the top of your sternum toward your chin. Try to broaden your shoulder blades, creating a space at the base of your neck as you lift upwards. Just make sure to do everything gently to protect your neck; the movement of your chin directly affects the pressure on your neck.
-
4Release carefully. You have to slowly ease out of the bridge pose as you exhale, so you don't injure your neck and back. Slowly roll down onto your back without straining your neck and let your feet flop out to the side so you can rest with one hand on your heart and one hand on your belly. You can repeat this exercise three times, holding your bridge for ten breaths each time, or you can even move on to the full wheel pose, which is also known as the backbend.
- When you come out of the pose, you can hug your knees into your chest and roll up and down a bit, massaging your back.
- In yoga, the bridge pose is typically one of the last poses that you will do during a practice, so it helps you move forward into relaxation and prepares you to enter shavasana, the final pose of a yoga practice.
Expert Q&A
-
QuestionHow do you do a cobra pose?
 Eric Christensen, DPTEric Christensen is a Physical Therapist based in Chandler, Arizona. With over a decade of experience, Eric works in both orthopedic and neurological fields and specializes in custom orthotic prescription and casting, vestibular reprogramming, and manual therapy. He holds a Bachelor’s degree in Exercise Science with a focus in Sports Medicine from Colorado State University and a Doctor of Physical Therapy from Regis University. In practice, Eric takes a developmental approach to rehabilitation utilizing the Selective Functional Movement Assessment. He uses functional movement patterning and manual therapy to return patients to prior levels of function.
Physical Therapist Start by lying face-down in the prone position, with your hands beneath your shoulders and your thumbs beneath your armpits. While keeping your hips on the ground, slowly use your hands to push your head and shoulders away, so your shoulders come up and you slightly arch your back. Don't excessively look up while in this pose--just keep your head neutral and facing forward.
 -
QuestionWhat about the bridge with hands?
 Community AnswerKeep your hands steady. Keep your hands facing your ankle, it will give you more strength and stability.
 -
QuestionHow do I come up from a bridge with my hands?
 Community AnswerPlace your hands next to your ears, fingers pointed toward your feet, elbows directly overhead. Press into your hands and tilt the head so the the top of the head is on the floor. Press into your hands, lifting the head off the floor and arching the back. Take care that the bend is evenly distributed over your entire spine and not just in your lower back, or you will hurt yourself. Also, please make sure that you have sufficient arm strength and shoulder flexibility to perform the action, or, again, you can injure yourself.
Things You'll Need
- Yoga mat
References
About this article
To do the bridge exercise, lay on your back and position your arms at your side with your knees bent. Your feet should be flat on the floor as you lift your hips to the ceiling until your knees and thighs are parallel. Keep your shoulders on the floor and hold the pose for 5 deep breaths, and then lower your hips back to the floor. Do 3 sets of 10 repetitions each, adding more repetitions or performing them faster for a more strenuous exercise. If you want to learn how to do a bridge in yoga, keep reading the article!
